1. Introduction
This manual provides detailed instructions for the safe and proper installation, operation, and maintenance of your Link2Home Premium Full Motion TV Wall Mount, Model MB-19053. Please read all instructions carefully before beginning installation.
This wall mount is designed for flat and curved TVs ranging from 23 to 55 inches and supporting a maximum weight of 50 lbs. It features full motion capabilities including extension, swivel, and tilt for optimal viewing angles.
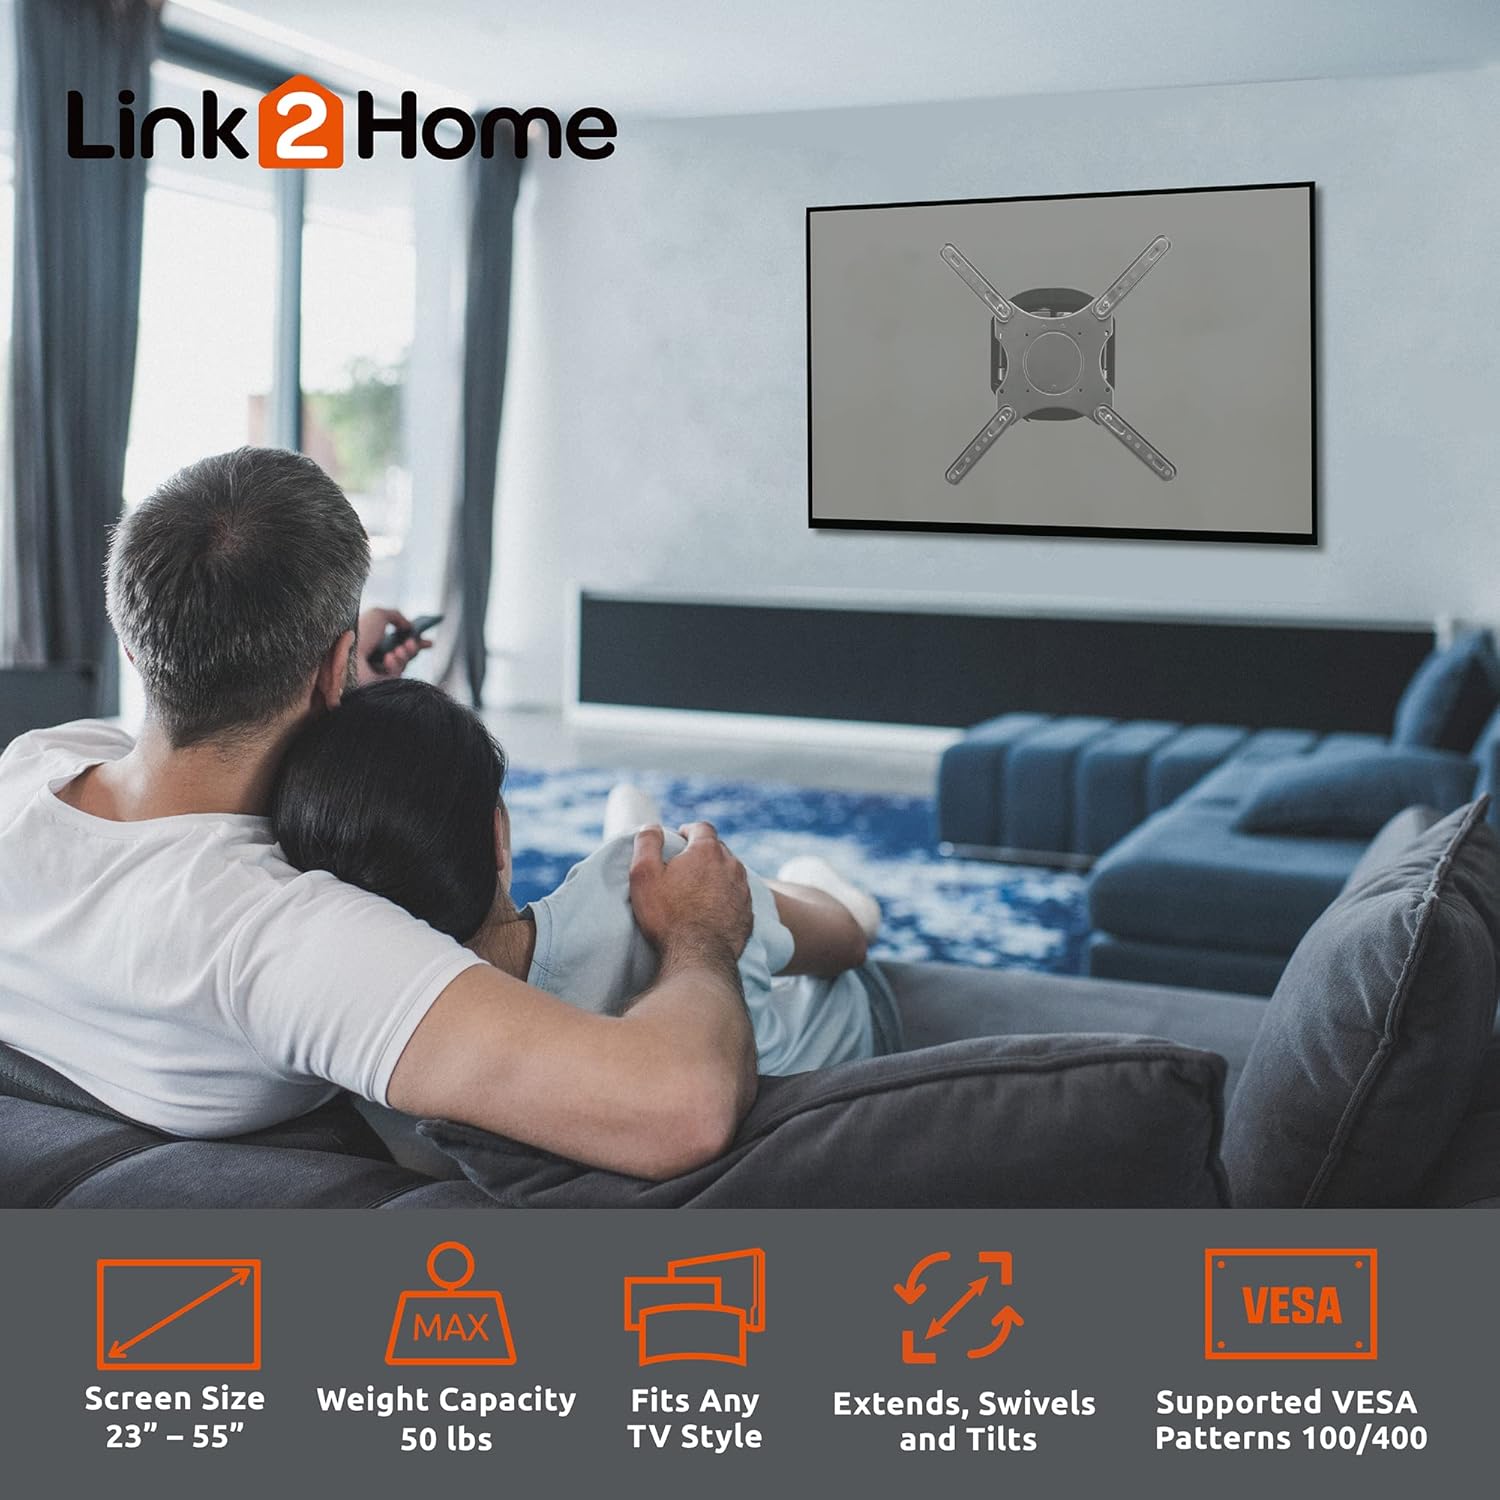
Image 1: Link2Home Full Motion TV Wall Mount highlighting its features.
2. Package Contents
Verify that all components are present and undamaged before proceeding with installation. If any parts are missing or damaged, do not attempt to install the mount and contact customer support.

Image 2: Contents of the Link2Home TV Wall Mount package.
Included Hardware:
- Wall Plate Assembly
- VESA Plate
- Extension Adapter Arms (if applicable for larger VESA patterns)
- Various TV mounting screws (M4, M6, M8)
- Washers and Spacers
- Concrete/Brick Wall Anchors
- Lag Bolts for Wood Studs
- Wrench
- Small Bubble Level
- Cable Clips
3. Installation Preparation
Before installation, ensure you have the necessary tools and understand the wall type you will be mounting to. Safety is paramount; consider wearing safety glasses.
Required Tools:
- Power Drill
- Drill Bits (3/16" (4.5mm) for wood, 1/4" (6mm) for masonry, 3/8" (10mm) for masonry)
- Phillips Screwdriver
- Level (a larger one than the included small level is recommended)
- Stud Finder (for wood stud installation)
- Tape Measure
- Pencil
- Safety Glasses
Important: Ensure the mounting surface can safely support the combined weight of the mount and your TV. For concrete or brick walls, use the appropriate masonry drill bits and anchors. For wood studs, ensure the lag bolts are securely fastened into the center of the stud.
4. Installation Instructions
Follow these steps carefully for a secure installation. It is recommended to have a second person assist during certain stages, especially when mounting the TV.
4.1. Prepare the Wall Mount
- Remove the VESA plate from the main arm assembly. This is typically secured with screws that will need to be loosened or removed.
- Remove the decorative cover from the wall plate to expose the mounting holes.
- If your TV's VESA pattern requires it, attach the VESA extension adapter arms to the VESA plate using the provided screws. Refer to the VESA pattern compatibility in the specifications section.
Video 1: Installation guide for Link2Home Full Motion Wall Mount. This video demonstrates the steps for mounting the TV bracket to the wall and attaching the TV.
4.2. Mount the Wall Plate to the Wall
For Concrete or Brick Walls:
- Position the wall plate assembly on the desired location on the wall. Use a level to ensure it is perfectly horizontal.
- Mark the drill holes through the wall plate onto the wall using a pencil.
- Drill pilot holes using a 1/4" (6mm) masonry drill bit. For larger anchors, enlarge pilot holes using a 3/8" (10mm) masonry drill bit.
- Insert the nylon anchors into the drilled holes until flush with the wall surface.
- Align the wall plate with the anchors and secure it using the provided lag bolts and washers. Tighten firmly but do not overtighten.
- Install the decorative cover over the wall plate.
For Indoor Framed Walls with Wood Studs:
- Use a stud finder to locate the center of a wood stud. Mark the center line.
- Position the wall plate assembly on the desired location, ensuring the mounting holes align with the center of the stud. Use a level to ensure it is horizontal.
- Mark the drill holes through the wall plate onto the stud using a pencil.
- Drill pilot holes using a 3/16" (4.5mm) wood drill bit.
- Align the wall plate with the pilot holes and secure it using the provided lag bolts and washers. Tighten firmly but do not overtighten.
- Install the decorative cover over the wall plate.
4.3. Attach Mounting Brackets to the TV
For Flat TVs:
- Manually identify the proper bracket screws for your TV by testing different sizes (M4, M6, M8) with the TV's mounting holes. Do not force screws.
- Attach the VESA plate (with extension arms if used) to the back of your flat TV using the identified screws and appropriate washers/spacers. Ensure it is securely fastened.
For Curved TVs:
- Manually identify the proper bracket screws for your TV.
- Attach the VESA plate (with extension arms if used) to the back of your curved TV using the identified screws and appropriate washers/spacers. Ensure the spacers are used to create a flat mounting surface and prevent damage to the TV.
For Recessed TVs:
- Manually identify the proper bracket screws for your TV.
- Attach the VESA plate (with extension arms if used) to the back of your recessed TV using the identified screws and appropriate washers/spacers. Ensure the spacers are used to bridge any recessed areas and create a flat mounting surface.
4.4. Mount the TV to the Wall Plate
- With assistance, carefully lift the TV and align the VESA plate on the back of the TV with the main arm assembly on the wall.
- Hook the VESA plate onto the main arm assembly. Ensure it is securely seated.
- Tighten any locking screws or mechanisms on the VESA plate to secure the TV to the mount. Use the included small level to make final adjustments to ensure the TV is level.
5. Operating Instructions
Your full motion TV wall mount allows for flexible viewing adjustments.
- Extension: Gently pull the TV away from the wall to extend the arm. The mount extends up to 16.85 inches.
- Retraction: Push the TV gently towards the wall to retract the arm. The mount retracts to 3.27 inches from the wall.
- Swivel: The TV can swivel 90 to 180 degrees from left to right, depending on TV size and wall clearance. Gently push the TV to the desired angle.
- Tilt: The TV can be tilted +3° to -15° to reduce glare or achieve a better viewing angle. Loosen the tilt adjustment screws, adjust the angle, and then re-tighten the screws to secure the position.
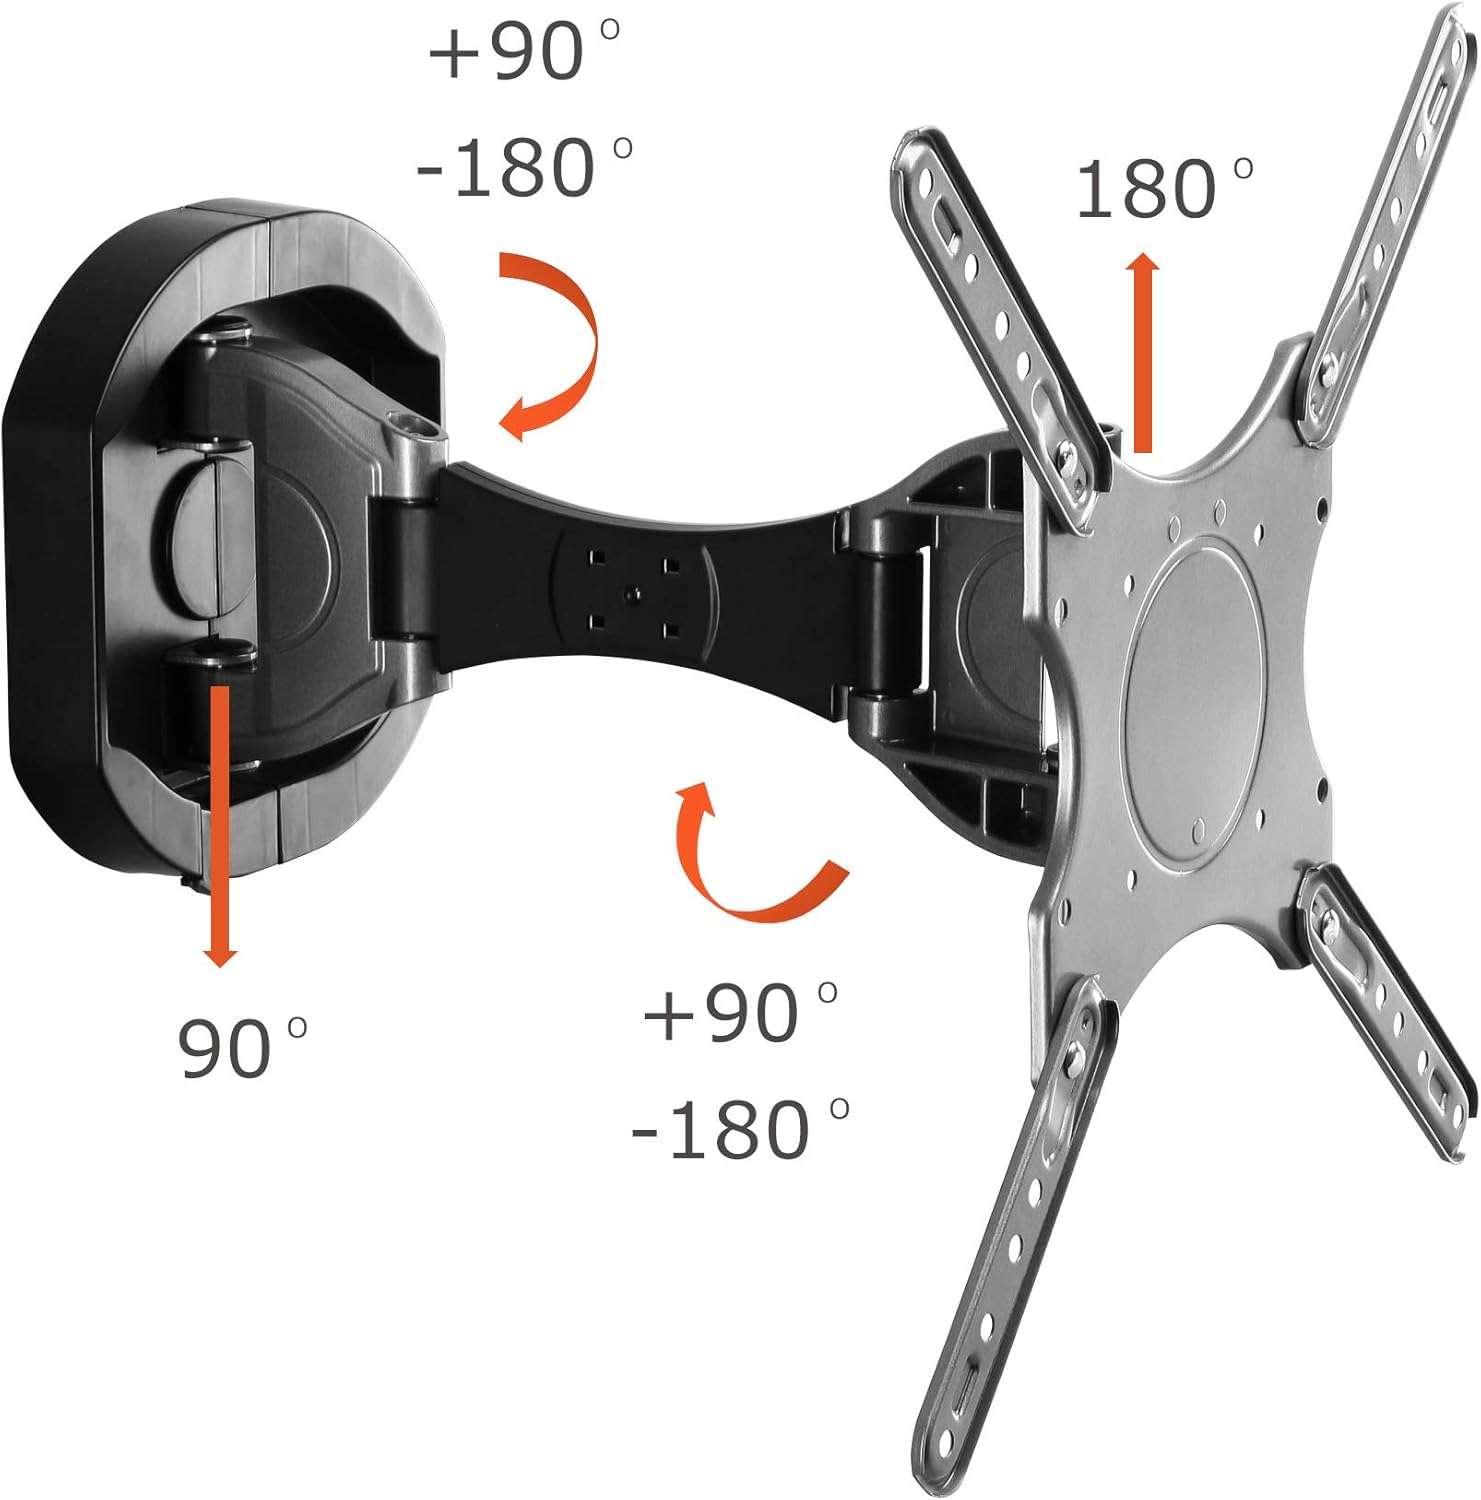
Image 3: Swivel and tilt range of the wall mount.
6. Cable Management
To maintain a clean and organized appearance, utilize the integrated cable management system.
- Route your TV cables (HDMI, power, etc.) along the arm of the mount.
- Use the provided cable clips to secure the cables to the mount arm, keeping them tidy and preventing tangles.

Image 4: Cable management on the wall mount.
7. Maintenance
Regular maintenance ensures the longevity and safe operation of your TV wall mount.
- Cleaning: Wipe the mount with a soft, dry cloth to remove dust. Avoid abrasive cleaners or solvents.
- Periodic Checks: Periodically check all screws and bolts to ensure they remain tight. Re-tighten if necessary.
- Lubrication: The moving parts are designed for smooth operation and generally do not require lubrication. If movement becomes stiff, consult customer support.
8. Troubleshooting
If you encounter issues, refer to the following common troubleshooting tips:
- TV is not level: Ensure the wall plate is level during installation. For minor adjustments, use the leveling screws on the VESA plate if available, or re-adjust the wall plate.
- Mount feels loose: Re-check all wall mounting bolts and TV attachment screws. Ensure they are tightened securely. Do not exceed the maximum weight capacity of 50 lbs.
- Difficulty adjusting movement: Check for any obstructions. Ensure all adjustment screws (e.g., for tilt) are loosened before attempting to move, and re-tightened afterward.
- Missing parts: Do not proceed with installation. Contact Link2Home customer support for replacement parts.
9. Specifications
| Brand: | Link2Home |
| Model Number: | MB-19053 |
| Screen Size Compatibility: | 23" to 55" |
| Maximum Weight Capacity: | 50 lbs |
| VESA Compatibility: | 100x100 mm to 400x400 mm |
| Movement Type: | Articulating, Swivel, Tilt |
| Extension from Wall: | 3.27 inches (retracted) to 16.85 inches (extended) |
| Swivel Range: | 90-180 degrees (left to right) |
| Tilt Range: | +3° / -15° |
| Material: | Metal |
| Product Dimensions: | 17.13 x 17.13 x 3.27 inches |
| Item Weight: | 9.63 pounds |
10. Warranty and Support
The Link2Home Premium Full Motion TV Wall Mount is backed by a Lifetime Warranty, ensuring quality and durability. For warranty claims, technical assistance, or any questions regarding your product, please contact Link2Home customer support.
Please visit the official Link2Home website or refer to your product packaging for the most current contact information.


