1. Introduction
This manual provides instructions for the BESTEK MRJ6008 Travel Power Strip. This device is designed to expand your power access with multiple AC outlets and USB charging ports, incorporating surge protection for your electronic devices. It is suitable for both home and travel use.
2. Features
- Multiple Outlets: Equipped with 6 standard AC outlets (125V, 15A, 1875W) to power various devices simultaneously.
- USB Charging Ports: Includes 1 Quick Charge 3.0 (QC 3.0) USB port and 3 USB-A ports (Auto 0-2.4A) for efficient charging of smartphones, tablets, and other USB-powered devices.
- Surge Protection: Provides 200 joules of surge protection to safeguard connected electronics from voltage spikes and lightning. A dedicated indicator light confirms active protection.
- Circular Design: The compact, circular layout with 1.5 inches of space between AC outlets accommodates larger power adapters without blocking adjacent ports.
- 6-Foot Extension Cord: A durable 6-foot cord offers flexibility in placement, featuring a flat plug design for use in tight spaces and a Velcro strap for cable management.
- Power Switch: A master ON/OFF switch controls power to all outlets and USB ports, allowing for energy saving and easy power cycling.
- Wall Mountable: Two keyhole slots on the back allow for convenient wall mounting.

Image: The BESTEK Travel Power Strip showing its 6 AC outlets, 4 USB ports, and power switch.

Image: Diagram highlighting the 1.5-inch wide spacing between AC outlets for accommodating bulky plugs.
3. Safety Instructions
WARNING: To reduce the risk of electric shock, fire, or injury, always follow these safety precautions.
- Use this device only indoors and in dry locations. Do not expose to moisture or liquids.
- Do not plug this power strip into another relocatable power tap or extension cord. Plug directly into a wall outlet.
- Do not exceed the maximum load of 1875W (15A at 125V).
- The power strip features a UL94 V-0 PC+ABS flame-retardant housing (rated up to 1382°F) and provides overload, short circuit, overcurrent, overvoltage, and overheating protection.
- Outlets are equipped with safety shutters to prevent accidental contact.
- The integrated phosphor bronze and UL Certified Strong Copper Wire (SJT 3x14AWG) ensure low-loss, low-heat, and enhanced safety.
- If the surge protection indicator light is off, the surge protection feature may no longer be active.
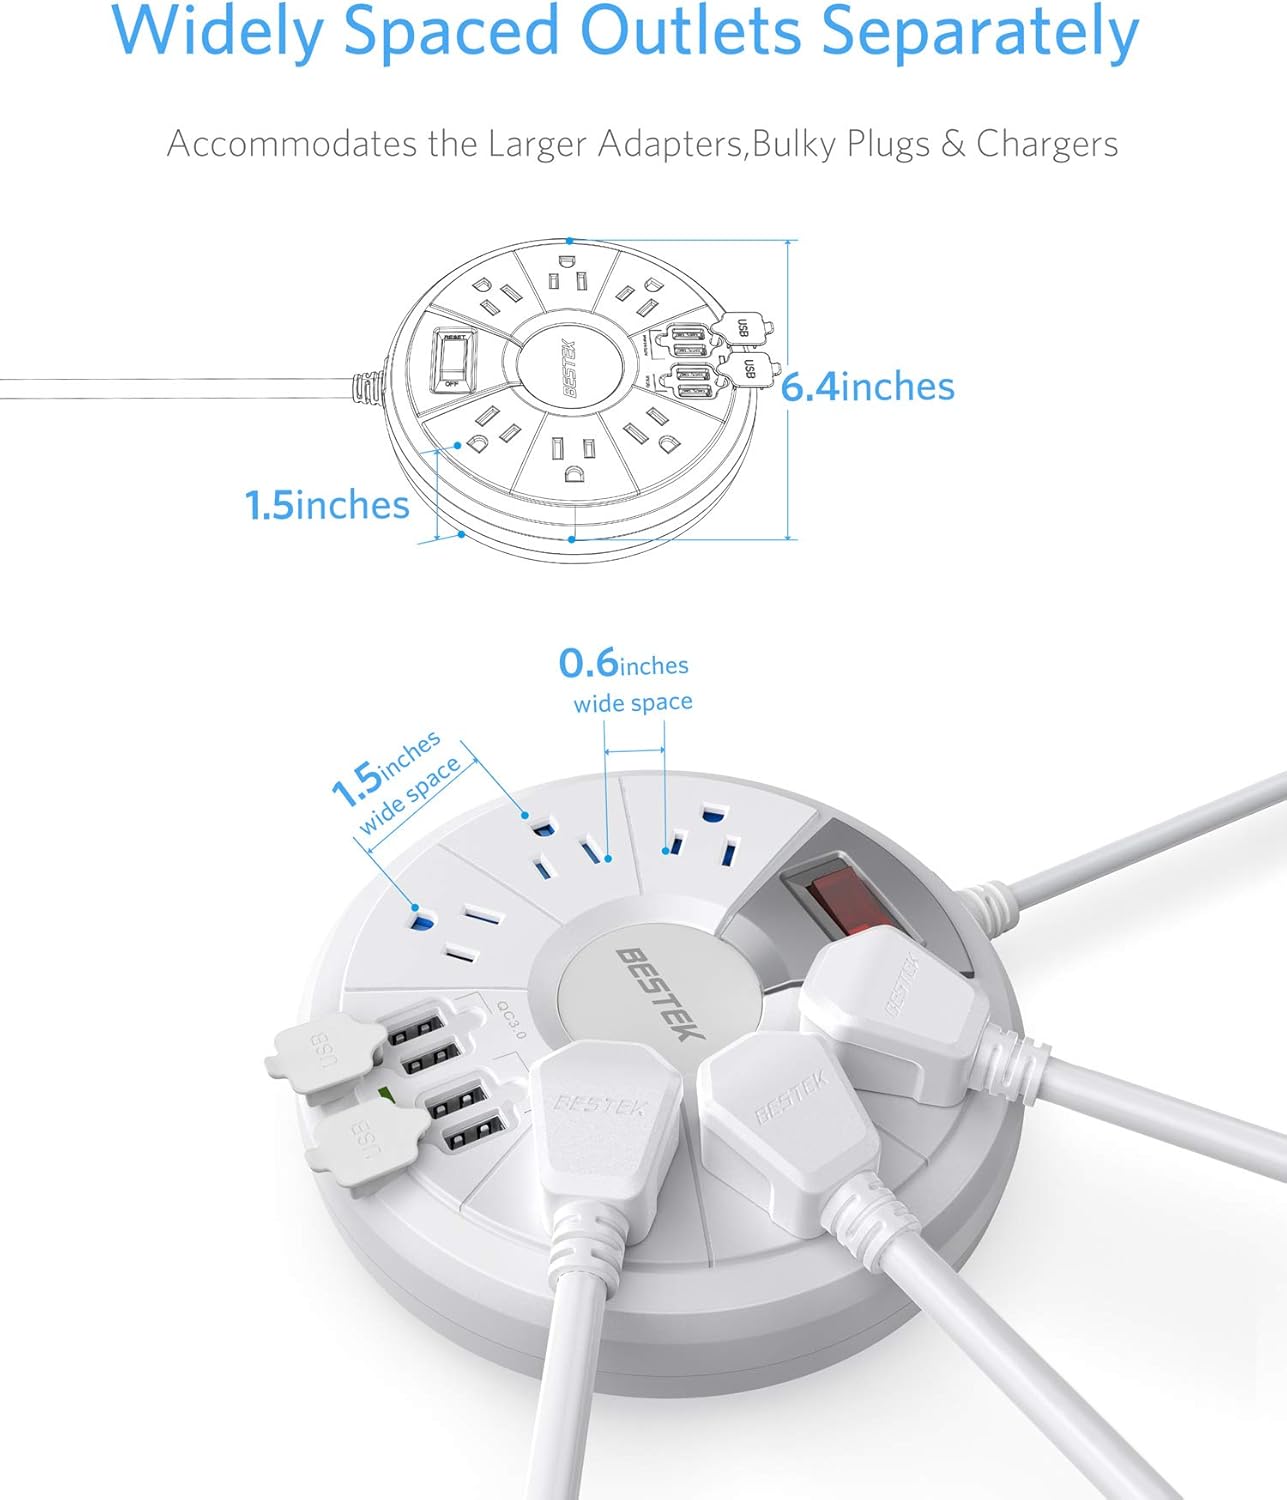
Image: Illustration of the power strip's internal safety features, including flame-retardant material, safety shutters, and power surge protection.
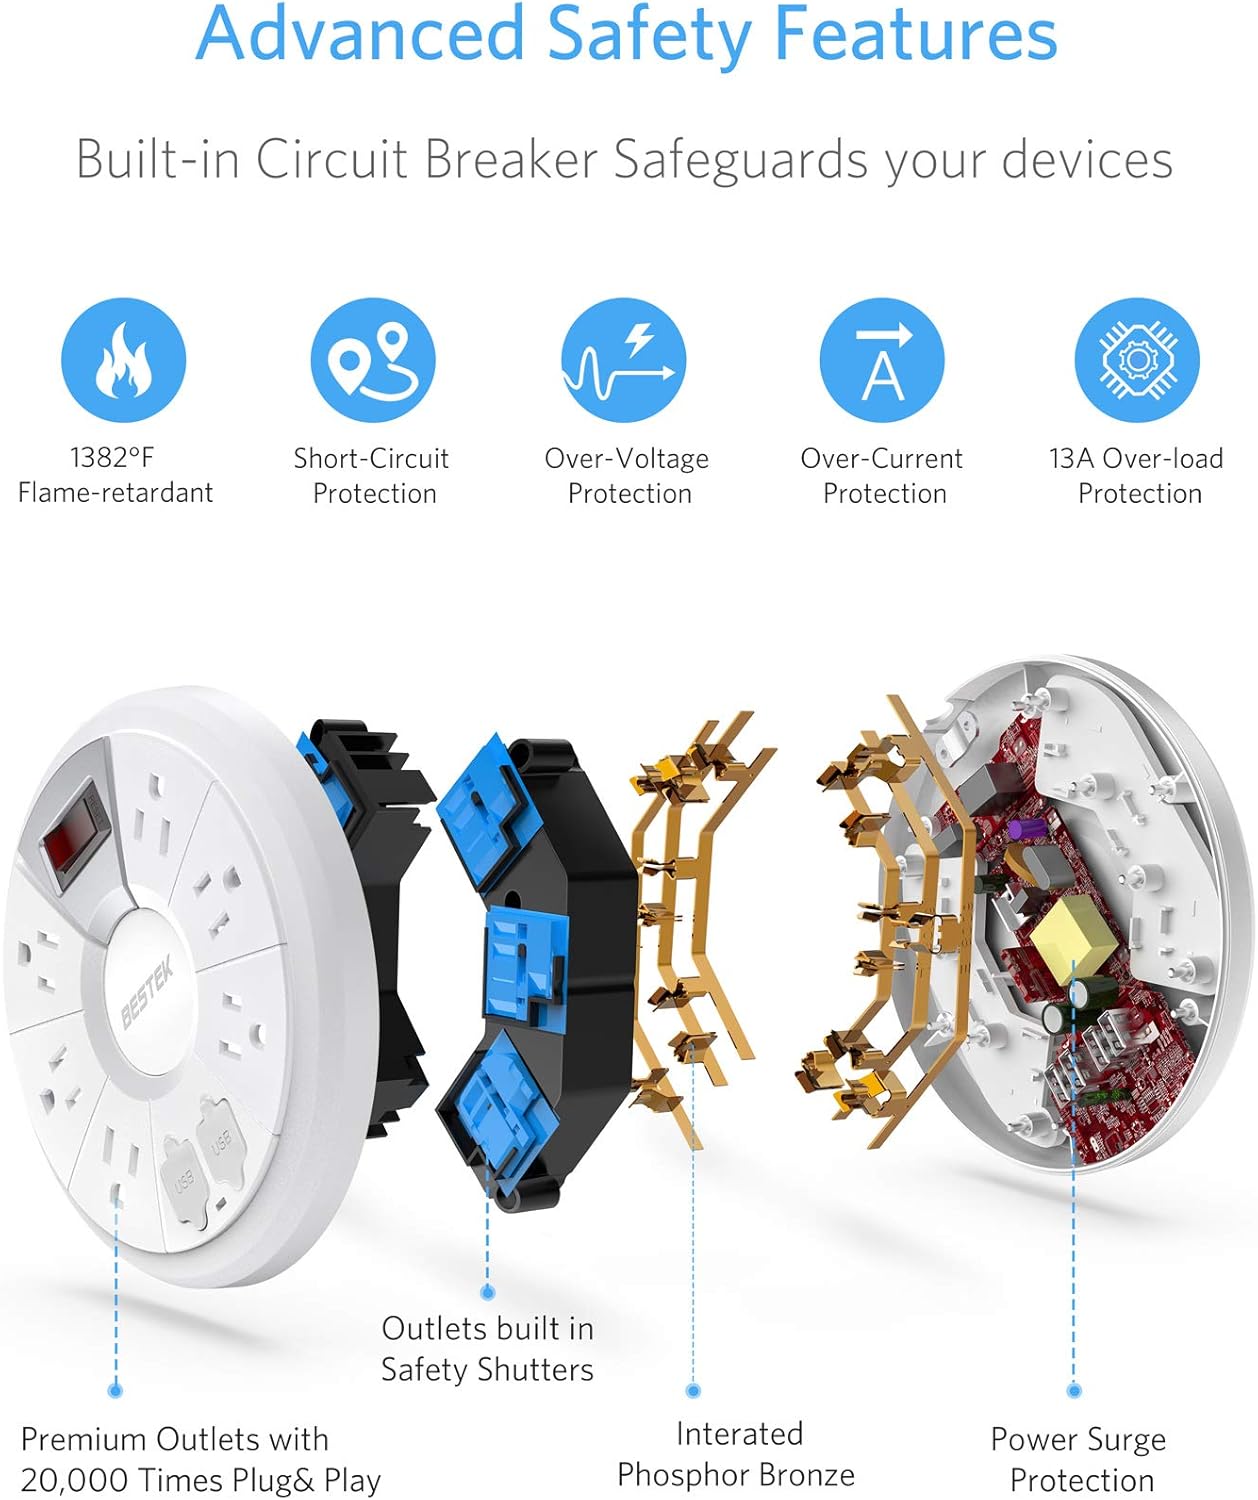
Image: Diagram detailing the UL Certified Strong Copper Wire, emphasizing its thickness and safety benefits.
4. Setup
- Unpack: Carefully remove the power strip from its packaging.
- Placement: Place the power strip on a stable, dry surface, or mount it to a wall using the integrated keyhole slots.
- Plug In: Insert the power strip's flat plug directly into a grounded 3-prong wall outlet.
- Cable Management: Use the attached Velcro strap to manage any excess cord length, keeping your area tidy.
- Power On: Press the master ON/OFF switch. The switch will illuminate red, and a green indicator light for the USB ports will turn on, indicating the unit is powered and ready for use.

Image: The power strip shown mounted on a wall, demonstrating its space-saving capability.
5. Operating Instructions
- Connect AC Devices: Plug your electronic devices into any of the 6 AC outlets. The wide spacing allows for larger adapters.
- Connect USB Devices: Open the protective covers for the USB ports. Plug your USB-powered devices into the available USB-A ports or the QC 3.0 port for faster charging of compatible devices.
- Power Control: Use the master ON/OFF switch to turn power to all connected devices on or off. This helps conserve energy when devices are not in use.
- Surge Protection Indicator: The red light on the power switch indicates that the power strip is receiving power and the surge protection is active.

Image: The power strip in use, demonstrating multiple devices connected to both AC outlets and USB ports.

Image: Close-up details of the power strip, including the power switch, flat plug, and USB ports with protective covers.
6. Maintenance
- Cleaning: Disconnect the power strip from the wall outlet before cleaning. Wipe the exterior with a dry, soft cloth. Do not use liquid cleaners or abrasive materials.
- Storage: When not in use, store the power strip in a cool, dry place. Use the Velcro strap to keep the cord neatly coiled.
- USB Port Protection: Keep the protective covers over the USB ports when not in use to prevent dust and debris accumulation.
7. Troubleshooting
- No Power to Devices:
- Ensure the power strip's master ON/OFF switch is in the 'ON' position (red light illuminated).
- Verify that the power strip is securely plugged into a functioning wall outlet.
- Check if the wall outlet itself is working by plugging in another device.
- If the surge protection light is off, the surge protection may have been compromised. Discontinue use and replace the unit.
- USB Ports Not Charging:
- Ensure the power strip is powered on.
- Confirm that your USB cable is not damaged and is properly connected to both the power strip and your device.
- Some devices may require specific charging protocols; ensure compatibility with the QC 3.0 or standard USB-A ports.
- Overload Protection: If the power strip automatically shuts off, it may be due to an overload. Disconnect some devices, then press the reset button (if available, typically integrated with the power switch) or cycle the power switch to restore functionality.
8. Specifications
| Model Number | MRJ6008 |
| Brand | BESTEK |
| AC Outlets | 6 |
| USB Ports | 4 (1 x QC 3.0, 3 x Auto 0-2.4A) |
| Input Voltage | 125 Volts |
| Max Current | 15 Amps |
| Max Power | 1875 Watts |
| Surge Protection | 200 Joules |
| Cord Length | 6 Feet |
| Product Dimensions | 6 x 6 x 0.1 inches |
| Item Weight | 1.68 pounds |
| Housing Material | UL94 V-0 PC+ABS Flame-Retardant |
9. Warranty and Support
Specific warranty information for the BESTEK MRJ6008 Travel Power Strip is not provided in this document. Please refer to the product packaging or the official BESTEK website for detailed warranty terms and conditions.
For technical support or customer service inquiries, please visit the official BESTEK website or contact their customer support channels.


