1. Introduction
Thank you for choosing the Grundig GKR1020 DKR 2000 BT DAB CD Kitchen Radio. This manual provides essential information for the safe and efficient operation of your new device. Please read these instructions carefully before use and retain them for future reference.
2. Safety Information
- Power Supply: Only use the provided power adapter. Ensure the voltage matches your local power supply.
- Water and Moisture: Do not expose the device to rain, moisture, or dripping water. Do not place objects filled with liquids, such as vases, on the device.
- Ventilation: Ensure adequate ventilation. Do not block ventilation openings.
- Heat Sources: Keep the device away from heat sources such as radiators, heat registers, stoves, or other apparatus (including amplifiers) that produce heat.
- Cleaning: Unplug the device before cleaning. Use a soft, dry cloth. Do not use liquid cleaners or aerosol cleaners.
- Service: Do not attempt to service this product yourself. Refer all servicing to qualified service personnel.
3. Package Contents
Please check that all items are present in the packaging:
- Grundig GKR1020 DKR 2000 BT DAB CD Kitchen Radio
- Remote Control
- Power Adapter
- Mounting Bracket and Screws
- Cable Clips
- Batteries (for remote control)
- User Manual (this document)
- Warranty Card

The image above shows the main radio unit, the remote control, and the power adapter. These are essential components for operating your device.

This image displays the additional accessories provided for installation and remote control functionality, including mounting screws, cable clips for tidy cable management, and batteries for the remote.
4. Product Overview
4.1 Front Panel Controls and Display
The front panel features a high-resolution 2.4-inch TFT color display and large buttons for intuitive operation. Key controls include power, source selection, volume, and playback controls for CD and radio functions.
This image highlights the front of the radio, showcasing its clear TFT color display and the arrangement of its user-friendly control buttons, including the large rotary knob for volume and navigation.
4.2 Rear Panel Connections
The rear panel includes the DC IN port for power and the service port. An integrated antenna cable is also visible.
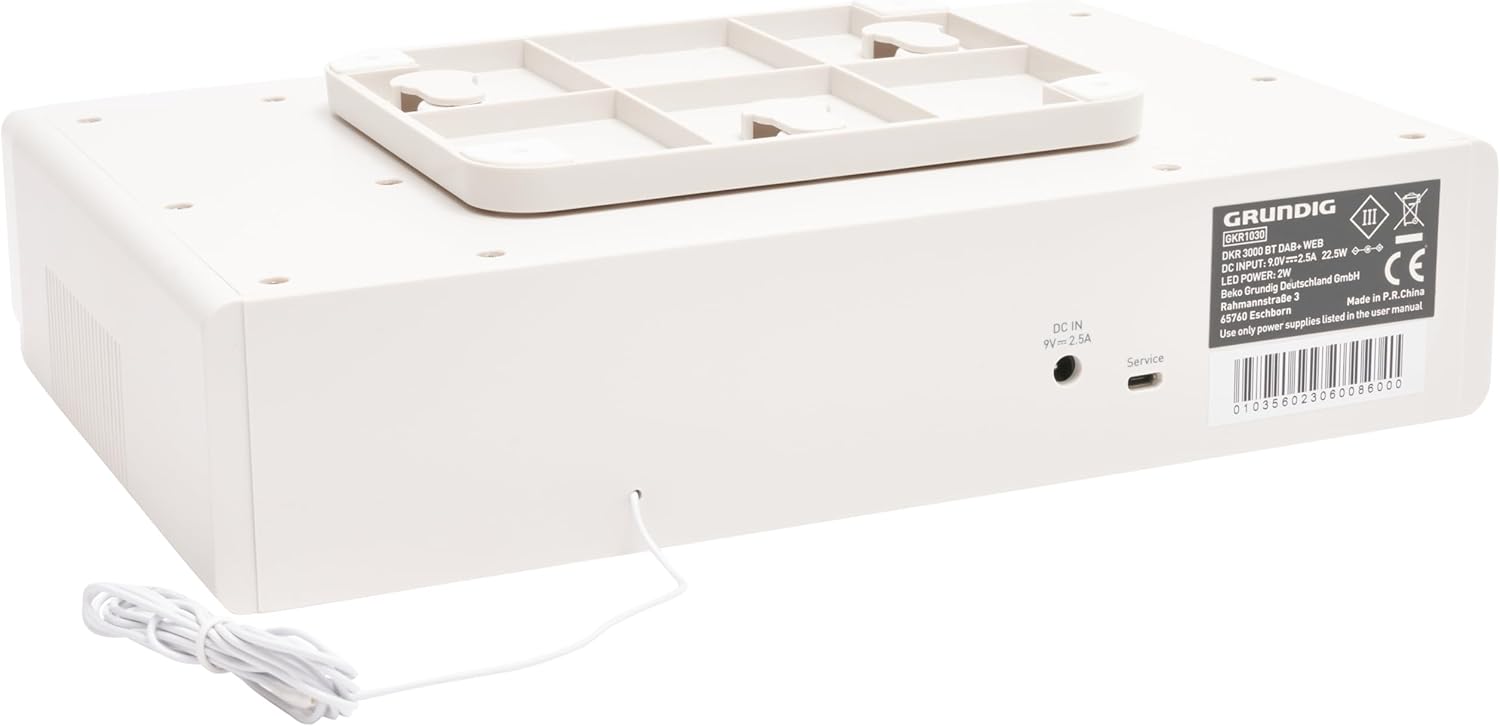
The rear view of the radio shows the DC power input (9V=2.5A) and a service port. The integrated antenna wire is also visible, extending from the unit.
4.3 Bottom Panel and Mounting
The bottom of the unit features the mounting bracket attachment points, allowing for under-cabinet installation.

This image displays the underside of the radio, clearly showing the pre-installed mounting bracket designed for secure under-cabinet installation.
5. Setup
5.1 Power Connection
- Connect the power adapter to the DC IN port on the rear of the radio.
- Plug the power adapter into a suitable wall outlet.
5.2 Antenna Placement
For optimal FM and DAB+ reception, fully extend the integrated antenna wire and position it for the best signal. Avoid placing it near metal objects or other electronic devices that may cause interference.
5.3 Mounting (Optional Under-Cabinet Installation)
The radio can be mounted under a cabinet using the included mounting bracket and screws.
- Choose a suitable location under a cabinet, ensuring enough space for operation and ventilation.
- Detach the mounting bracket from the radio if it's pre-attached.
- Hold the mounting bracket against the desired surface and mark the screw positions.
- Drill pilot holes if necessary.
- Secure the mounting bracket to the cabinet using the provided screws.
- Slide the radio onto the mounted bracket until it clicks securely into place.
- Use the included cable clips to manage the power cord neatly.
5.4 Remote Control Batteries
Insert the included batteries into the remote control, observing the correct polarity (+/-).
6. Operating Instructions
6.1 Power On/Off
Press the Power button on the unit or remote control to turn the radio on or off.
6.2 Volume Control
Rotate the large knob on the front panel clockwise to increase volume and counter-clockwise to decrease. Alternatively, use the VOL+ and VOL- buttons on the remote.
6.3 Source Selection
Press the Source button on the unit or remote to cycle through available modes: DAB+, FM, CD, Bluetooth.
6.4 DAB+ Radio Operation
- Select DAB+ mode. The radio will automatically scan for available stations on first use.
- Use the Tune/Select knob or Up/Down buttons on the remote to browse stations.
- Press the Select button to confirm a station.
- Preset Stations: To save a station, press and hold the Preset button, then use the knob/buttons to select a preset number (1-30) and press Select to save. To recall, briefly press Preset and select the desired number.
6.5 FM Radio Operation
- Select FM mode.
- Use the Tune/Select knob or Up/Down buttons to manually tune. Press and hold to auto-scan for the next available station.
- Preset Stations: Saving and recalling FM stations works similarly to DAB+ (30 presets available).
6.6 CD Player Operation
- Select CD mode.
- Gently insert a CD into the CD slot until it is pulled in automatically. The display will show "Reading Disc" and then begin playback.
- Use the Play/Pause, Stop, Skip Forward, and Skip Backward buttons on the unit or remote for playback control.
6.7 Bluetooth Streaming
- Select Bluetooth mode. The radio will enter pairing mode, indicated on the display.
- On your Bluetooth-enabled device (e.g., smartphone), search for available devices and select "Grundig GKR1020" (or similar).
- Once paired, you can stream audio from your device to the radio.
- Use your connected device or the radio's controls for playback (play/pause, skip).
7. Maintenance
7.1 Cleaning
To clean the unit, first unplug it from the power outlet. Use a soft, dry, lint-free cloth to wipe the surfaces. Do not use abrasive cleaners, waxes, or solvents as they may damage the finish.
7.2 CD Player Care
Handle CDs by their edges to avoid fingerprints. If a CD is dirty, wipe it gently with a soft, dry cloth from the center outwards. Do not use abrasive materials or solvents.
8. Troubleshooting
| Problem | Possible Cause | Solution |
|---|---|---|
| No power | Power adapter not connected or faulty outlet. | Ensure power adapter is securely plugged into the radio and a working wall outlet. |
| Poor radio reception | Antenna not properly positioned; interference. | Adjust the antenna position. Move the radio away from other electronic devices. |
| CD not playing | CD is dirty, scratched, or inserted incorrectly. | Clean the CD. Ensure it is inserted correctly with the label side up. Try another CD. |
| Bluetooth not connecting | Device not in pairing mode; radio not discoverable; distance too far. | Ensure the radio is in Bluetooth pairing mode. Make sure Bluetooth is enabled on your device and it's within range (approx. 10 meters). |
| Remote control not working | Batteries are dead or inserted incorrectly; obstruction. | Replace batteries, ensuring correct polarity. Remove any obstructions between the remote and the radio. |
9. Specifications
- Model: GKR1020 DKR 2000 BT
- Brand: Grundig
- Connectivity: Bluetooth V5.0
- Tuner Technology: Digital (DAB+, FM)
- Supported Radio Bands: AM/FM
- Display: 2.4-inch TFT Color Display
- Audio Output Mode: Stereo
- Speaker Max Output Power: 6 Watts
- Power Source: Corded Electric Component
- Voltage: 220V
- Frequency: 60 Hz
- Material Type: Plastic
- Product Dimensions (L x W x H): 29.6 cm x 19 cm x 7.9 cm
- Item Weight: 1.12 kg
- Included Components: Radio, Remote Control, User Manual, Warranty Card, Mounting Bracket, Screws, Batteries
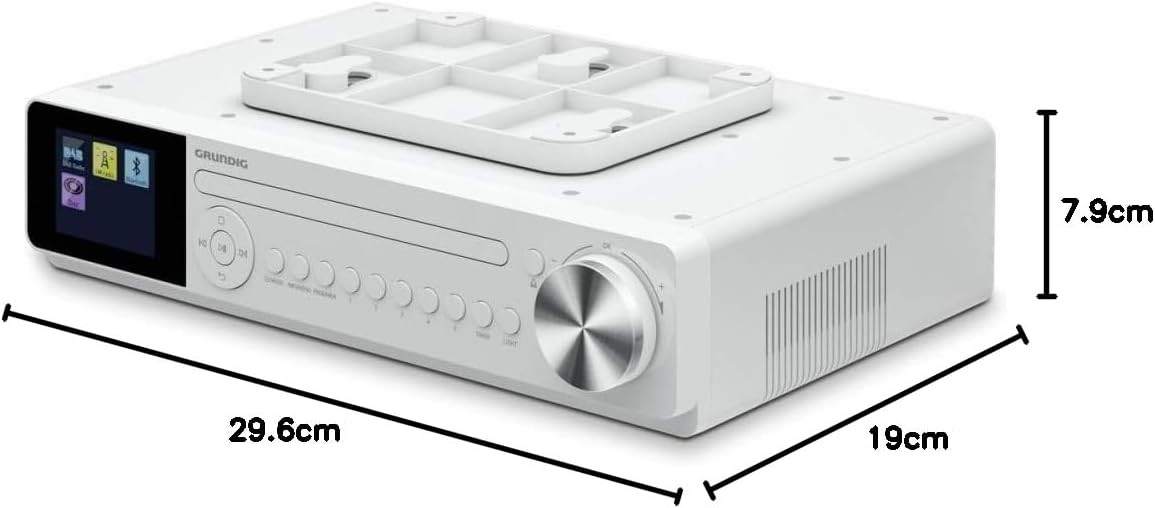
This image provides a visual representation of the radio's dimensions, indicating a length of 29.6 cm, a width of 19 cm, and a height of 7.9 cm, which is useful for planning installation space.
10. Warranty and Support
This product comes with a warranty. Please refer to the included warranty card for detailed terms and conditions. For technical support, service, or further inquiries, please contact your local Grundig service center or authorized dealer. Keep your purchase receipt as proof of purchase for warranty claims.


