1. Introduction
The OOYCYOO 100 Amp MPPT Solar Charge Controller is designed to efficiently manage power flow from your solar panels to your battery bank. This manual provides essential information for safe installation, operation, and maintenance of your solar charge controller. Please read this manual thoroughly before installation and use.
2. Product Overview
2.1 Key Features
- 100 Amp MPPT Solar Charge Controller with 12V/24V/36V/48V automatic system voltage identification.
- Equipped with a blacklight LCD display for clear visibility of operational data.
- Directly displays accumulated charge in KWH, eliminating the need for external measuring instruments.
- Features two newly designed vents for enhanced convection cooling.
- Incorporates multiple safety protection functions.
- Achieves a maximum DC/DC transfer efficiency of up to 98.7%.
- Compatible with various battery types: USER (programmable for Lithium, LiFePO4, Li(NiCoMn)O2), Flooded, Sealed, and Gel batteries.
- User-programmable settings for absorption voltage, floating voltage, low voltage disconnect, and load timer.
- Built-in cooling fan activates when temperature exceeds 45℃ and deactivates below 40℃, designed for extended life.
- Maximum Power Point Tracking (MPPT) rate ≥99% and conversion rate >98%.
2.2 Product Components
The following image illustrates the main components and connection points of the OOYCYOO 100 Amp MPPT Solar Charge Controller.

Figure 1: Front and bottom view of the OOYCYOO MPPT Solar Charge Controller with labeled ports. Key components include the LCD display, 5S Reset button, Solar Panel terminals, Battery terminals, Load terminals, USB 5V 2A ports, Remote Temp Sensor port, RS485 Communication port, and mounting holes.
- LCD Display: Shows real-time system status and parameters.
- 5S Reset Button: Used for system reset or accessing certain settings.
- Solar Panel Terminals: Connect to your solar panel array.
- Battery Terminals: Connect to your battery bank.
- Load Terminals: Connect to your DC loads.
- USB 5V 2A Ports: For charging compatible USB devices.
- Remote Temp Sensor Port: Connects to the included temperature sensor for accurate battery temperature compensation.
- RS485 Communication Port: For external communication and monitoring.
- Mounting Holes: For secure installation of the controller.
3. Setup and Installation
3.1 Safety Precautions
- Ensure all connections are tight and secure to prevent loose connections that can cause excessive heat.
- Install the controller in a well-ventilated area, away from flammable materials and direct sunlight.
- Always wear appropriate personal protective equipment (PPE) during installation.
- Disconnect all power sources (solar panels and battery) before performing any wiring or maintenance.
3.2 Mounting
Mount the controller vertically on a solid surface to allow for proper heat dissipation. Ensure there is adequate clearance around the unit for airflow. The controller dimensions are approximately 12 inches (L) x 7.8 inches (W) x 3.2 inches (H).

Figure 2: Illustration of the OOYCYOO MPPT Solar Charge Controller's dimensions (12.60 inches / 32 cm height, 7.87 inches / 20 cm width, 3.15 inches / 8 cm depth) and its compatibility with AGM, Gel, Flooded, and Lithium battery types.
3.3 Wiring Instructions
Follow the connection order carefully to avoid damage to the controller or other components.
- Connect the Battery: First, connect the battery to the controller's battery terminals. Ensure correct polarity (positive to positive, negative to negative). The controller will automatically detect the battery voltage (12V/24V/36V/48V).
- Connect the Solar Panels: Next, connect the solar panel array to the controller's solar panel terminals. Ensure correct polarity.
- Connect the Load: Finally, connect your DC loads to the controller's load terminals.
Disconnection Order: To disconnect the system, reverse the order: first disconnect the load, then the solar panels, and finally the battery.
Wire Gauge: Use 10 AWG wire for power terminals to ensure optimal performance and safety.
3.4 Battery Compatibility
The controller is compatible with a wide range of battery types, including:
- AGM (Absorbent Glass Mat)
- Sealed Lead-Acid
- Gel
- Flooded Lead-Acid
- Lithium (LiFePO4, Li(NiCoMn)O2) - User programmable
4. Operating Instructions
4.1 LCD Display
The integrated blacklight LCD display provides real-time information about your solar system's performance. It shows parameters such as battery voltage, charging current, load current, and accumulated energy (KWH).
4.2 System Settings
The controller allows for user-programmable settings to optimize charging for different battery types and system requirements. These settings typically include:
- Battery Type Selection: Choose the appropriate battery type (AGM, Gel, Flooded, Lithium, or USER-defined).
- Absorption Voltage: Set the voltage at which the battery is held during the absorption charging stage.
- Floating Voltage: Set the voltage at which the battery is maintained after absorption, to keep it fully charged.
- Low Voltage Disconnect (LVD): Configure the voltage threshold at which the load will be disconnected to protect the battery from over-discharge.
- Load Timer: Program the operating hours for the DC load output.
Refer to the detailed instructions within the controller's interface for navigating and adjusting these settings.
5. Maintenance
Regular maintenance ensures the longevity and optimal performance of your solar charge controller.
- Cleaning: Periodically clean the controller's exterior with a dry cloth. Ensure vents are free from dust and debris to maintain proper airflow.
- Connection Checks: Annually inspect all wiring connections for tightness and signs of corrosion. Loose connections can lead to overheating and system inefficiency.
- Fan Operation: The built-in cooling fan will activate automatically when the internal temperature exceeds 45℃ and turn off when it drops below 40℃. Ensure the fan is not obstructed and operates freely.
- Environmental Check: Verify that the installation environment remains dry and free from excessive humidity or extreme temperatures.
6. Troubleshooting
If you encounter issues with your OOYCYOO MPPT Solar Charge Controller, consider the following general troubleshooting steps:
- No Display/Power: Check battery connections and ensure the battery voltage is within the controller's operating range. Verify that the battery is charged.
- No Charging: Confirm solar panel connections and polarity. Check for sufficient sunlight and ensure solar panel voltage is above the battery voltage. Inspect for any blown fuses in the solar array.
- Load Not Working: Check load connections and ensure the load is not exceeding the controller's rated current. Verify that the battery voltage is above the Low Voltage Disconnect (LVD) setting.
- Overheating: Ensure the controller is mounted in a well-ventilated area and that its cooling vents are not obstructed. Reduce the load if consistently overheating.
- Error Codes: If the LCD displays an error code, consult the specific error code section of the full user manual (if available) or contact customer support.
For persistent issues, it is recommended to contact OOYCYOO customer support.
7. Specifications
Technical specifications for the OOYCYOO 100 Amp MPPT Solar Charge Controller (Model KP60 100):
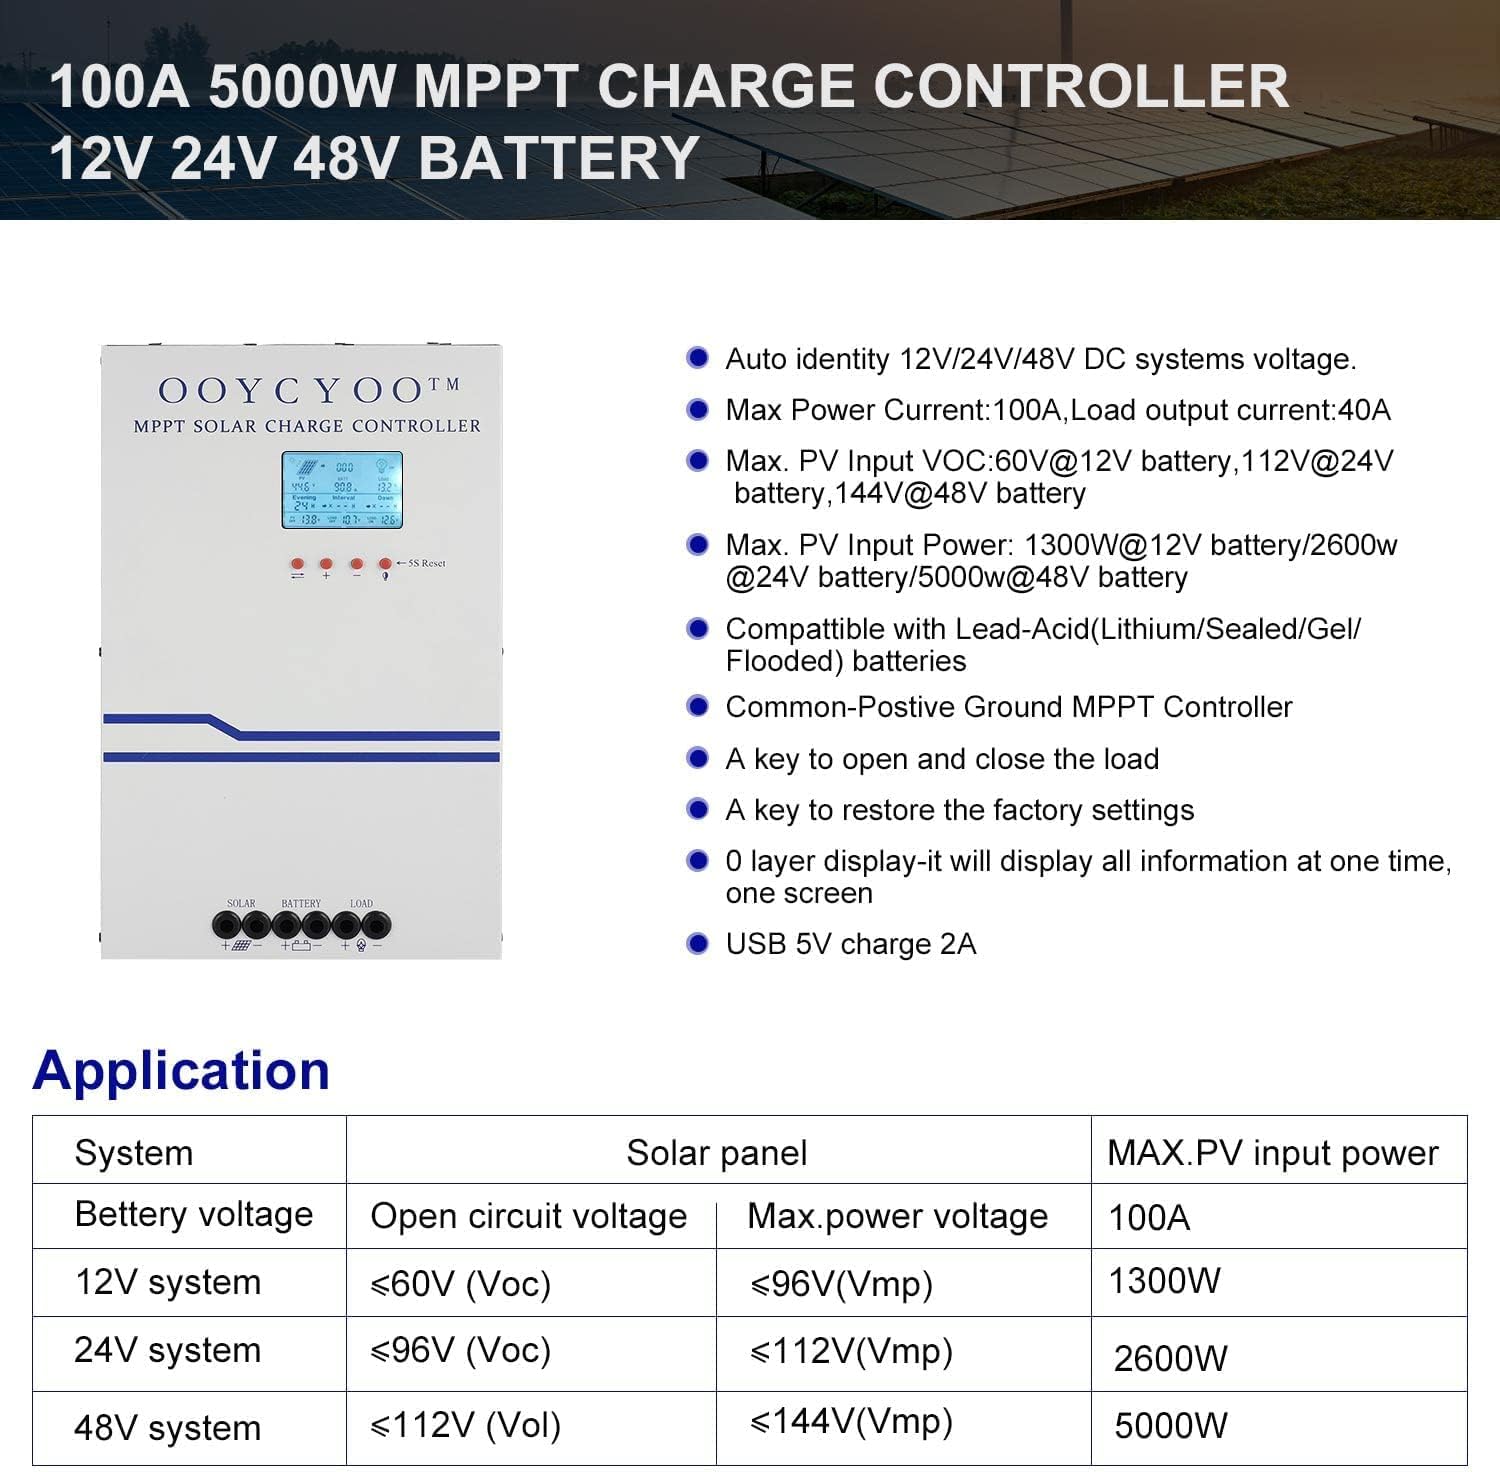
Figure 3: Overview of the OOYCYOO 100A 5000W MPPT Charge Controller, highlighting its auto-identification for 12V/24V/48V DC systems, maximum power current, PV input voltage limits, and maximum PV input power for different battery systems. Also shows compatibility with various battery types and key operational features.
| Parameter | Value |
|---|---|
| Rated Charge Current | 100A |
| System Nominal Voltage | 12V/24V/36V/48V DC Auto Identifying |
| Max. PV Open Circuit Voltage | 150VDC |
| Max. PV Input Power (12V System) | 1300W (Voc ≤96V) |
| Max. PV Input Power (24V System) | 2600W (Voc ≤112V) |
| Max. PV Input Power (48V System) | 5000W (Voc ≤150V) |
| Power Terminal Wire Gauge | 10 AWG |
| Product Dimensions (L x W x H) | 12 x 7.8 x 3.2 inches (30.5 x 19.8 x 8.1 cm) |
| Item Weight | 8.86 pounds (4.02 kg) |
| Operating Temperature | 40℃ (104℉) |
| Display Type | LCD |
8. Safety Information and Protections
The OOYCYOO MPPT Solar Charge Controller is equipped with comprehensive protection features to ensure safe operation of your solar power system:
- PV Over Current/Power Protection
- PV Short Circuit Protection
- PV Reverse Polarity Protection
- Night Reverse Charging Protection
- Battery Reverse Polarity Protection
- Battery Over Voltage Protection
- Battery Over Discharge Protection
- Battery Overheating Protection
- Controller Overheating Protection
- Lithium Battery Low Temperature Protection
- Load Short Circuit Protection
- Load Overload Protection
- TVS High Voltage Transients Protection
9. Warranty and Support
Warranty information for the OOYCYOO 100 Amp MPPT Solar Charge Controller is typically provided with the product packaging or through the point of purchase. Please retain your proof of purchase for warranty claims.
For technical support, troubleshooting assistance, or inquiries regarding your product, please refer to the contact information provided by OOYCYOO or your authorized dealer. This package includes a user manual in English for detailed guidance.


