1. Introduction
The ANENG ST203 is a pocket-sized, 3 3/4-digit automatic digital instrument designed for stable performance, high precision, and reliability. It features clear readings and robust overload protection, making it suitable for various electrical measurements.
This manual provides essential information for the safe and effective use of your ANENG ST203 Digital Clamp Meter. Please read it thoroughly before operation and keep it for future reference.

Figure 1: Front view of the ANENG ST203 Digital Clamp Meter, showcasing its compact design and display.
2. Safety Information
To ensure safe operation and avoid electric shock or damage to the meter, please observe the following safety precautions:
- When measuring voltage, do not input a voltage exceeding the effective value of DC 1000V or AC 750V.
- Voltages below 36V DC and 25V AC are generally considered safe. When measuring voltages higher than these values, always ensure the test leads are in reliable contact, connected correctly, and well insulated to prevent electric shock.
- Before changing functions or measurement ranges, ensure the test leads are disconnected from the test point.
- Do not operate the meter if it appears damaged or if the insulation is compromised.
- Always use the correct terminals, function, and range for your measurements.
3. Product Overview
3.1 Components
The ANENG ST203 Digital Clamp Meter consists of the following main components:
- Clamp Jaw: Used for non-contact AC current measurement.
- LCD Display: Shows measurement readings, units, and various indicators.
- Function Buttons: Including POWER, Hz/NCV, and HOLD.
- Input Terminals: COM (Common) and VΩHz (Voltage, Resistance, Frequency) for test lead connections.
- Flashlight: For illuminating the measurement area.

Figure 2: Angled view of the ANENG ST203, highlighting its ergonomic design.
3.2 LCD Display
The LCD provides a clear digital readout and various indicators:
- Maximum Display: 4000 counts (3 3/4 digits) with automatic polarity display.
- Over Range Display: Indicated by "OL" on the screen.
- Low Voltage Display: A battery symbol will appear when the battery is low.
- Unit Symbols: Displays units such as V, A, Ω, Hz, etc.
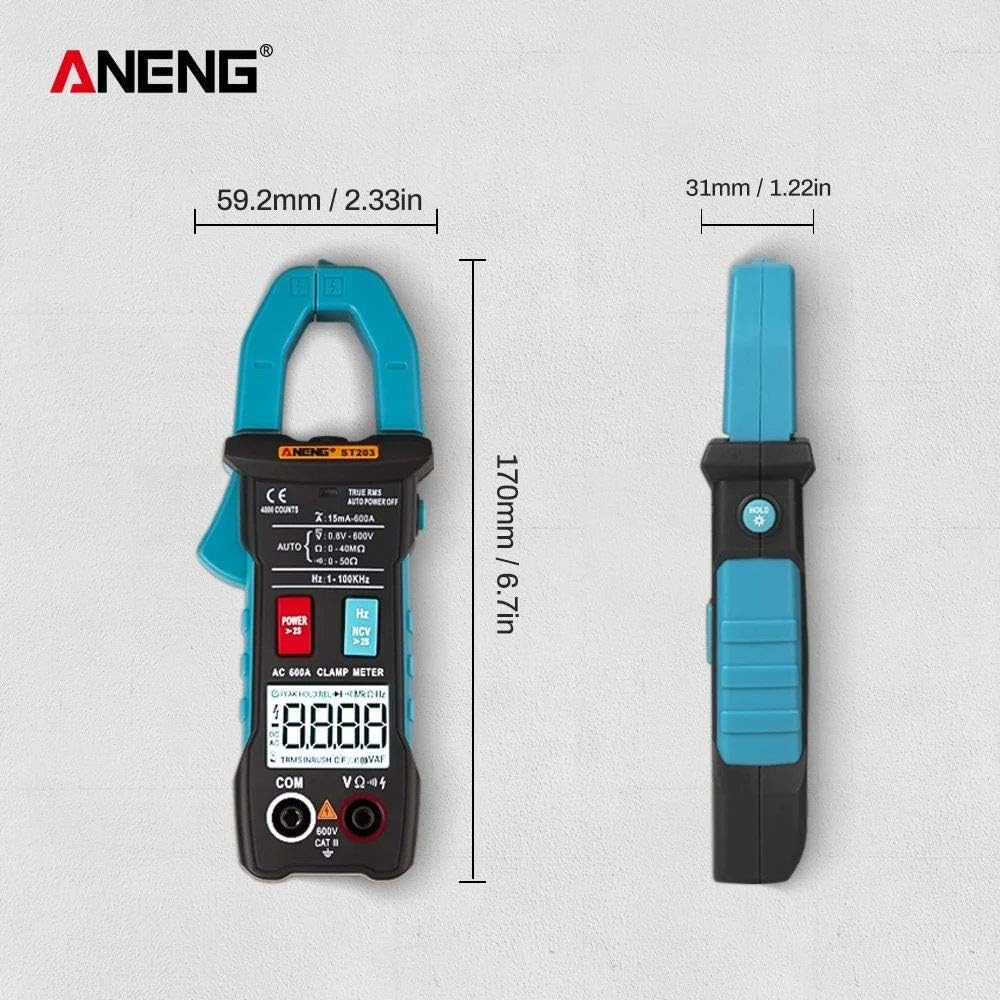
Figure 3: Dimensions of the ANENG ST203, showing its compact size (170mm height, 59.2mm width, 31mm thickness).
4. Specifications
| Parameter | Specification |
|---|---|
| DC Voltage (DCV) | 4V / 40V / 400V / 600V (±0.5%+3) |
| AC Voltage (ACV) | 4V / 40V / 400V / 600V (±1%+3) |
| AC Current (ACA) | 15mA / 4A / 40A / 400A / 600A (±2.5%+8) |
| Resistance | 4kΩ / 40kΩ / 400kΩ / 4MΩ / 40MΩ (±0.5%+3) |
| Frequency Measurement | 4Hz / 40Hz / 400Hz / 4kHz / 40kHz / 400kHz |
| Display | LCD, 4000 Counts (3 3/4 digits) |
| Measurement Method | Double integral A/D conversion |
| Sampling Rate | Approximately 3 times per second |
| Working Environment | 0-40°C, Relative humidity ≤ 80% |
| Power Source | AAA 1.5V battery (Batteries excluded) |
| Dimensions (LWH) | 170mm x 65mm x 30mm |
| Weight | Approximately 160g (Batteries excluded) |
| True RMS | Yes |
| NCV (Non-Contact Voltage) | Yes |
| Flashlight | Yes |
| HOLD Function | Yes |

Figure 4: Visual summary of key specifications for the ANENG ST203.
5. Setup
5.1 Battery Installation
The ANENG ST203 requires AAA 1.5V batteries (not included). To install or replace batteries:
- Locate the battery compartment cover on the back of the meter.
- Use a screwdriver to open the battery compartment.
- Insert the AAA 1.5V batteries, ensuring correct polarity (+ and -).
- Replace the battery compartment cover and secure it.
6. Operating Instructions
Before operating, ensure the batteries are correctly installed and the test leads are in good condition.
6.1 Power On/Off
- Press the POWER button to turn the meter on.
- Press and hold the POWER button for more than 2 seconds to turn the meter off. The meter also features an auto-off function to conserve battery life.
6.2 Measurement Functions
The ST203 automatically selects the appropriate range for most measurements. Connect the test leads to the COM and VΩHz terminals for voltage, resistance, and frequency measurements.
- DC Voltage (DCV): Connect test leads to the circuit. The meter will automatically detect and display the DC voltage.
- AC Voltage (ACV): Connect test leads to the circuit. The meter will automatically detect and display the AC voltage.
- AC Current (ACA): Open the clamp jaw and enclose a single conductor (not a power cord with multiple wires). The meter will display the AC current. Ensure the conductor is centered within the jaw for accurate readings.
- Resistance / On-Off Test: Connect test leads across the component. The meter will display resistance in Ohms (Ω) or indicate continuity with a beep.
- Frequency (F): The meter can measure frequency in Hz. This function is often integrated with voltage or current measurements.
- NCV (Non-Contact Voltage): Press the Hz/NCV button to activate NCV mode. Bring the top of the clamp meter near an AC voltage source without direct contact. The meter will beep and flash its LED if voltage is detected.
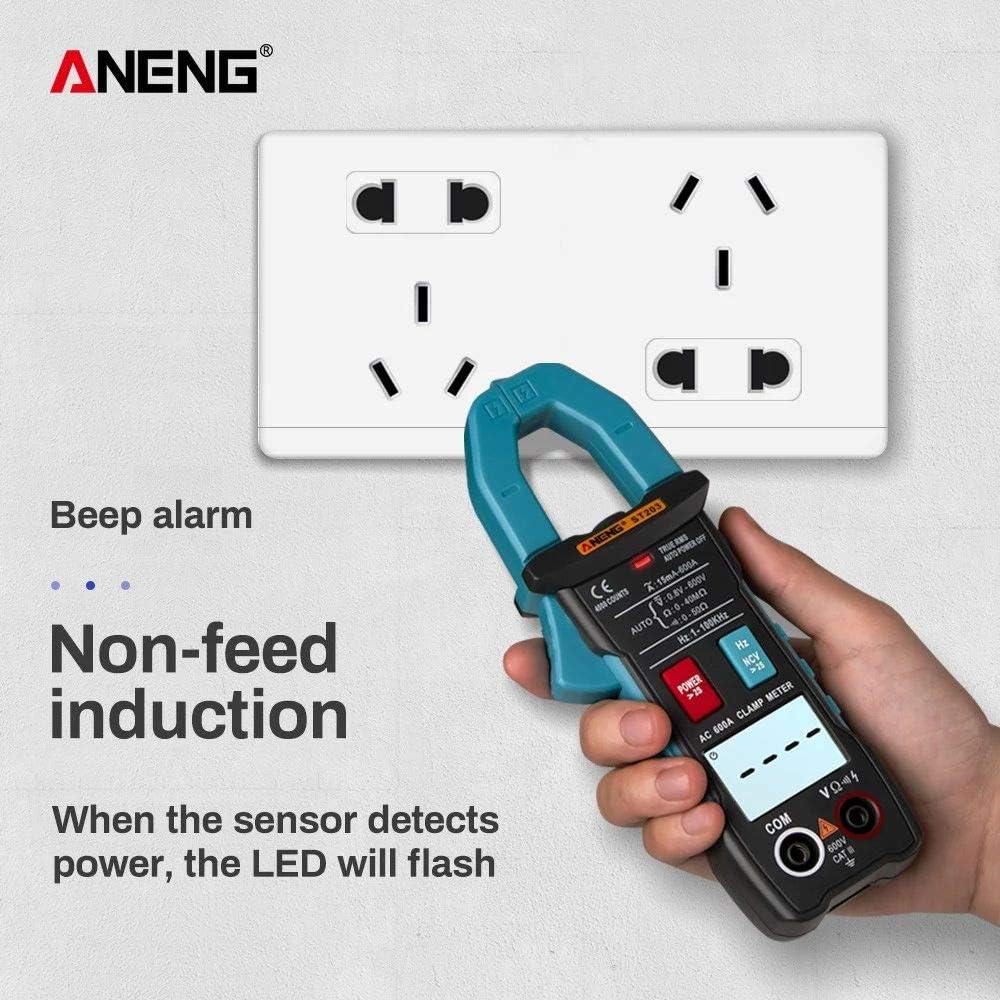
Figure 5: NCV function in action, detecting power without direct contact.
- Zero Line / Fire Line Test: This function helps distinguish between live (fire) and neutral (zero) wires. Refer to the display for indications.
- True RMS Measurement: The ST203 provides True RMS measurements for AC voltage and current, ensuring accurate readings for non-sinusoidal waveforms.
- Flashlight Lighting: Press the flashlight button (if available, often integrated with POWER or HOLD) to illuminate the measurement area.
- HOLD Function: Press the HOLD button to freeze the current reading on the display. Press it again to release.

Figure 6: The clamp meter measuring current on a conductor.
7. Maintenance
Proper maintenance ensures the longevity and accuracy of your ANENG ST203:
- Cleaning: Use a soft, damp cloth to clean the meter's casing. Do not use abrasive cleaners or solvents.
- Storage: When not in use for extended periods, remove the batteries to prevent leakage. Store the meter in a cool, dry place, away from direct sunlight and extreme temperatures.
- Test Leads: Regularly inspect test leads for any signs of damage, such as cracks or frayed insulation. Replace damaged leads immediately.

Figure 7: The ANENG ST203 comes with a portable storage bag, test leads, and an instruction manual.

Figure 8: The meter features a convenient anti-fall lanyard for secure handling.
8. Troubleshooting
If you encounter issues with your ANENG ST203, refer to the following common problems and solutions:
- Meter does not power on: Check battery installation and ensure batteries are not depleted. Replace if necessary.
- "OL" displayed: This indicates an over-range condition. The measured value exceeds the meter's maximum range for the selected function. Switch to a higher range if available, or ensure the measurement is within the meter's capabilities.
- Inaccurate readings: Ensure test leads are properly connected and not damaged. Verify the correct function and range are selected. Clean the input terminals if dirty.
- Low battery symbol: Replace the batteries promptly to ensure accurate measurements and proper operation.
9. Warranty and Support
For warranty information or technical support, please refer to the documentation provided at the point of purchase or contact your retailer. Keep your purchase receipt as proof of purchase.
Included in the package:
- ANENG ST203 Digital Clamp Meter
- Test Leads (one pair)
- Instruction Manual
- Outer Packaging Box
- Portable Storage Bag