1. Introduction
The BenQ TK860i Smart Home Theater Projector delivers an authentic 4K HDR viewing experience, ideal for brightly lit living rooms. Featuring HDR-PRO technology, it projects a large 100-inch+ 4K UHD picture with striking clarity and defined details. This projector integrates Android TV with Netflix and Chromecast, along with Dolby Digital Plus for enhanced audio. Designed for ease of use, it includes 2D Keystone correction, built-in 10W speakers, and Wi-Fi connectivity.
Key Features:
- 4K UHD Resolution: True 8.3 million pixels for sharp, detailed images.
- HDR-PRO (HDR10/HLG): Enhanced contrast and brightness for realistic visuals.
- Vivid Colors: Over 3000 ANSI lumens and 98% Rec. 709 for use in various lighting conditions.
- Immersive Sports Experience: Dedicated Sport modes with CinemaMaster Audio+2.
- Easy Installation: 1.3X big zoom and lens shift for flexible setup.
- Android TV: Integrated smart TV platform with streaming apps.
- Built-in Speakers: Dual 10W speakers for integrated audio.
2. Product Overview

Figure 2.1: Front view of the BenQ TK860i projector, showcasing its sleek design and lens.

Figure 2.2: Side view of the BenQ TK860i projector, highlighting its ventilation and compact form factor.
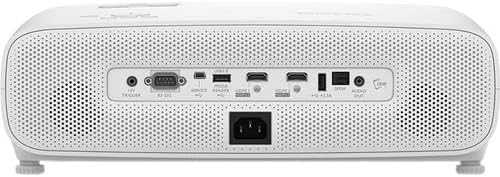
Figure 2.3: Rear view of the BenQ TK860i projector, displaying the various input and output ports for connectivity.
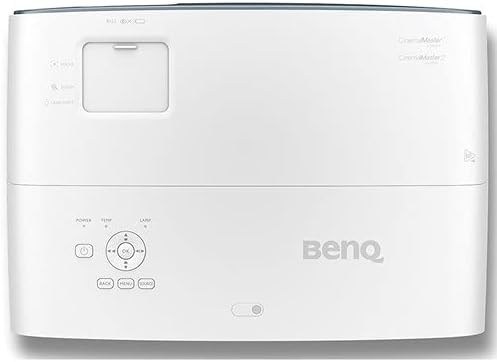
Figure 2.4: Top view of the BenQ TK860i projector, showing the control panel and adjustment dials.
3. Setup
3.1 Placement
Position the projector on a stable, flat surface or mount it to the ceiling. Ensure adequate ventilation around the unit. The TK860i features a 1.3X big zoom and lens shift, allowing for flexible placement and image adjustment without moving the projector itself. For a 100-inch screen, the projector can be placed approximately 8.2 feet away from the screen.
3.2 Power Connection
- Connect the power cord to the projector's AC IN port.
- Plug the other end of the power cord into a grounded electrical outlet.
3.3 Connecting Devices
The TK860i offers multiple connectivity options:
- HDMI: Connect Blu-ray players, gaming consoles, streaming devices, or computers using HDMI cables. The projector features multiple HDMI ports.
- USB: Use the USB ports for media playback or to power compatible streaming dongles.
- Audio Out: Connect external audio systems if desired.
4. Operating Instructions
4.1 Powering On/Off
- Press the Power button on the projector or the remote control to turn the unit on.
- To turn off, press the Power button again. A confirmation message may appear; confirm to shut down.
4.2 Initial Setup and Image Adjustment
- Upon first power-on, follow the on-screen prompts to select your preferred language and projector position (e.g., Front, Rear, Front Ceiling, Rear Ceiling).
- Use the Focus and Zoom rings near the lens to adjust the image clarity and size.
- Utilize the Lens Shift feature (if available on your model) to vertically or horizontally adjust the image position without tilting the projector.
- Apply 2D Keystone correction via the menu to square the image if the projector is not perfectly perpendicular to the screen.
4.3 Input Source Selection
Press the Source button on the remote control or the projector's control panel to cycle through available input sources (HDMI1, HDMI2, USB, etc.).
4.4 Smart TV Features (Android TV)
The integrated Android TV dongle provides access to a wide range of streaming applications, including Netflix, YouTube, and Prime Video. Use the remote control to navigate the Android TV interface, browse content, and launch apps.
5. Maintenance
5.1 Cleaning the Lens
Gently wipe the projector lens with a soft, lint-free cloth specifically designed for optical surfaces. Avoid using abrasive cleaners or excessive force.
5.2 Air Filter Cleaning
Regularly check and clean the air filter to ensure proper ventilation and prevent overheating. Refer to the full user manual for specific instructions on accessing and cleaning the filter.
5.3 Lamp Replacement
The projector lamp has a limited lifespan. When the lamp life indicator appears, replace the lamp according to the instructions in the full user manual. Always use genuine BenQ replacement lamps.
6. Troubleshooting
6.1 No Picture
- Ensure the projector is powered on and the input source is correctly selected.
- Check all cable connections (HDMI, power) to ensure they are secure.
- Verify that the connected source device is powered on and outputting a signal.
6.2 Blurry Image
- Adjust the focus ring on the projector lens until the image is sharp.
- Ensure the projector is at the correct distance from the screen for optimal focus.
6.3 No Audio
- Check the volume level on both the projector and the connected source device.
- If using external speakers, ensure they are properly connected and powered on.
- Verify audio settings in the projector's menu.
7. Specifications
| Feature | Specification |
|---|---|
| Product Dimensions | 19 x 15.1 x 7.7 inches |
| Item Weight | 9.26 pounds |
| Item Model Number | TK850 |
| Brand | BenQ |
| Recommended Uses | Gaming |
| Special Feature | Portable |
| Connectivity Technology | HDMI |
| Display Resolution | 3840 x 2160 (4K UHD) |
8. Official Product Videos
Video 8.1: An overview of the BenQ TK850 projector, highlighting its 4K HDR-PRO capabilities and home entertainment features. This video provides a visual guide to the projector's design and core functionalities.
Video 8.2: A comparison video discussing the features and differences between the BenQ HT3550 and TK850 models, offering insights into their performance and suitability for various home theater setups.
9. Warranty and Support
BenQ offers an industry-leading 3-year warranty, providing peace of mind with coverage that exceeds many competitors' 1-year warranties. Our US-based customer service team is available to assist with any inquiries or support needs.
For detailed support, troubleshooting, or warranty claims, please refer to the official BenQ website or contact their customer service directly.


