1. Important Safeguards
Please read and save this Instruction and Care Manual. When using electrical appliances, basic safety precautions should always be followed, including:
- Read all instructions before operating the appliance.
- Do not touch hot surfaces. Use handles or knobs.
- To protect against electrical shock, do not immerse cord, plugs, or appliance in water or other liquid.
- Close supervision is necessary when any appliance is used by or near children.
- Unplug from outlet when not in use and before cleaning. Allow to cool before putting on or taking off parts.
- Do not operate any appliance with a damaged cord or plug, or after the appliance malfunctions or has been damaged in any manner.
- The use of accessory attachments not recommended by the appliance manufacturer may cause injuries.
- Do not use outdoors.
- Do not let cord hang over edge of table or counter, or touch hot surfaces.
- Do not place on or near a hot gas or electric burner, or in a heated oven.
- Extreme caution must be used when moving an appliance containing hot oil or other hot liquids.
- Always attach plug to appliance first, then plug cord into the wall outlet. To disconnect, turn any control to “off”, then remove plug from wall outlet.
- Do not use appliance for other than intended use.
- Extreme caution should be exercised when using containers constructed of materials other than metal or glass.
- Do not store any materials, other than manufacturer’s recommended accessories, in this oven when not in use.
- Do not place any of the following materials in the oven: paper, cardboard, plastic, or any materials that may catch fire.
- Do not cover crumb tray or any part of the oven with metal foil. This will cause overheating of the oven.
- Oversize foods or metal utensils must not be inserted in a toaster oven as they may create a fire or risk of electric shock.
- A fire may occur if the oven is covered or touching flammable material, including curtains, drapes, walls, and the like, when in operation. Do not store any item on top of the appliance when in operation.
- Do not clean with metal scouring pads. Pieces can break off the pad and touch electrical parts, creating a risk of electric shock.
- Do not attempt to dislodge food when the appliance is plugged in.
- Use recommended temperature settings for cooking, baking, roasting, and air frying.
2. Product Overview & Features
The DASH Chef Series 23L 7-in-1 Air Fryer Oven is a versatile countertop appliance designed to simplify your cooking. It combines the functions of an air fryer, convection oven, toaster, broiler, and more, all in one compact unit.
Key Features:
- 7-in-1 Functionality: Air Fry, Bake, Broil, Convection, Toast, Rotisserie, and Warm.
- AirCrisp® Technology: Utilizes hot air for less preheating and faster cooking, reducing oil usage by up to 75%.
- Generous Capacity: 23-liter interior, suitable for meals for 1-4 people or up to a 12-inch pizza.
- Dual Thermostats: Six heating elements with dual thermostats ensure even and consistent cooking.
- Interior Oven Light: Allows monitoring of cooking progress without opening the door.
- Durable Construction: Stainless steel exterior with a non-stick interior for easy cleaning.
Included Accessories:
- Removable Air Fry Basket
- Drip Tray
- Baking Pan
- Oven Rack
- Rotisserie Skewer
- Rotisserie Removal Tool
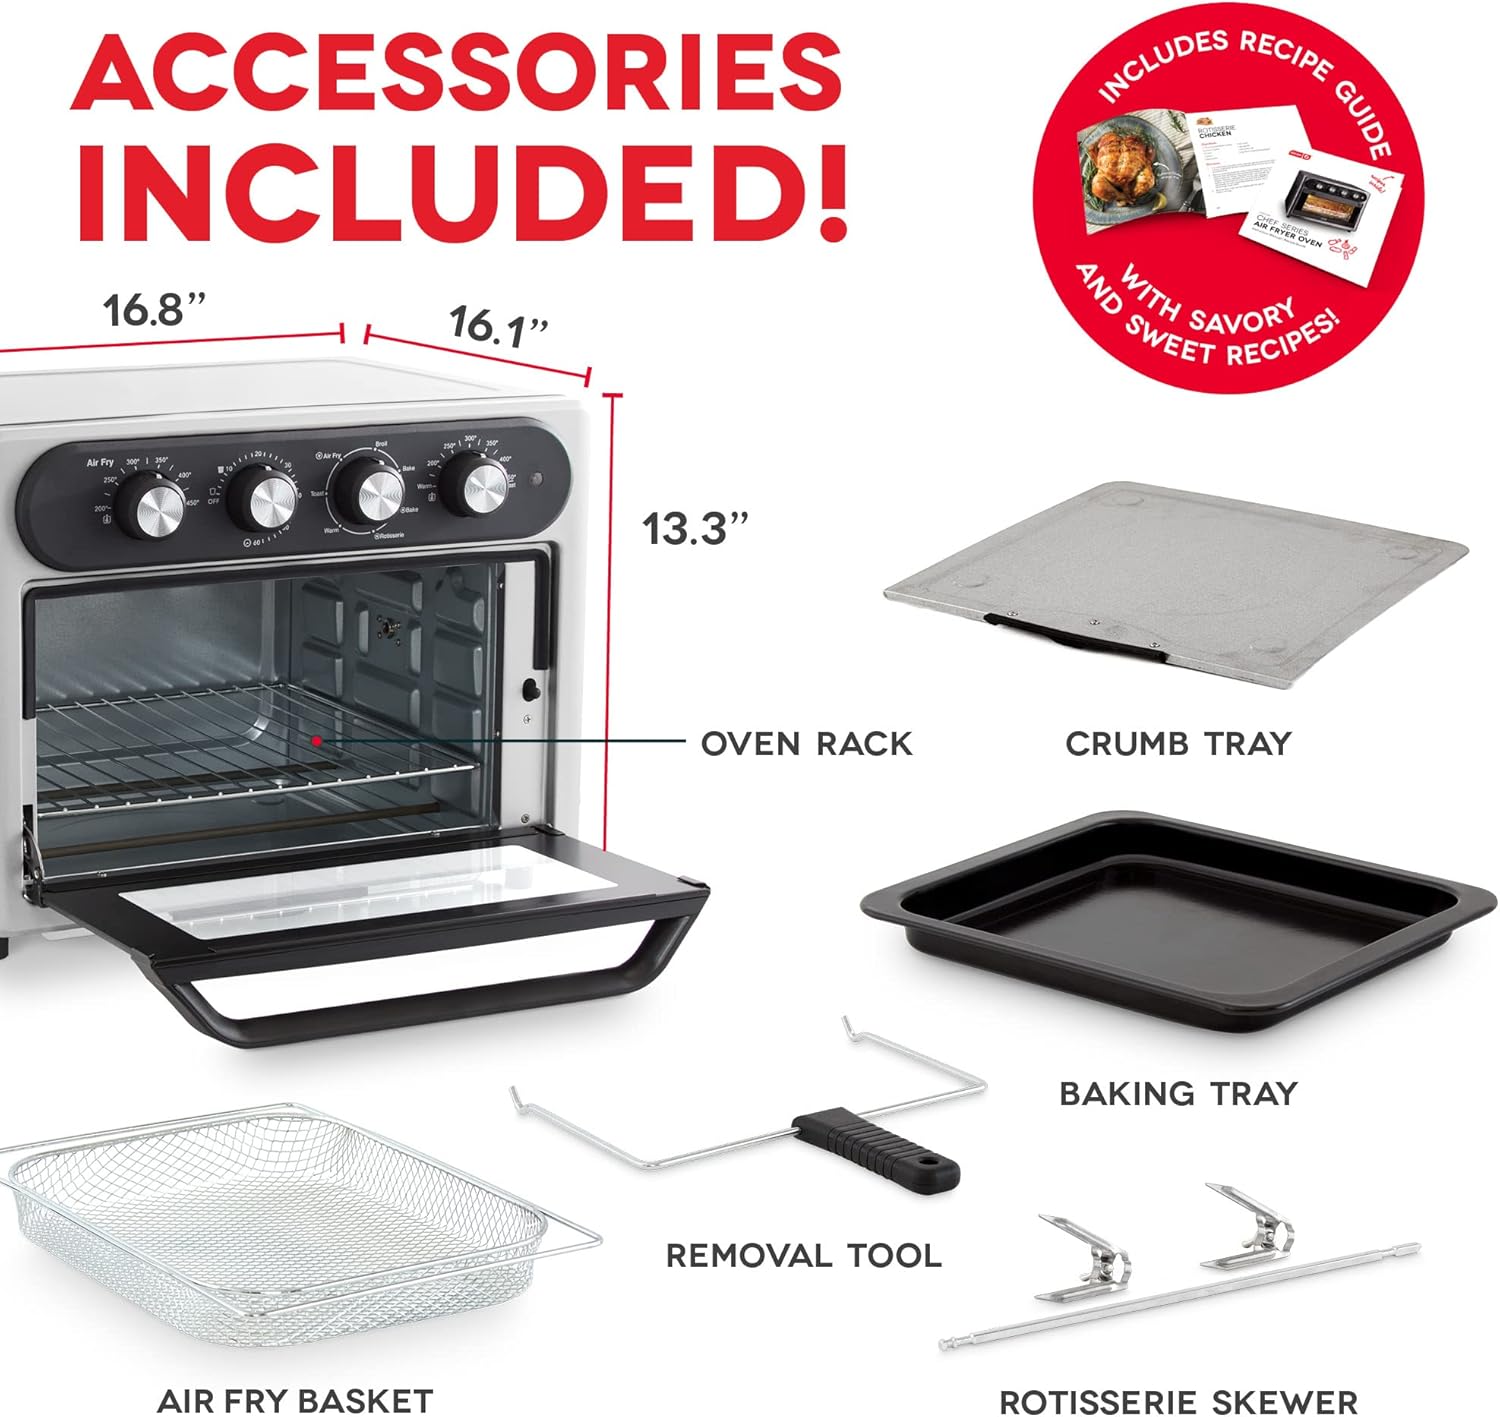
Figure 1: Included accessories for the DASH Chef Series Air Fryer Oven.

Figure 2: The DASH Chef Series Air Fryer Oven in use, preparing a meal.
Video 1: An overview of the DASH Air Fryer Multi Oven, showcasing its various functions and cooking capabilities.
3. Setup
- Unpack: Carefully remove all packaging materials, stickers, and labels from the appliance and its accessories.
- Clean: Wash the Air Fry Basket, Drip Tray, Baking Pan, Oven Rack, Rotisserie Skewer, and Rotisserie Removal Tool in warm, soapy water. Rinse thoroughly and dry completely. Wipe the interior and exterior of the oven with a damp cloth.
- Placement: Place the Air Fryer Oven on a stable, level, heat-resistant surface, ensuring adequate ventilation (at least 4 inches of space on all sides and above).
- Power: Plug the power cord into a grounded electrical outlet.
- Initial Burn-Off: Before first use, operate the oven on the Air Fry setting at 400°F (200°C) for 15 minutes to burn off any manufacturing residues. A slight odor or smoke is normal during this process. Ensure the area is well-ventilated.
4. Operating Instructions
The DASH Chef Series Air Fryer Oven features four control dials for precise cooking.
Control Panel Overview:
- Air Fry Dial (Left): Sets the temperature for air frying (200°F - 450°F).
- Timer Dial (Second from Left): Sets the cooking time (up to 60 minutes), including Dark Toast and Light Toast settings.
- Function Dial (Third from Left): Selects the cooking method (Air Fry, Broil, Bake, Warm, Toast, Rotisserie).
- Temperature Dial (Right): Sets the temperature for broiling, baking, toasting, and warming (200°F - 450°F). Note: This dial does not affect the Air Fry function.
Cooking Functions:
- Air Frying:
- Place food in the Air Fry Basket.
- Insert the Air Fry Basket into the Oven Rack in Position 2.
- Set the Function Dial to 'Air Fry'.
- Set the Air Fry Dial to the desired temperature.
- Set the Timer Dial to the desired cooking time. The Power Light will illuminate.
- The oven will automatically turn off when the timer expires.
- Baking/Convection:
- Place food on the Baking Pan or Oven Rack.
- Set the Function Dial to 'Bake'.
- Set the Temperature Dial to the desired baking temperature.
- Set the Timer Dial to the desired cooking time.
- Broiling:
- Place food on the Air Fry Basket on top of the Baking Pan in Position 2.
- Set the Function Dial to 'Broil'.
- Set the Temperature Dial to 'Broil' (typically 450°F).
- Set the Timer Dial to the desired cooking time.
- Toasting:
- Place bread/bagels on the Oven Rack in Position 2.
- Set the Function Dial to 'Toast'.
- Set the Timer Dial to the desired toast shade (Light, Medium, Dark).
- Warming:
- Place food on the Baking Pan or Oven Rack.
- Set the Function Dial to 'Warm'.
- Set the Temperature Dial to 'Warm' (typically 200°F).
- Set the Timer Dial to the desired warming time.
- Rotisserie:
- Secure food (e.g., whole chicken) onto the Rotisserie Skewer using the forks.
- Using the Rotisserie Removal Tool, carefully insert the skewer into the rotisserie slots inside the oven.
- Set the Function Dial to 'Rotisserie'.
- Set the Temperature Dial to the desired cooking temperature.
- Set the Timer Dial to the desired cooking time.
- The rotisserie will rotate the food for even cooking.

Figure 3: The 7-in-1 functions of the DASH Chef Series Air Fryer Oven.

Figure 4: Air Frying with AirCrisp Technology for crispy results.
Video 2: Demonstrates the rotisserie feature and other functions of the oven, including how to load and unload the rotisserie skewer.
5. Cleaning & Maintenance
Regular cleaning ensures optimal performance and longevity of your Air Fryer Oven.
Cleaning Steps:
- Unplug and Cool: Always unplug the appliance from the power outlet and allow it to cool completely before cleaning.
- Remove Accessories: Take out the Air Fry Basket, Drip Tray, Baking Pan, Oven Rack, and Rotisserie Skewer.
- Wash Accessories: Wash all removable accessories in warm, soapy water. For stubborn food residue, soak them before cleaning. They are not dishwasher safe.
- Clean Interior: Wipe the interior walls of the oven with a damp cloth and mild detergent. Avoid abrasive cleaners or metal scouring pads.
- Clean Exterior: Wipe the exterior with a damp cloth. Do not immerse the appliance in water.
- Crumb Tray: The Drip Tray (also functions as a crumb tray) slides out from the bottom for easy cleaning. Empty and wash it after each use to prevent grease buildup.
- Dry Thoroughly: Ensure all parts are completely dry before reassembling and storing the appliance.
6. Troubleshooting
| Problem | Possible Cause | Solution |
|---|---|---|
| Appliance does not turn on. | Not plugged in; power outlet not working; timer not set. | Ensure the appliance is plugged into a working outlet. Set the Timer Dial to the desired cooking time. |
| Food is not cooking evenly. | Overcrowding the basket; incorrect temperature/time; food not rotated. | Do not overcrowd the basket; cook in smaller batches if necessary. Adjust temperature and time as per recipe. For rotisserie, ensure the skewer is properly engaged. Turn food halfway through cooking for air frying. |
| Smoke coming from the oven. | Grease buildup; food residue; initial burn-off. | Clean the Drip Tray and interior thoroughly. Ensure no food particles are left. If it's the first use, this is normal. |
| Rotisserie function not working. | Skewer not properly inserted; Function Dial not set to 'Rotisserie'. | Ensure the Rotisserie Skewer is fully engaged in the motor drive. Set the Function Dial to 'Rotisserie'. Ensure the chicken size is appropriate for the oven to spin freely. |
7. Specifications
| Specification | Detail |
|---|---|
| Brand | DASH |
| Model Name | Chef Series 7 in 1 Convection Air Fry Oven |
| Model Number | DAFT2350GBSS01 |
| Capacity | 23 Liters |
| Product Dimensions (D x W x H) | 16.1"D x 16.8"W x 13.3"H |
| Item Weight | 17.4 Pounds |
| Material | Stainless Steel |
| Wattage | 1500 watts |
| Control Type | Knob |
| Temperature Range | Up to 450°F |
8. Warranty & Support
DASH provides a 2-Year Warranty for this product with registration. For customer support, troubleshooting assistance, or warranty claims, please refer to the contact information provided in your product packaging or visit the official DASH website.
For additional information and recipes, visit the DASH Store on Amazon.


