
Makita RW01R1
Makita RW01R1 12V max CXT® Lithium-Ion Cordless Ratchet Kit Instruction Manual
Introduction
This manual provides essential information for the safe and effective operation, maintenance, and care of your Makita RW01R1 12V max CXT® Lithium-Ion Cordless 3/8" / 1/4" Sq. Drive Ratchet Kit. Please read and understand all instructions before using the tool. Proper use and maintenance will ensure optimal performance and extend the lifespan of your product.
General Safety Information
WARNING: Read all safety warnings, instructions, illustrations, and specifications provided with this power tool. Failure to follow all instructions listed below may result in electric shock, fire, and/or serious injury.
- Always wear appropriate personal protective equipment, including eye protection, hearing protection, and gloves.
- Keep the work area clean and well-lit. Cluttered or dark areas invite accidents.
- Do not operate power tools in explosive atmospheres, such as in the presence of flammable liquids, gases, or dust.
- Keep children and bystanders away while operating a power tool. Distractions can cause you to lose control.
- Use only Makita genuine batteries and chargers. Using non-genuine batteries can lead to fire, personal injury, or property damage.
- Ensure the switch is in the off-position before connecting to a battery pack, picking up or carrying the tool.
- Do not force the power tool. Use the correct power tool for your application.
- Disconnect the battery pack from the power tool before making any adjustments, changing accessories, or storing power tools.
- Store idle power tools out of the reach of children and do not allow persons unfamiliar with the power tool or these instructions to operate the power tool.
Battery Safety:
- Do not short-circuit a battery pack.
- Do not charge a damaged battery pack.
- Do not expose battery packs to heat or fire. Avoid storage in direct sunlight.
- Do not store battery packs where the temperature may reach or exceed 50°C (122°F).
- Dispose of used battery packs properly.

Image: Warning regarding the exclusive use of genuine Makita Lithium-Ion batteries to prevent hazards.
Package Contents
The Makita RW01R1 Kit includes the following components:
- 12V max CXT® 3/8" / 1/4" Sq. Drive Ratchet (RW01Z)
- 12V max CXT® Lithium-Ion 2.0Ah Battery (BL1021B)
- 12V max CXT® Lithium-Ion Charger (DC10WD)
- 3/8" Sq. Drive Anvil Adapter, RW01 (191A50-3)
- 1/4" Sq. Drive Anvil Adapter, RW01 (191A51-1)
- Tool Bag

Image: The complete Makita RW01R1 kit, showing the cordless ratchet, 2.0Ah battery, charger, and tool bag.
Setup
1. Charging the Battery
- Connect the 12V max CXT® Lithium-Ion Charger (DC10WD) to a standard power outlet.
- Insert the 12V max CXT® Lithium-Ion 2.0Ah Battery (BL1021B) into the charger.
- The charger's indicator lights will show the charging status. Refer to the charger's specific manual for detailed light patterns.
- Once fully charged, remove the battery from the charger.
2. Installing the Battery
- Align the charged battery pack with the battery port on the handle of the ratchet.
- Slide the battery into the port until it clicks securely into place. Ensure it is fully seated to prevent accidental dislodgement during operation.
- To remove the battery, press the release button on the battery pack and slide it out.
3. Attaching the Anvil Adapter
The RW01R1 ratchet features interchangeable 3/8" and 1/4" square drive anvil adapters for versatility.
- Select the desired anvil adapter (3/8" or 1/4").
- Align the adapter with the drive shaft of the ratchet.
- Push the adapter firmly onto the shaft until it locks into place. Ensure it is securely attached before use.
- To remove, pull the adapter off the shaft.
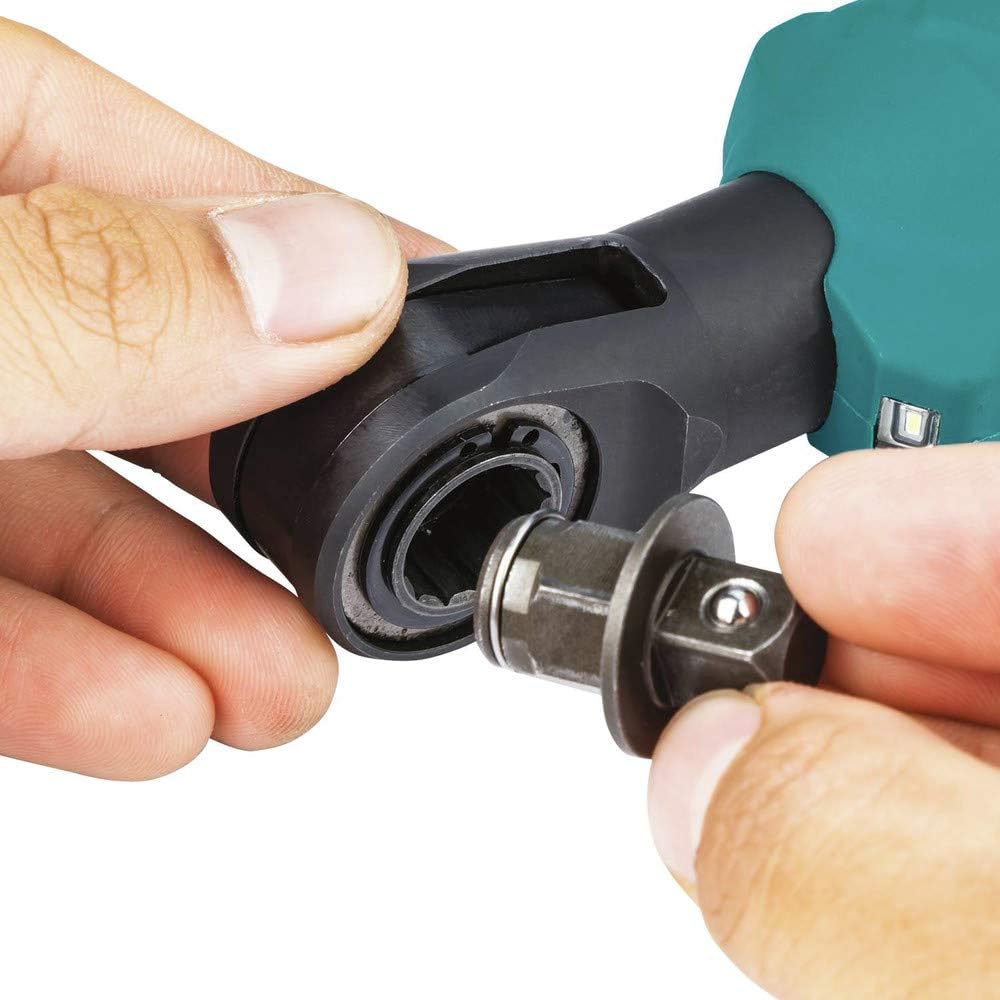
Image: A user demonstrating the attachment of a square drive anvil adapter to the ratchet head.
Operating Instructions
1. Powering On/Off and Variable Speed
- To power on the ratchet, pull the trigger switch. The tool will start operating.
- The tool features variable speed control. The speed increases with increased pressure on the trigger switch.
- To power off, release the trigger switch. The electric brake will stop the rotation quickly.
2. Forward and Reverse Operation
The direction of rotation is controlled by the forward/reverse switch located on the head of the ratchet.
- To rotate clockwise (for tightening), push the switch to the left.
- To rotate counter-clockwise (for loosening), push the switch to the right.
- Ensure the switch is fully engaged in the desired direction before operating the tool.
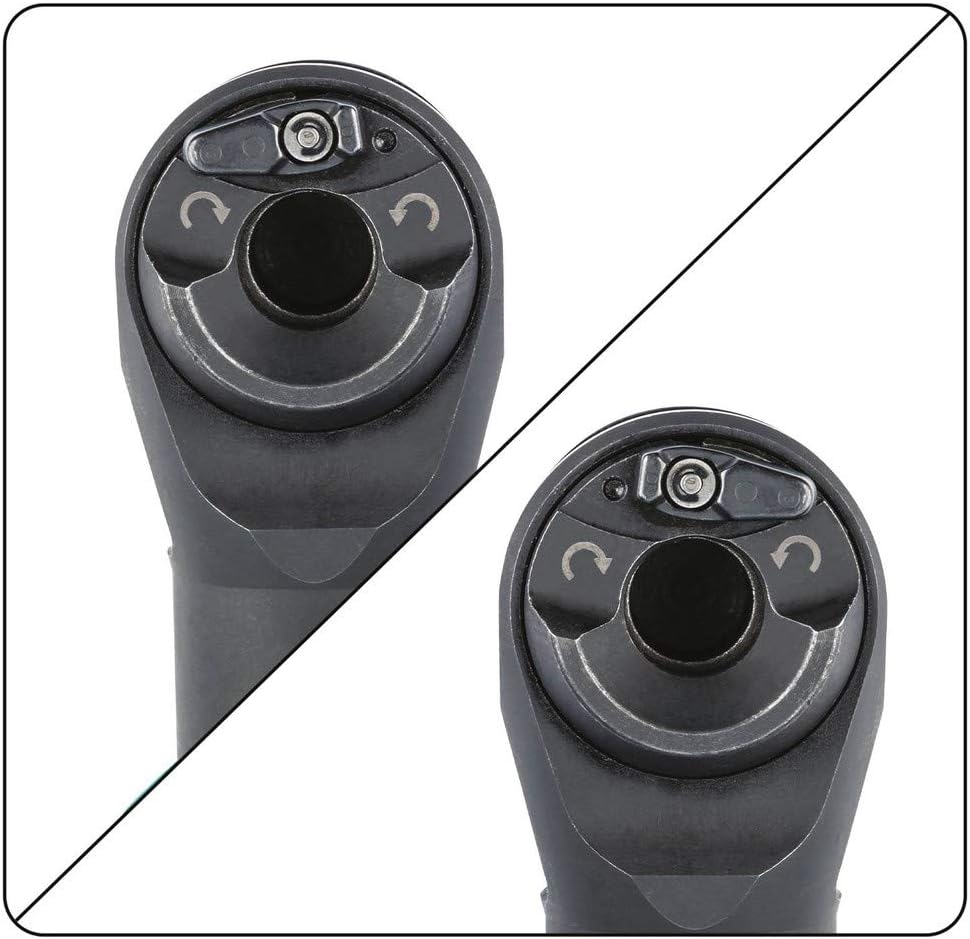
Image: A detailed view of the ratchet head, highlighting the forward and reverse selector switch.
3. Manual Ratchet Function
When the motor is not engaged, the ratchet can be used manually like a standard hand ratchet. This is useful for breaking loose stubborn fasteners before using power, or for final tightening where precise torque is required.
4. LED Work Light
The ratchet is equipped with a built-in LED light that illuminates the work area when the trigger is pulled, improving visibility in dimly lit spaces.
Maintenance
1. Cleaning
- Regularly clean the tool's ventilation openings to prevent overheating.
- Wipe the tool with a soft, damp cloth. Do not use harsh chemicals or abrasive cleaners.
- Keep the anvil and drive shaft free from debris.
2. Battery Care
- Charge batteries before they are completely depleted to prolong their lifespan.
- Store batteries in a cool, dry place away from direct sunlight and extreme temperatures.
- If the tool will not be used for an extended period, remove the battery pack.
3. Storage
- Store the tool and accessories in the provided tool bag or a secure, dry location.
- Keep out of reach of children.
Troubleshooting
| Problem | Possible Cause | Solution |
|---|---|---|
| Tool does not start | Battery not charged or improperly installed | Charge battery; ensure battery is fully inserted until it clicks. |
| Reduced power or short run time | Battery charge is low | Recharge the battery pack. |
| Anvil adapter is loose | Adapter not fully seated | Push the adapter firmly onto the drive shaft until it locks. |
| Tool stops during operation | Overload protection activated | Reduce load on the tool; allow it to cool down if necessary. |
Specifications

Image: An overview diagram detailing the features and ergonomic design of the Makita RW01R1 cordless ratchet.
| Feature | Detail |
|---|---|
| Model Number | RW01R1 |
| Voltage | 12 Volts |
| Max Torque | 35 ft. lbs. |
| Speed | 0-800 RPM (Variable) |
| Drive Size | 3/8" and 1/4" Square Drive (Interchangeable) |
| Item Weight | 2.35 pounds (with battery) |
| Item Length | 13.44 Inches |
| Power Source | Battery Powered |
| Battery Type | Lithium-Ion |
| Included Components | Ratchet, 2.0Ah Battery, Charger, 3/8" Anvil, 1/4" Anvil, Tool Bag |
Warranty and Support
Warranty Information
The Makita RW01R1 Cordless Ratchet Kit comes with a 3-year limited warranty on the tool, battery, and charger. For detailed warranty terms and conditions, please refer to the official Makita warranty documentation or contact Makita customer service.
Further Support
For additional information, troubleshooting assistance, or to purchase replacement parts, please visit the official Makita website or contact their customer support. You can also refer to the comprehensive user guide available as a PDF document:
Related documentsRW01R1


Ask a question about this manual
Ask about setup, troubleshooting, compatibility, parts, safety, or missing instructions. Manuals+ will review the question and use this page’s manual context to help answer it.