Important Safety Instructions
Always observe basic safety precautions when using electric tools to reduce the risk of fire, electric shock, and personal injury. Read all instructions before operating this product.
- Work Area Safety: Keep your work area clean and well lit. Cluttered or dark areas invite accidents. Do not operate power tools in explosive atmospheres, such as in the presence of flammable liquids, gases or dust. Power tools create sparks which may ignite the dust or fumes.
- Electrical Safety: Avoid body contact with earthed or grounded surfaces such as pipes, radiators, ranges and refrigerators. There is an increased risk of electric shock if your body is earthed or grounded. Do not expose power tools to rain or wet conditions. Water entering a power tool will increase the risk of electric shock.
- Personal Safety: Stay alert, watch what you are doing and use common sense when operating a power tool. Do not use a power tool while you are tired or under the influence of drugs, alcohol or medication. A moment of inattention while operating power tools may result in serious personal injury. Use personal protective equipment. Always wear eye protection. Protective equipment such as dust mask, non-skid safety shoes, hard hat, or hearing protection used for appropriate conditions will reduce personal injuries.
- Power Tool Use and Care: Do not force the power tool. Use the correct power tool for your application. The correct power tool will do the job better and safer at the rate for which it was designed. Disconnect the plug from the power source and/or the battery pack from the power tool before making any adjustments, changing accessories, or storing power tools. Such preventive safety measures reduce the risk of starting the power tool accidentally.
- Battery Pack Use and Care: Recharge only with the charger specified by the manufacturer. A charger that is suitable for one type of battery pack may create a risk of fire when used with another battery pack. Use power tools only with specifically designated battery packs. Use of any other battery packs may create a risk of injury and fire.
Product Overview
The MYLEK MYW09 18V Cordless Drill Electric Screwdriver Set is a versatile tool designed for various drilling and screwdriving tasks. It features a powerful lithium-ion battery, variable speed control, and multiple torque settings for optimal performance across different materials.

Figure 1: The MYLEK 18V Cordless Drill with its comprehensive 13-piece accessory kit, including various drill bits and screwdriver attachments, along with the battery and charger.
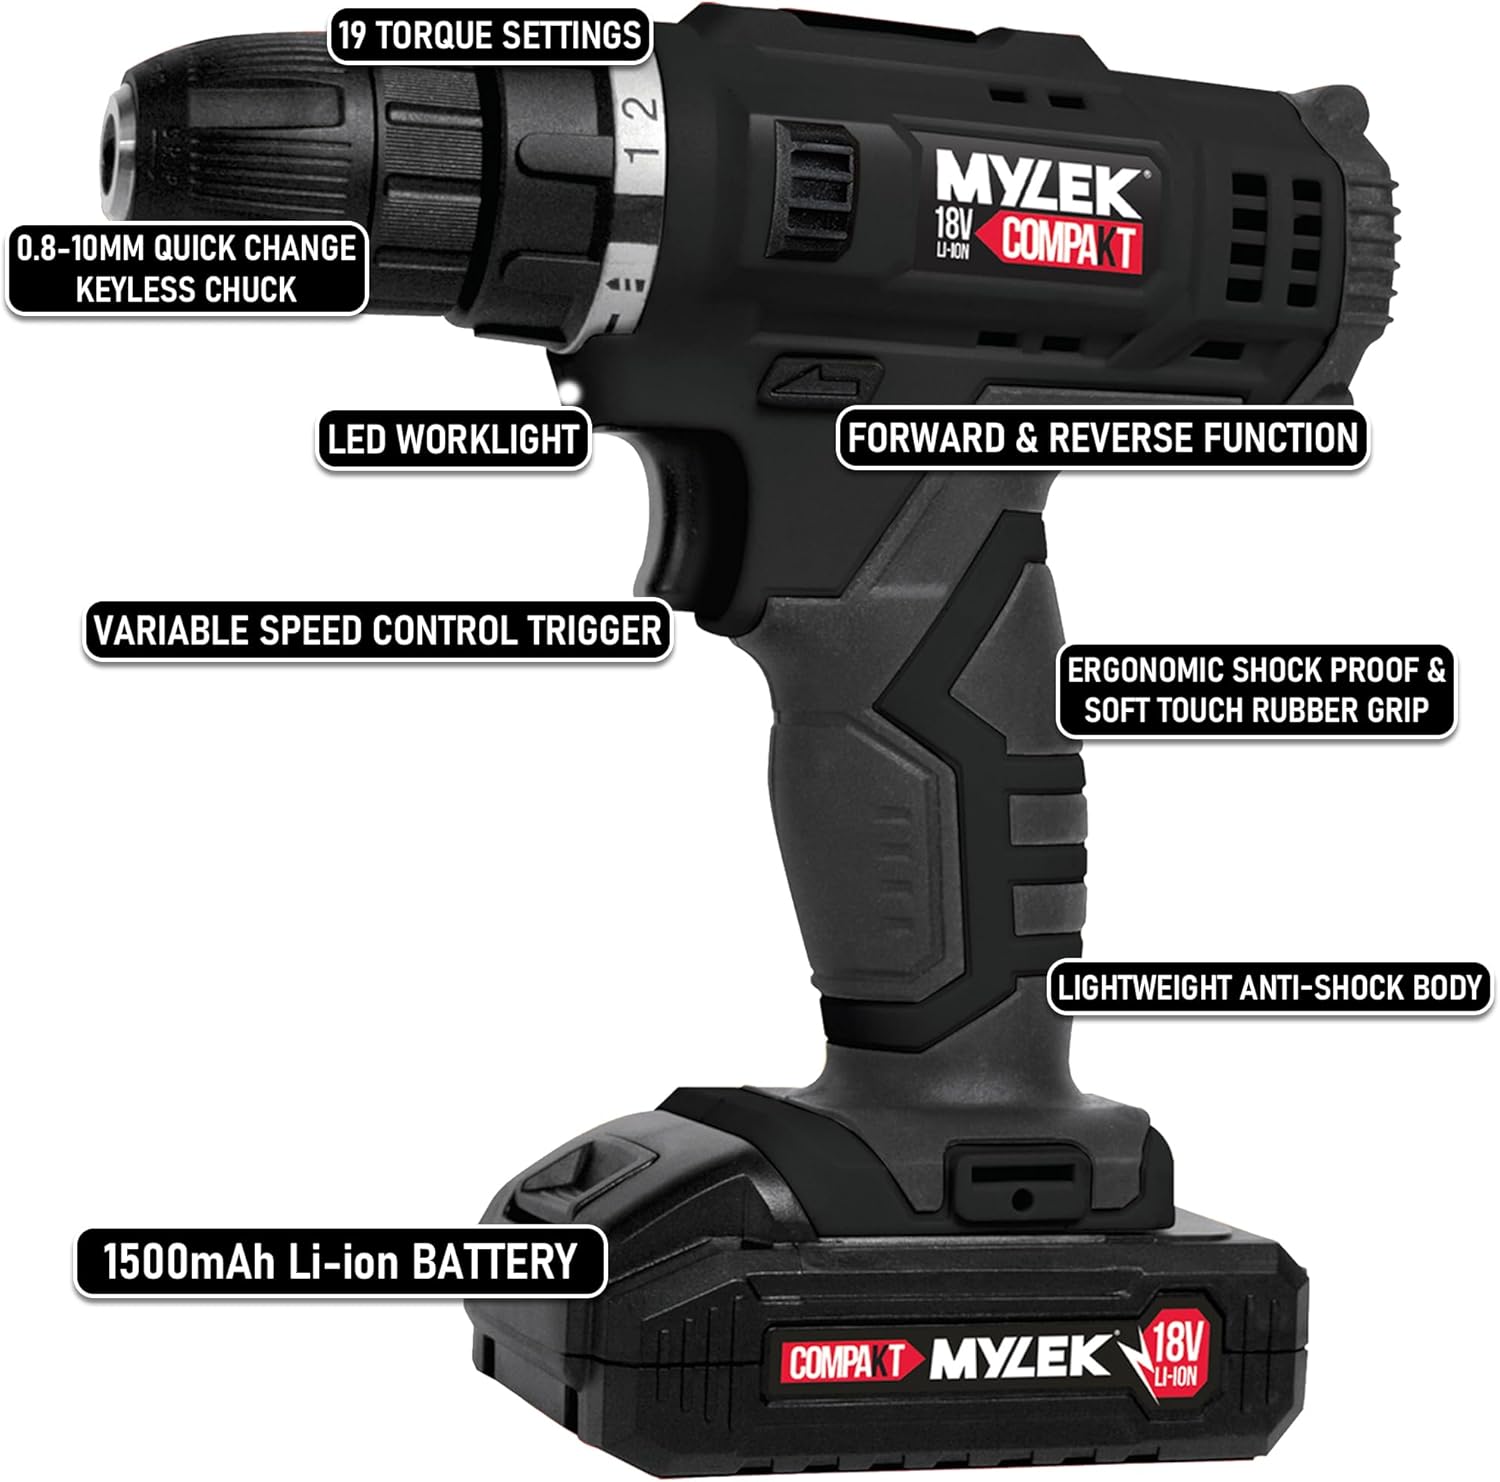
Figure 2: Detailed view of the MYLEK Cordless Drill highlighting key features such as the 19 torque settings, 0.8-10mm keyless chuck, LED worklight, forward & reverse function, variable speed control trigger, ergonomic grip, lightweight anti-shock body, and 1500mAh Li-ion battery.
Key Components:
- Keyless Chuck: For quick and easy bit changes (0.8 - 10mm).
- Torque Adjustment Ring: Selects from 18+1 torque settings for various applications.
- Forward/Reverse Switch: Controls the direction of rotation.
- Variable Speed Trigger: Allows precise control over drilling speed (up to 650 RPM).
- LED Worklight: Illuminates the work area for improved visibility.
- Ergonomic Grip: Provides comfort and reduces fatigue during extended use.
- 18V Li-ion Battery Pack: Provides portable power for the drill.
- Battery Charger: For recharging the lithium-ion battery.
- Accessory Kit: Includes various drill bits, screwdriver bits, and a magnetic bit holder.
Getting Started & Setup
1. Charging the Battery
The 1500mAh Li-ion battery pack is supplied partially charged. For optimal performance, fully charge the battery before first use.
- Connect the UK charger to a standard wall outlet.
- Slide the battery pack onto the charger until it clicks into place.
- Allow the battery to charge until the indicator light on the charger signals a full charge. Charging time may vary.
- Once fully charged, disconnect the battery from the charger.
Note: The Li-ion battery features no memory effect and advanced no self-discharge, ensuring it holds its charge well when not in use.
2. Installing and Removing the Battery Pack
- To Install: Align the battery pack with the base of the drill handle and slide it firmly into place until it clicks securely.
- To Remove: Press the battery release button (usually located on the front or sides of the battery pack) and slide the battery pack out of the drill handle.
3. Installing Drill Bits and Accessories
The drill features a 0.8 - 10mm keyless chuck for quick and easy accessory changes.
- Ensure the drill is switched off and the forward/reverse switch is in the center (locked) position to prevent accidental starting.
- Rotate the chuck counter-clockwise to open the chuck jaws wide enough to insert the desired drill bit or screwdriver bit.
- Insert the bit fully into the chuck.
- Rotate the chuck clockwise to tighten the jaws firmly around the bit. Ensure the bit is centered and secure to prevent slippage during operation.

Figure 3: The 13-piece accessory kit, including the 1500mAh Li-ion battery, UK fast charger, 6 twist drill bits, 6 Cr-V screwdriver bits, and 1 bit holder.
Operation
1. Powering On/Off and Variable Speed Control
- To start the drill, press the variable speed control trigger. The speed of rotation increases as you press the trigger further.
- To stop the drill, release the trigger.
- The maximum no-load speed is 650 RPM.
2. Forward/Reverse Function
The forward/reverse switch is located above the trigger. This switch controls the direction of the chuck's rotation.
- Push the switch to the left for forward rotation (for drilling and tightening screws).
- Push the switch to the right for reverse rotation (for removing screws).
- When the switch is in the center position, the trigger is locked, preventing accidental operation. Always set the switch to the center position when not in use or when changing bits.
3. Torque Settings
The torque adjustment ring allows you to select from 18 torque settings plus a drill mode. This feature helps prevent over-driving screws and damaging materials.
- Rotate the torque adjustment ring to the desired setting. Lower numbers are for smaller screws and softer materials, while higher numbers are for larger screws and harder materials.
- Select the drill symbol for drilling applications, which provides maximum torque (15 Nm) without clutch engagement.
- The drill has a maximum drilling capacity of 20mm in wood and 8mm in steel.
4. LED Worklight
The integrated LED worklight automatically illuminates when the trigger is pressed, providing visibility in dimly lit work areas.

Figure 4: The powerful LED worklight positioned to illuminate the work area, useful for hard-to-see spaces.

Figure 5: The drill's LED worklight effectively illuminating a wall socket during a screwdriving task, demonstrating its utility in low-light conditions.
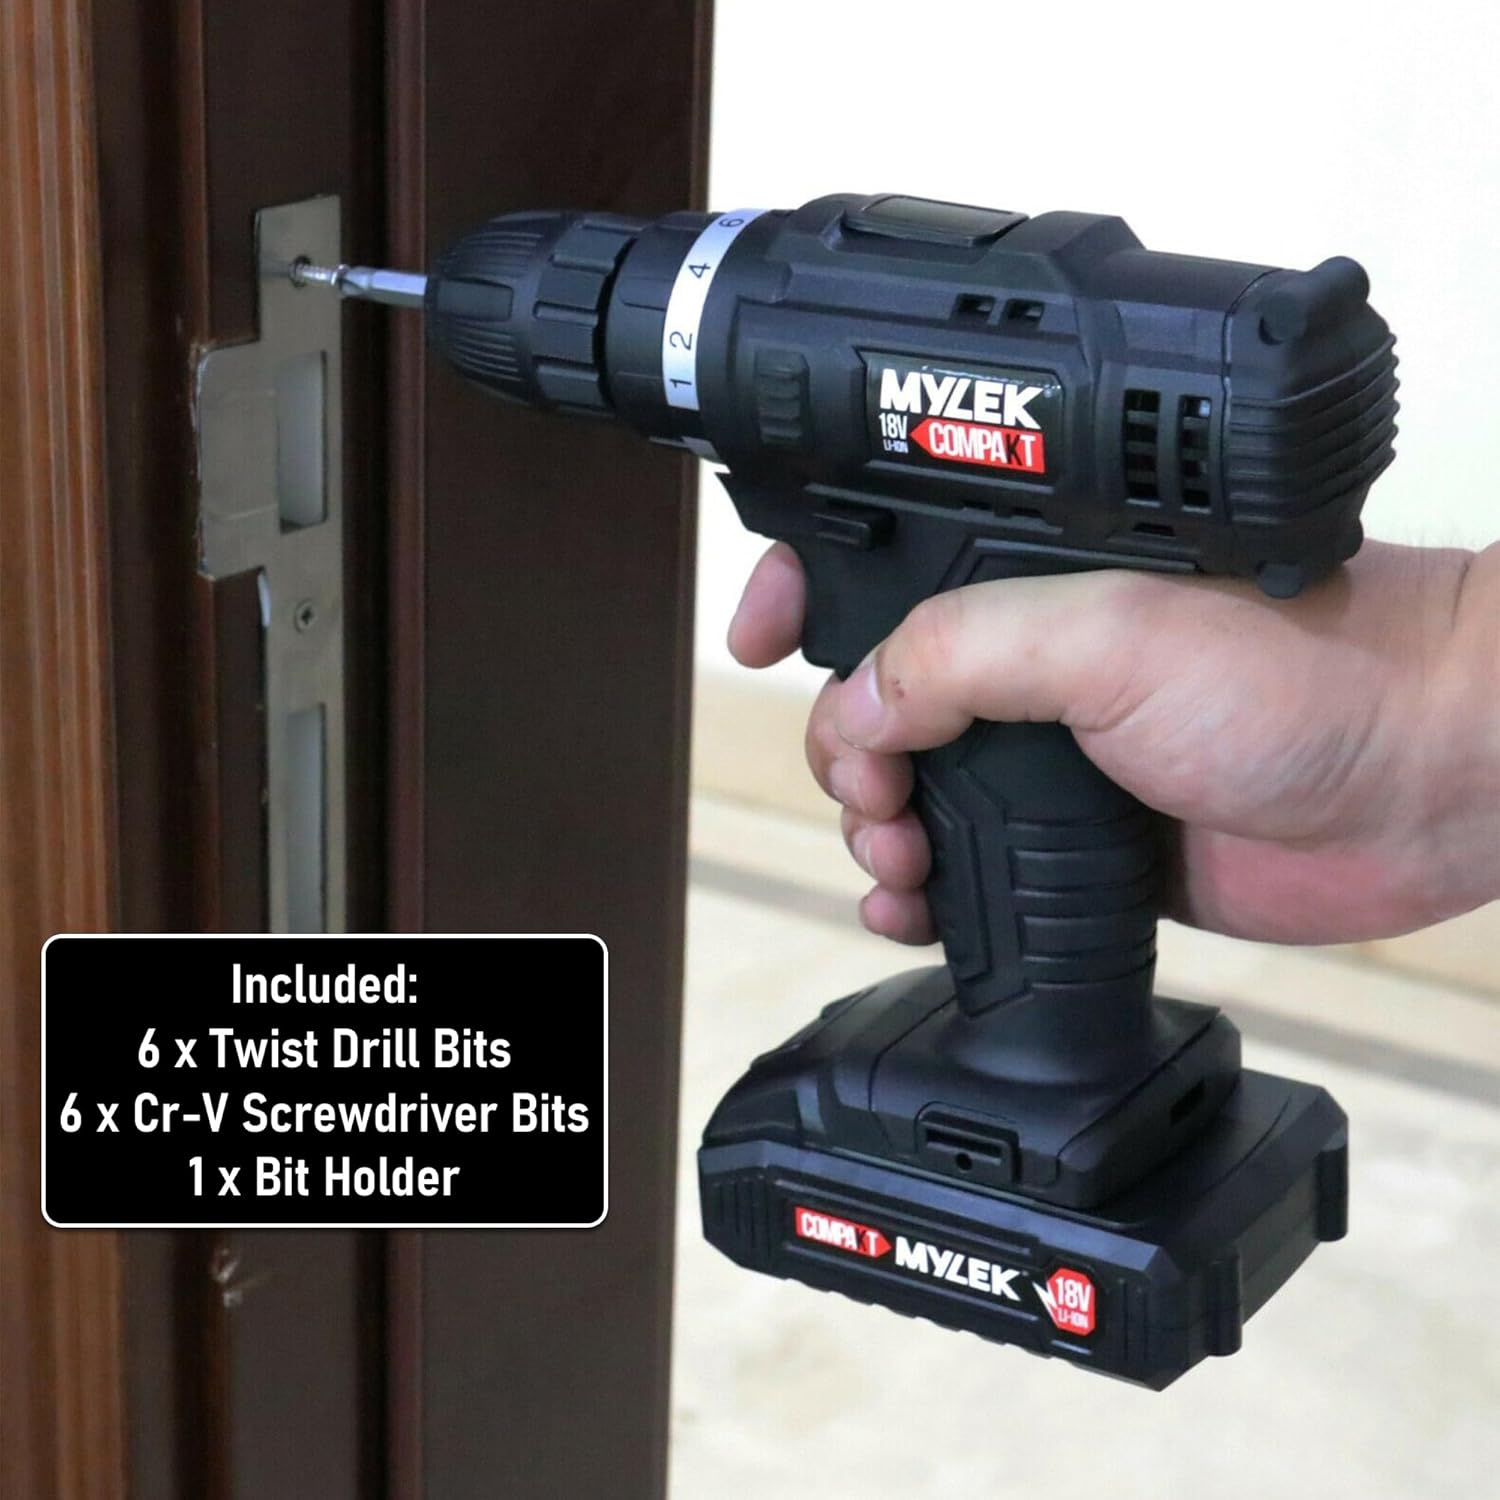
Figure 6: The MYLEK Cordless Drill in action, demonstrating its use for screwdriving tasks, such as installing hardware on a door.
Maintenance
Regular maintenance ensures the longevity and optimal performance of your MYLEK Cordless Drill.
- Cleaning: After each use, wipe the tool with a clean, damp cloth. Do not use harsh chemicals or abrasive cleaners. Keep the ventilation openings clear of dust and debris.
- Storage: Store the drill, battery, and charger in a cool, dry place, away from direct sunlight and moisture. Ensure the battery is removed from the drill before storage.
- Battery Care: Do not store the battery in a discharged state. Recharge it periodically if not used for extended periods to maintain battery health. Avoid exposing the battery to extreme temperatures.
- Chuck Maintenance: Periodically clean the chuck jaws to ensure proper gripping of bits.
Troubleshooting
Refer to the table below for common issues and their solutions.
| Problem | Possible Cause | Solution |
|---|---|---|
| Drill does not start. | Battery not charged or not properly installed. Forward/reverse switch in center (locked) position. | Ensure battery is fully charged and securely installed. Move forward/reverse switch to forward or reverse position. |
| Loss of power during operation. | Battery is low on charge. Overload protection activated. | Recharge the battery. Reduce pressure on the drill or use a lower torque setting. |
| Bit slips in chuck. | Chuck not tightened sufficiently. Bit shank is dirty or damaged. | Retighten the chuck firmly. Clean or replace the bit. |
| Drill overheats. | Continuous heavy use. Blocked ventilation. | Allow the drill to cool down. Ensure ventilation slots are clear. |
Specifications
| Feature | Detail |
|---|---|
| Brand | MYLEK |
| Model Number | MY2225 (Part No. MYW09) |
| Power Source | Battery Powered |
| Battery Type | 18V Lithium-Ion (1500mAh) |
| Voltage | 18 Volts (peaks at 20V) |
| Amperage | 2 Amps |
| Maximum Rotational Speed | 650 RPM (No Load) |
| Maximum Torque | 15 Newton Meters |
| Torque Settings | 18 + 1 (Drill Mode) |
| Chuck Size | 0.8 - 10mm Keyless Chuck |
| Drilling Capacity (Wood) | 20 mm |
| Drilling Capacity (Steel) | 8 mm |
| Item Weight | 1.2 kg (2.64 lbs) |
| Product Dimensions (L x W x H) | 9.65" x 8.27" x 3.82" |
| Included Components | 13pc Accessory Set, Battery, Charger |
Warranty and Support
This MYLEK product comes with a Two Year Warranty from the date of purchase, covering defects in materials and workmanship under normal use.
For warranty claims, technical support, or any inquiries regarding your MYLEK Cordless Drill, please contact MYLEK customer service. Refer to your purchase documentation or the MYLEK official website for the most current contact information.
Please have your model number (MY2225) and purchase date available when contacting support.


