Introduction
This manual provides essential information for the safe installation, operation, and maintenance of your X1 HRU206V 24-inch Hardwired Power Strip. Please read all instructions carefully before installation and use. Retain this manual for future reference.
Important Safety Warnings
- Professional Installation Required: Installation of this unit must be performed by a qualified professional, licensed electrician, or electrical engineer.
- Power Disconnection: Always switch off the main power supply before commencing any installation or maintenance work.
- Indoor Use Only: This unit is designed for indoor use exclusively.
- Avoid Wet Areas: Do not install or use this unit in or around wet or potentially wet environments, including but not limited to aquariums, saunas, showers, and fountains.
- Thunderstorm Precaution: Never install this unit during a thunderstorm.
- Load Capacity: Do not exceed the recommended maximum load of 1440W (125V/15A). This is not a 20 Amp unit.
Product Overview
The X1 HRU206V is a 24-inch hardwired power strip featuring six NEMA 5-15R tamper-resistant outlets and two USB Type-A charging ports. This model is designed without integrated mounting tabs (ears) and includes separate mounting clips for flexible installation.

Figure 1: X1 HRU206V Hardwired Power Strip with included mounting clips. The power strip features six tamper-resistant outlets and a USB charging port.
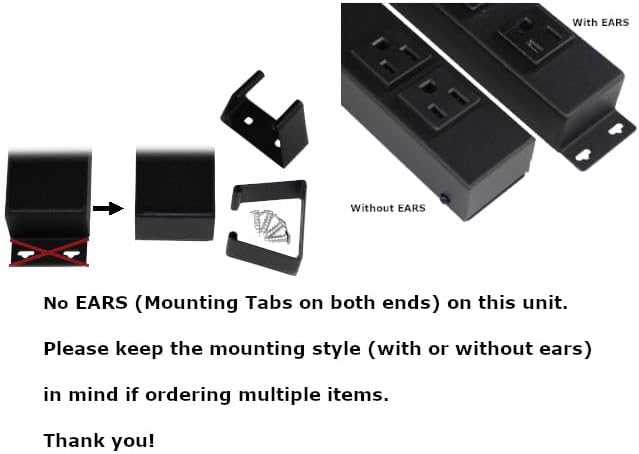
Figure 2: This model is designed without integrated mounting tabs (ears). Separate mounting clips are provided for installation flexibility.
Tamper-Resistant Outlets
The power strip is equipped with Tamper-Resistant (TR) outlets. These outlets feature an internal shutter mechanism that prevents the insertion of foreign objects, enhancing safety, especially in environments with children.
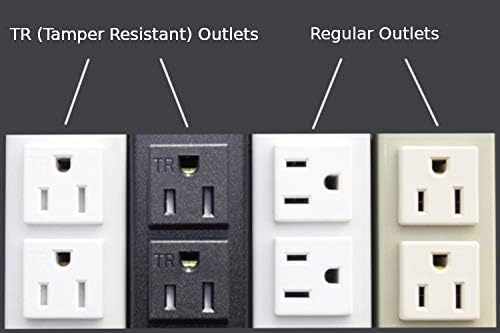
Figure 3: Illustration comparing Tamper-Resistant (TR) outlets, which have internal shutters for safety, with standard regular outlets.
Installation Instructions
WARNING: Installation must be performed by a licensed electrician. Ensure power is OFF before proceeding.
1. Prepare for Wiring
- Disconnect Power: Locate the circuit breaker controlling the installation area and switch it to the OFF position. Verify power is off using a voltage tester.
- Access Wiring Compartment: Remove the back cover of the power strip to access the internal wiring compartment.

Figure 4: Top image shows the internal wire connection area. Middle image shows the back cover. Bottom image shows the rear view of the power strip.
2. Wire Connection
- Select Knockout: Identify the desired knockout location for your wiring entry. The unit features 6 easily punched-off knockouts (1 on each side - top/bottom cover, both sides/ends).

Figure 5: The power strip casing includes 6 designated knockouts for flexible cord exit points.
- Punch Out: Carefully punch out the chosen knockout.
- Install Wire Clamp Connector (Not Included): A wire clamp connector may be needed to secure the incoming electrical wire to the power strip casing. This item is not included with your purchase.

Figure 6: An example of a wire clamp connector. This component is typically used to secure electrical wiring and is not supplied with the power strip.
- Connect Wires: Connect the electrical supply wires (14/3 AWG recommended) to the corresponding terminals inside the power strip. Use appropriate wire connectors (not included) for secure connections.

Figure 7: Various types of wire connectors (wire nuts) are required for making secure electrical connections. These are not included with the product.
- Secure Back Cover: Once wiring is complete and secure, reattach the back cover of the power strip.
3. Mounting the Power Strip
This power strip does not have integrated mounting ears. It comes with separate mounting clips for installation.
- Positioning: Determine the desired mounting location. Ensure it is a dry, indoor area.
- Attach Clips: Secure the included mounting clips to your desired surface using appropriate screws.
- Mount Power Strip: Slide the power strip into the mounted clips until it is securely held in place.

Figure 8: The back cover of the power strip features pre-drilled mounting holes, suitable for models without integrated ears, to facilitate secure installation.
Operating Instructions
- Restore Power: After installation is complete and verified by a professional, restore power at the circuit breaker.
- Using AC Outlets: Plug your devices into the six NEMA 5-15R tamper-resistant outlets. Ensure the total power draw does not exceed 1440W.
- Using USB Ports: Connect your USB-powered devices to the two USB Type-A ports for charging. The USB output is DC 5V/2.1A.
- Overload Protection: The unit is designed with internal protection. In case of an overload, the power strip may cease to function. Disconnect devices and reduce the load before attempting to reset (if applicable, this model does not specify a reset button, implying internal protection).
Maintenance
- Cleaning: Disconnect power to the unit before cleaning. Use a soft, dry cloth to wipe the exterior. Do not use liquid cleaners or abrasive materials.
- Inspection: Periodically inspect the power strip for any signs of damage, such as cracks in the casing or loose connections. If damage is found, discontinue use and consult a qualified electrician.
- Environmental Conditions: Ensure the power strip remains in a dry, indoor environment. Avoid exposure to extreme temperatures or humidity.
Troubleshooting
- No Power to Outlets/USB:
- Check the circuit breaker for the installed circuit. Ensure it is in the ON position.
- Verify that the power strip was correctly hardwired by a professional.
- Ensure the total connected load does not exceed 1440W. Disconnect some devices and retest.
- USB Devices Not Charging:
- Ensure the power strip has power.
- Check the USB cable and the device being charged for proper function.
- Verify the device's charging requirements are compatible with 5V/2.1A output.
- Loose Connections: If any part of the power strip feels loose or appears damaged, immediately disconnect power and contact a qualified electrician for inspection and repair. Do not attempt to repair yourself.
Specifications
| Model | HRU206V |
| Length | 24 inches (0.61m) |
| Dimensions (L x W x H) | 24" x 1.61" x 1.41" (610 x 41 x 35.8mm) |
| Casing/Outlet Height | 1.16" / 0.25" (29.5 / 6.3mm) |
| AC Outlets | 6 x NEMA 5-15R Tamper Resistant |
| USB Ports | 2 x Type-A |
| USB Output | DC 5V/2.1A |
| USB Input | AC 110-240V/0.5A/60Hz |
| Electrical Rating | 125V/15A/60Hz |
| Recommended Max Load | 1440W (Not a 20 Amp Unit) |
| Wiring | 14/3 AWG (Hardwired, No Power Cord) |
| Mounting | No integrated ears; includes mounting clips |
| Certifications | ETL Approved and Listed (Conforms to UL 5, 1310 and CAN/CSA C22.2 No. 62) |
| Color | Black |
Warranty and Support
For warranty information or technical support, please refer to the product packaging or contact the manufacturer directly. Keep your purchase receipt as proof of purchase.