
Introduction
This manual provides essential information for the safe and effective operation, maintenance, and troubleshooting of your Parkside PWS 230 C3 Angle Grinder. Please read these instructions carefully before using the tool and keep them for future reference. Proper use and adherence to safety guidelines will ensure optimal performance and extend the lifespan of your angle grinder.
General Safety Instructions
WARNING: Read all safety warnings, instructions, illustrations, and specifications provided with this power tool. Failure to follow all instructions listed below may result in electric shock, fire, and/or serious injury.
- Work Area Safety: Keep your work area clean and well-lit. Cluttered or dark areas invite accidents. Do not operate power tools in explosive atmospheres, such as in the presence of flammable liquids, gases, or dust.
- Electrical Safety: Power tool plugs must match the outlet. Never modify the plug in any way. Avoid body contact with earthed or grounded surfaces. Do not expose power tools to rain or wet conditions.
- Personal Safety: Always wear eye protection. Use personal protective equipment such as dust masks, non-skid safety shoes, hard hats, or hearing protection when appropriate. Dress properly; avoid loose clothing or jewelry.
- Power Tool Use and Care: Do not force the power tool. Use the correct power tool for your application. Disconnect the plug from the power source before making any adjustments, changing accessories, or storing power tools.
- Service: Have your power tool serviced by a qualified repair person using only identical replacement parts. This will ensure that the safety of the power tool is maintained.
- Specific Angle Grinder Safety:
- Always use the protective guard.
- Ensure the disc is correctly mounted and secured before operation.
- Do not use damaged or incorrect discs.
- Keep hands clear of the rotating disc.
- Secure the workpiece before grinding or cutting.
Product Overview
The Parkside PWS 230 C3 is a robust angle grinder designed for various cutting and grinding tasks. It features a powerful motor and user-friendly design for efficient operation.
Key Features:
- Robust aluminum housing for durability.
- Easy disc change with spindle lock (SPINDLE LOCK) mechanism.
- Non-slip rubberized handles for secure grip.
- Tool-free protective guard with quick adjustment.
- Main handle adjustable to 3 positions for ergonomic use.
- Auxiliary handle usable in 3 positions for enhanced control.
- Compatible with standard 230 mm diameter discs.
Components:


- Main Handle (adjustable)
- Auxiliary Handle
- Protective Guard
- Spindle Lock Button
- On/Off Switch
- Disc (sold separately)
- Power Cable
Setup
Before connecting the tool to the power supply, ensure all components are correctly assembled and secured.
1. Attaching the Protective Guard:
The protective guard is essential for safety. It can be adjusted quickly without tools.
- Slide the protective guard onto the grinder's collar.
- Rotate the guard to the desired position, ensuring it covers the disc adequately for your task.
- Secure the guard firmly using its quick-release mechanism.
2. Attaching the Auxiliary Handle:
The auxiliary handle provides additional grip and control. It can be positioned in 3 different locations.

- Screw the auxiliary handle into one of the three threaded openings on the grinder head.
- Tighten it securely by hand.
3. Installing/Changing the Grinding/Cutting Disc:
Always disconnect the tool from the power supply before changing discs.
- Press and hold the spindle lock button.
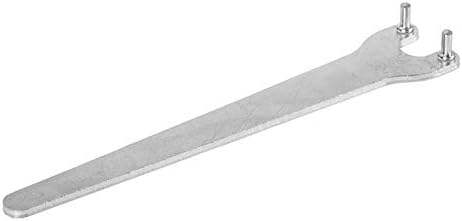
- Using the included two-hole mounting wrench, loosen the clamping nut by turning it counter-clockwise.
- Remove the old disc (if applicable) and the clamping nut.
- Place the new 230 mm disc onto the spindle, ensuring it sits correctly on the inner flange.
- Replace the clamping nut and tighten it clockwise using the two-hole wrench while holding the spindle lock button. Do not overtighten.
- Release the spindle lock button.
Operating Instructions
Always wear appropriate personal protective equipment, including eye protection, hearing protection, and gloves, before operating the angle grinder.
1. Powering On/Off:
- Connect the power cable to a suitable power outlet (230V).
- To turn on, slide the On/Off switch forward. For continuous operation, push the switch further forward until it locks.
- To turn off, release the switch. If locked, press the rear part of the switch to release it.
2. Grinding and Cutting Techniques:

- Secure Workpiece: Always clamp or secure the workpiece firmly to prevent movement during operation.
- Starting: Allow the disc to reach full speed before making contact with the workpiece.
- Grinding: Apply light, even pressure. Move the grinder smoothly across the surface. Avoid excessive pressure, which can damage the disc and the tool.
- Cutting: For cutting, use a cutting disc. Make shallow passes, gradually increasing depth. Do not twist or bend the disc during cutting, as this can cause kickback or disc breakage.
- Cooling: For prolonged use, allow the tool to cool periodically to prevent overheating.
- Finishing: After use, turn off the grinder and wait for the disc to stop completely before setting the tool down.

Maintenance
Regular maintenance ensures the longevity and safe operation of your angle grinder. Always disconnect the tool from the power supply before performing any maintenance.
- Cleaning:
- Clean the ventilation slots regularly to prevent motor overheating. Use a soft brush or compressed air.
- Wipe the tool housing with a damp cloth. Do not use harsh chemicals or abrasive cleaners.
- Disc Inspection:
- Before each use, inspect the grinding/cutting disc for cracks, chips, or excessive wear. Replace damaged discs immediately.
- Ensure the disc is securely mounted.
- Cable Inspection: Regularly check the power cable for any signs of damage. If damaged, have it replaced by a qualified technician.
- Storage: Store the angle grinder in a dry, secure place, out of reach of children.
Troubleshooting
This section addresses common issues you might encounter with your Parkside PWS 230 C3 Angle Grinder.
| Problem | Possible Cause | Solution |
|---|---|---|
| Tool does not start. | No power supply. Faulty power switch. | Check power outlet and cable. Contact qualified service personnel. |
| Excessive vibration. | Disc improperly mounted or damaged. Worn bearings. | Check disc mounting; replace if damaged. Contact qualified service personnel. |
| Motor overheats. | Blocked ventilation slots. Overloading the tool. | Clean ventilation slots. Reduce pressure; allow tool to cool. |
| Disc not spinning freely. | Spindle lock engaged. Obstruction. | Ensure spindle lock is disengaged. Check for debris around the disc. |
Specifications
Technical data for the Parkside PWS 230 C3 Angle Grinder.
| Model: | PWS 230 C3 |
| Brand: | Parkside |
| Power Input: | 2000 W |
| No-load Speed: | 6500 rpm |
| Disc Diameter: | 230 mm |
| Voltage: | 230 V |
| Sound Pressure Level (Lpa): | 92 dB (A) |
| Main Material: | Aluminum |
| Cable Length: | Approx. 4 m |
| Weight (without accessories): | Approx. 4.25 kg |
| Dimensions (Angle Grinder): | L 473 x H 105 x P 139 mm |
Warranty and Support
For warranty information, technical support, or spare parts, please refer to the documentation provided with your purchase or contact Parkside customer service. Keep your proof of purchase for warranty claims.
Information regarding spare parts availability is not provided in the product data. Please contact the manufacturer or your retailer for details.