1. Introduction
The NVX XLCA2 X-Series 2-Channel Line Out Converter is designed to seamlessly integrate aftermarket amplifiers, speakers, and subwoofers with your vehicle's factory car stereo system. Modern factory stereos often come with advanced features like large touchscreens, hands-free Bluetooth, Apple CarPlay, and Android Auto, making it undesirable to replace them. However, these factory units may not provide the necessary low-level RCA outputs or optimal bass response required for high-performance aftermarket audio components.
The XLCA2 addresses these challenges by converting high-level speaker signals from your factory head unit into clean, low-level RCA signals, while also restoring lost bass frequencies with its advanced xBOOST technology. This manual provides detailed instructions for setting up, operating, and maintaining your NVX XLCA2 to ensure optimal audio performance.

Figure 1: The NVX XLCA2 X-Series 2-Channel Line Out Converter, including the main unit, remote bass knob, and connecting cable.
2. Key Features
2.1 High-Power 2-Channel Line Out Converter
The NVX XLCA2 is a robust 2-channel line out converter capable of handling speaker-level inputs up to 400 watts RMS per channel. It efficiently converts these high-level signals to low-level RCA signals, making it compatible with a wide range of aftermarket amplifiers. This ensures a clean signal transfer without degradation, crucial for high-fidelity audio systems.

Figure 2: The NVX XLCA2 seamlessly integrates with existing factory car stereos, allowing for audio system upgrades without replacing the head unit.
2.2 xBOOST Technology for Enhanced Bass
Factory head units often implement a bass roll-off at higher volumes to protect their stock woofers. The XLCA2 features xBOOST technology, which intelligently detects and restores these lost bass frequencies. This ensures a deep, powerful, and undistorted bass response from your aftermarket subwoofers and speakers, even at high volume levels. The restored signal provides a full-range audio experience that factory systems often lack.

Figure 3: Adjustable controls on the XLCA2 for fine-tuning Bass Level, Main Level, and Bass-X (xBOOST) settings.
2.3 Selectable Auto-On for Efficiency
The Selectable Auto-On feature allows the XLCA2 to automatically power on when it detects an audio signal from the factory stereo. This eliminates the need for a separate remote turn-on wire from the head unit, simplifying installation and ensuring the unit only draws power when the vehicle's audio system is active. This feature also helps prevent turn-on and turn-off pops that can occur with basic line output converters.
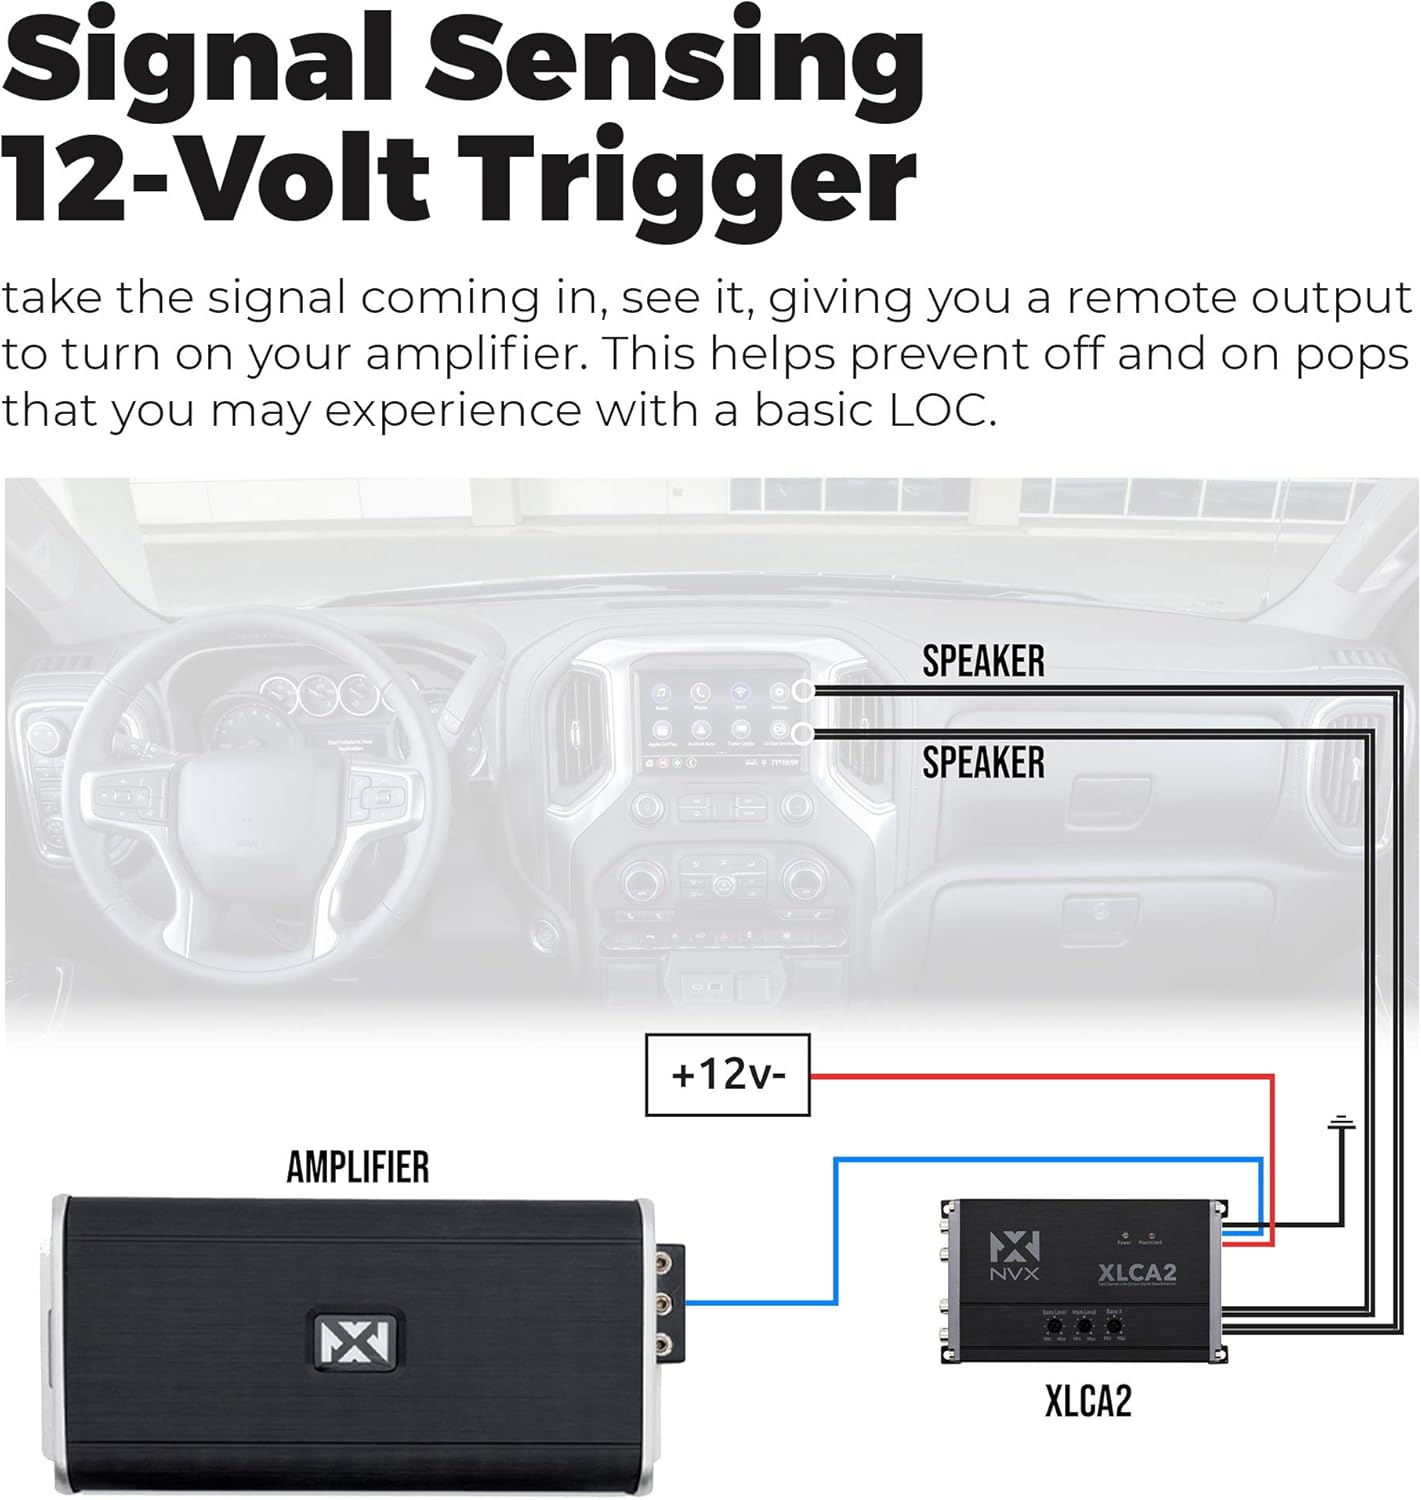
Figure 4: Wiring diagram illustrating the signal sensing 12-volt trigger connection for automatic amplifier turn-on.
2.4 Remote Bass Control Included
For convenient bass adjustment, the XLCA2 includes a remote bass knob. This allows you to easily control the subwoofer output level directly from the driver's seat, providing on-the-fly adjustments to suit your listening preferences and music genre.

Figure 5: The included remote bass level control provides convenient adjustment of bass output.
2.5 Versatile Output Options
The XLCA2 offers a 9.5V pre-out, a 12V trigger out, and dual amplifier outputs. These versatile options provide flexibility for complex car audio setups, ensuring compatibility with various amplifiers and audio system configurations. The high pre-amp output voltage helps deliver a cleaner, less distorted signal to your amplifiers, allowing for lower gain settings and reduced noise.

Figure 6: Rear panel connections of the XLCA2, including RCA outputs for bass and main signals, and the Bass-X Threshold adjustment.
3. Setup and Installation
Proper installation is crucial for optimal performance of your NVX XLCA2. It is recommended that installation be performed by a qualified car audio professional. Always disconnect the vehicle's battery before beginning any electrical work.
3.1 Wiring Connections
- Speaker Level Inputs: Connect the high-level speaker outputs from your factory head unit or amplifier to the speaker input terminals on the XLCA2. Ensure correct polarity (+/-) for each channel. The XLCA2 can accept up to 400 watts RMS per channel.
- RCA Outputs: Connect the RCA outputs (Bass Output and Main Output) from the XLCA2 to the corresponding RCA inputs on your aftermarket amplifiers.
- Power (REM In +12V): Connect a +12V constant power source to the REM In terminal.
- Ground (GND): Connect the GND terminal to a solid chassis ground point in the vehicle.
- Remote Turn-On (REM Out): The XLCA2 provides a 12V remote output to turn on your aftermarket amplifiers. Connect this to the remote turn-on input of your amplifiers. This feature is activated by the signal sensing technology.
- Remote Bass Knob: Connect the remote bass knob to the dedicated Bass REM port on the XLCA2 using the provided cable.

Figure 7: Included connectors and mounting hardware for secure installation.
3.2 Initial Setup
After all connections are made, re-connect the vehicle's battery. Turn on your factory head unit. The XLCA2 should power on automatically via its signal sensing feature. Verify that your aftermarket amplifiers also turn on.
Video 1: An overview of the NVX XLCA2, demonstrating its features, unboxing, and basic connections. This video provides visual guidance for understanding the product and its setup.
4. Operating Instructions
The NVX XLCA2 features several adjustable controls to optimize your audio system's performance.
4.1 Main Level Adjustment
The Main Level knob controls the overall output voltage of the main RCA outputs. Adjust this to match the input sensitivity of your main full-range amplifier(s). Start with the knob at minimum and slowly increase until a clean, undistorted signal is achieved at your amplifier's input.
4.2 Bass Level Adjustment
The Bass Level knob controls the output voltage of the bass RCA outputs. Adjust this to match the input sensitivity of your subwoofer amplifier. This setting works in conjunction with the remote bass knob.
4.3 Bass-X Threshold Adjustment
The Bass-X Threshold knob adjusts the sensitivity of the xBOOST bass restoration circuit. This allows you to fine-tune how aggressively the XLCA2 restores lost bass frequencies. Experiment with this setting to achieve the desired bass impact without over-boosting or distortion.
4.4 Remote Bass Knob Operation
The remote bass knob provides convenient, real-time control over the bass output level. Turn the knob clockwise to increase bass and counter-clockwise to decrease it. This allows for quick adjustments based on music content or personal preference while driving.
5. Maintenance
The NVX XLCA2 is designed for reliable operation with minimal maintenance. To ensure longevity and optimal performance:
- Cleaning: Periodically wipe the unit with a soft, dry cloth to remove dust and debris. Avoid using harsh chemicals or abrasive cleaners.
- Connections: Occasionally check all wiring connections to ensure they are secure and free from corrosion. Loose connections can lead to signal loss or intermittent performance.
- Ventilation: Ensure the unit is installed in a location with adequate ventilation to prevent overheating. Do not block any ventilation openings.
6. Troubleshooting
If you experience issues with your NVX XLCA2, refer to the following common troubleshooting steps:
| Problem | Possible Cause | Solution |
|---|---|---|
| No Power/No Indicator Light | No +12V power; No ground connection; Blown fuse (if applicable); No signal detected (if Auto-On is enabled). | Check +12V and GND connections; Verify fuse integrity; Ensure audio signal is present from head unit. |
| No Audio Output | Incorrect input/output connections; RCA cables faulty; Amplifier not powered on or faulty. | Verify all speaker-level inputs and RCA outputs are correctly connected; Test RCA cables; Check amplifier power and functionality. |
| Distorted Audio | Input signal too high; Output level set too high; Amplifier gain set too high. | Reduce factory head unit volume; Lower Main Level or Bass Level on XLCA2; Adjust amplifier gain settings. |
| Weak Bass Output | Bass Level or Bass-X Threshold set too low; Subwoofer amplifier gain too low; Incorrect polarity on speaker inputs. | Increase Bass Level and Bass-X Threshold; Adjust subwoofer amplifier gain; Verify correct speaker input polarity. |
| Turn-On/Off Pops | Ground loop; Amplifier turn-on delay issue. | Ensure proper grounding; Check amplifier's turn-on sequence. The XLCA2's signal sensing helps minimize this. |
If the problem persists after following these steps, contact NVX customer support or a certified car audio technician.
7. Specifications
| Specification | Value |
|---|---|
| Brand | NVX |
| Model Number | XLCA2 |
| Number of Channels | 2 |
| Maximum Supply Voltage | 9.5 Volts (Pre-out) |
| Interface Type | RCA, Coaxial |
| Mounting Type | Surface Mount |
| Item Weight | 1.21 pounds |
| Package Dimensions | 8.62 x 6.26 x 1.85 inches |
| Color | Black |
8. Warranty and Support
8.1 Warranty Information
For detailed warranty information regarding your NVX XLCA2, please refer to the warranty card included in the product packaging or visit the official NVX website. Warranty terms and conditions may vary based on region and retailer.
8.2 Customer Support
If you require technical assistance, have questions about installation, or need to report a product issue, please contact NVX customer support. Contact information can typically be found on the official NVX website or in the product documentation.


