1. Introduction
Thank you for choosing the LoraTap Smart Roller Shutter Switch. This device allows you to control your motorized roller shutters, blinds, or curtains via Wi-Fi using a smartphone application, an RF remote control, or voice commands through smart assistants like Amazon Alexa and Google Home. It also features a programmable timer function for automated operation. Please read this manual thoroughly before installation and use to ensure proper functionality and safety.
2. Safety Information
- Electrical Installation: Installation should only be performed by a qualified electrician or a person with a thorough understanding of electrical wiring.
- Power Disconnection: Always disconnect power at the circuit breaker before performing any electrical work.
- Voltage: Ensure the operating voltage of your motor matches the switch's specifications (240 Volts).
- Motor Compatibility: This switch is compatible only with 4-wire motors (Live, Neutral, Up, Down). A neutral wire is required for operation.
- Load Capacity: Do not exceed the maximum load capacity of 600 Watts.
- Indoor Use Only: This device is designed for indoor use in dry environments.
3. Package Contents
- LoraTap Smart Roller Shutter Switch (Model HU-XI-179)
- RF Remote Control (battery included)
- Mounting Screws
- Terminal Block
- User Manual
4. Specifications
| Model Reference | HU-XI-179 |
| Brand | LoraTap |
| Color | White |
| Material | Tempered Glass |
| Operating Voltage | 240 Volts |
| Current Rating | 10 A |
| Max Load Power | 600 Watts |
| Switch Type | Touch, 1-way |
| Operating Mode | ON-ON-OFF |
| Connectivity | Wi-Fi (2.4GHz only), RF |
| Motor Compatibility | 4-wire motors (Live, Neutral, Up, Down) |
| Dimensions (Switch) | 86mm x 86mm x 30mm (approx.) |
| Battery (Remote) | 1 C Lithium metal (included) |
5. Setup
5.1. Electrical Installation and Wiring
Important: Ensure power is disconnected at the main circuit breaker before starting any wiring. This switch requires a neutral wire for operation.

Figure 5.1: Wiring Diagram
Follow this wiring diagram carefully for correct installation. The switch requires connection to a 4-wire motor (Live, Neutral, Up, Down).
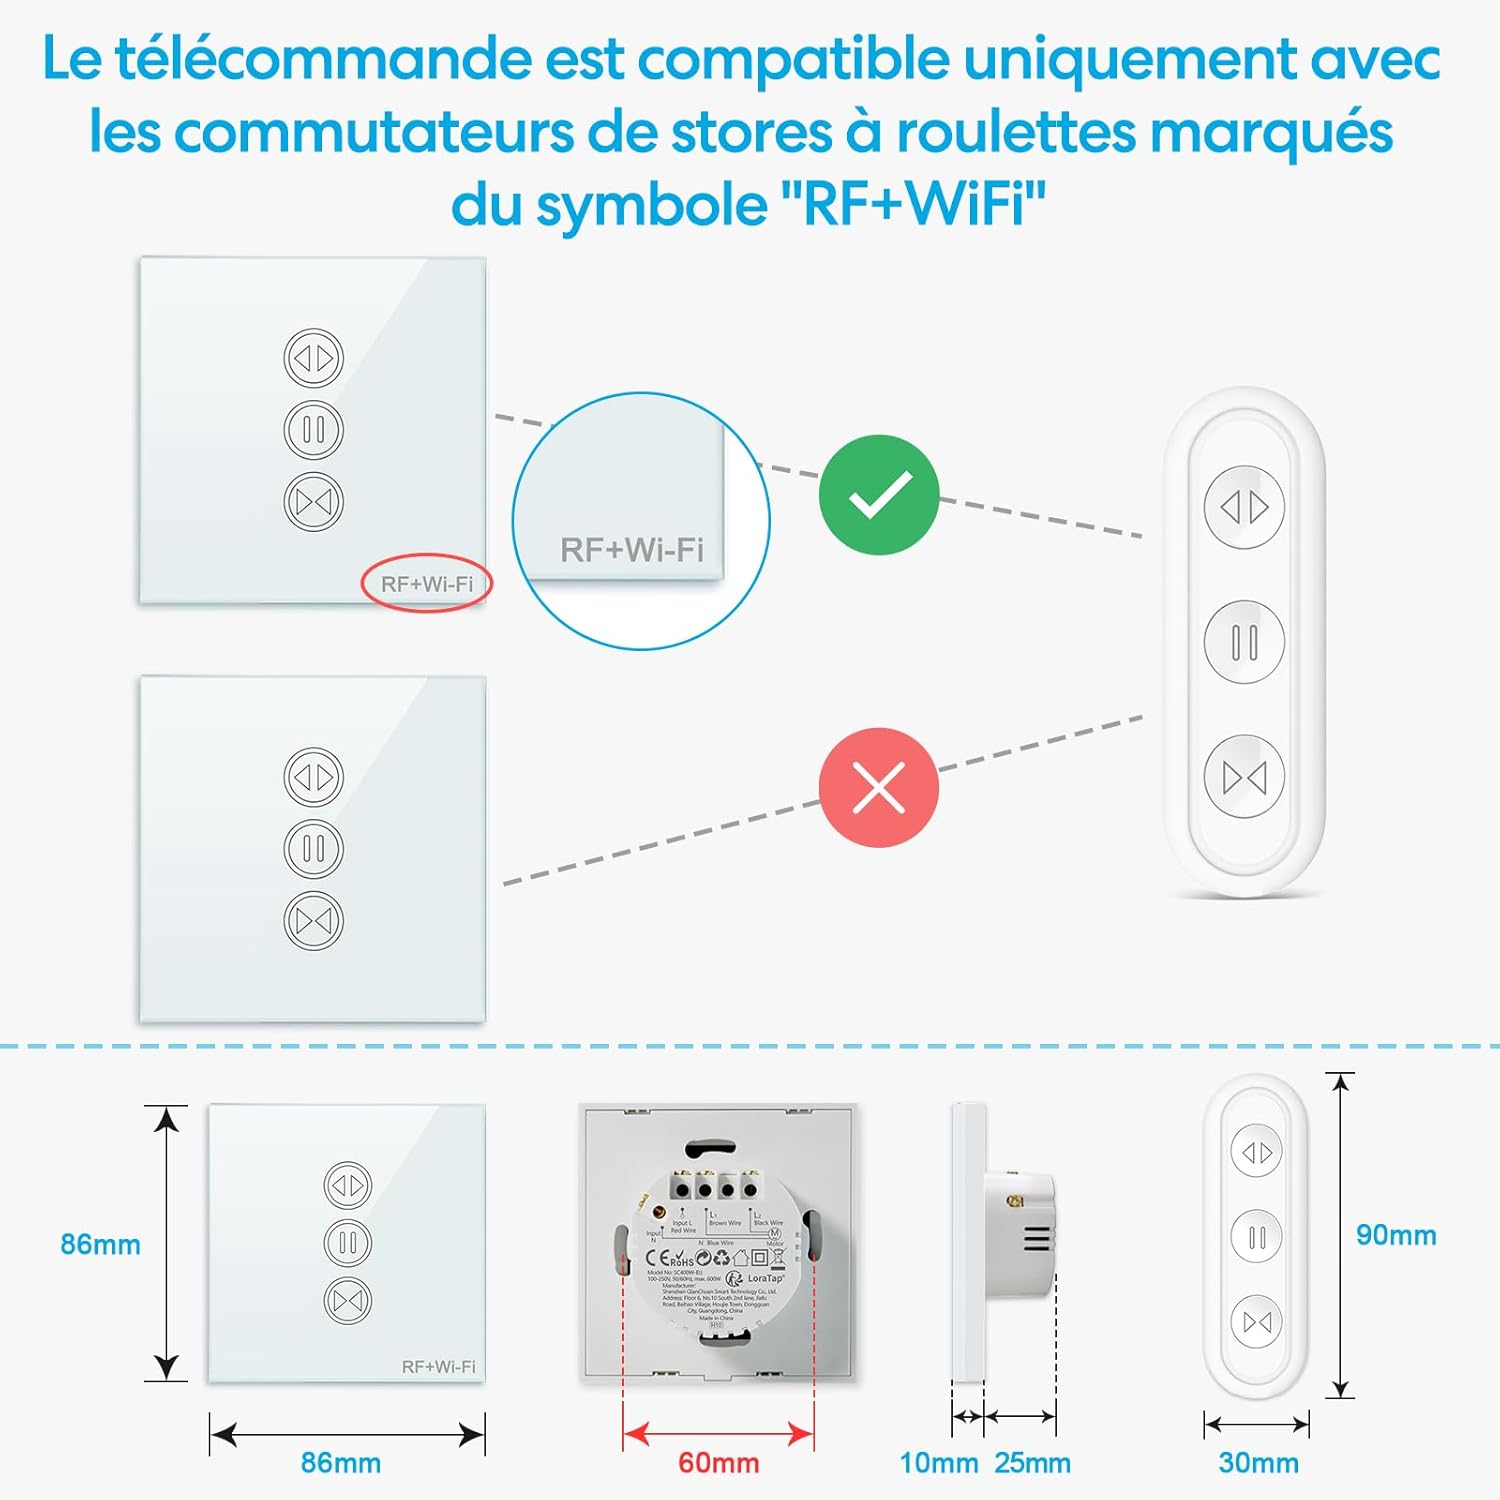
Figure 5.2: Motor Compatibility Note
This switch is compatible only with motors that have 4 wires (Live, Neutral, Up, Down). A neutral wire is essential for operation. Maximum load capacity is 600W.
- Turn off the main power supply at your circuit breaker.
- Remove your existing switch (if any).
- Connect the wires to the LoraTap switch according to the wiring diagram (Figure 5.1):
- L (Input Live): Connect to your household live wire.
- N (Input Neutral): Connect to your household neutral wire.
- L1 (Output Up): Connect to the motor's 'Up' wire.
- L2 (Output Down): Connect to the motor's 'Down' wire.
- N (Output Neutral): Connect to the motor's neutral wire.
- Mount the switch securely into the wall box.
- Restore power at the circuit breaker.
5.2. Wi-Fi Network Requirements
The LoraTap Smart Roller Shutter Switch operates on a 2.4GHz Wi-Fi network. It is not compatible with 5GHz Wi-Fi networks or combined 2.4GHz/5GHz networks unless your router allows for separate 2.4GHz configuration.

Figure 5.3: Wi-Fi Signal Range
For optimal Wi-Fi performance, ensure the switch is installed within 10 meters of your 2.4GHz Wi-Fi router.
5.3. App Pairing (Smart Life / Tuya App)
To enable smart control features, you need to pair the switch with the Smart Life or Tuya app.

Figure 5.4: Easy Pairing Process
Follow these steps to pair your switch with the Smart Life or Tuya app.
- Download the "Smart Life" or "Tuya Smart" app from the App Store (iOS) or Google Play Store (Android).
- Register or log in to your account.
- Ensure your smartphone is connected to a 2.4GHz Wi-Fi network.
- On the app's home screen, tap the "+" icon (or "Add Device").
- Select "Curtain Switch" or similar device type from the list.
- Follow the in-app instructions to put the switch into pairing mode (usually by pressing and holding a button on the switch until an indicator light flashes rapidly).
- Confirm the indicator light is flashing rapidly in the app.
- Enter your 2.4GHz Wi-Fi network password.
- Wait for the device to connect. Once successfully added, you can rename the device.
6. Operating Instructions
6.1. Manual Touch Control
The switch features a responsive touch panel for direct control.

Figure 6.1: Touch Panel and RF Remote Control
Operate the switch using the responsive touch panel directly or via the included RF remote control.
- Up Arrow: Touch to open the roller shutter.
- Down Arrow: Touch to close the roller shutter.
- Pause Button: Touch to stop the roller shutter at its current position.
6.2. RF Remote Control
The included RF remote control provides convenient wireless operation.

Figure 6.2: Remote Compatibility and Dimensions
The RF remote is compatible only with LoraTap switches featuring the 'RF+Wi-Fi' marking. Dimensions of the switch and remote are provided for installation planning.
- The remote is typically pre-paired with the switch. If not, refer to the pairing instructions in the remote's separate manual or contact support.
- Use the Up, Down, and Pause buttons on the remote to control the roller shutter.
6.3. App Control (Smart Life / Tuya App)
After successful pairing, you can control your roller shutters from anywhere using the app.

Figure 6.3: Remote Control via App
Control your roller shutters remotely from anywhere using the Smart Life or Tuya application on your smartphone.
- Open the Smart Life or Tuya app and select your roller shutter switch.
- Use the virtual buttons to open, close, or pause the roller shutter.
- Partial Opening/Closing: The updated switch allows you to set the motor's running time in the app to achieve partial opening or closing (e.g., 30% or 50%). Adjust this setting in the device's control interface within the app.
6.4. Voice Control (Alexa / Google Home)
Integrate your switch with Amazon Alexa or Google Home for hands-free control.

Figure 6.4: Voice Control Integration
Integrate with Amazon Alexa or Google Home for convenient voice control of your roller shutters.
- In the Smart Life/Tuya app, go to the device settings and link your Amazon Alexa or Google Home account.
- Discover new devices in your Alexa or Google Home app.
- Use voice commands such as:
"Alexa, open [Device Name]"
"Hey Google, close [Device Name]"
"Alexa, stop [Device Name]"
6.5. Timer Function
Automate your roller shutters by setting schedules in the app.

Figure 6.5: Timer Function Setup
Set custom schedules and timers through the app to automatically open or close your roller shutters at specific times.
- In the Smart Life/Tuya app, select your device and navigate to the "Schedule" or "Timer" section.
- Add new schedules, specifying the time, action (open/close), and repetition days.
7. Maintenance
- Cleaning: Wipe the glass panel with a soft, dry cloth. Do not use abrasive cleaners or solvents.
- Connections: Periodically check electrical connections for tightness, especially after initial installation.
- Firmware Updates: Keep the Smart Life/Tuya app updated to receive the latest features and security patches for your device.
- Remote Battery: Replace the remote control battery (Type C Lithium metal) when its performance degrades.
8. Troubleshooting
- Switch Not Responding:
- Check if the main power supply is on.
- Verify all wiring connections are secure and correct according to the diagram.
- Ensure the motor is a 4-wire type and a neutral wire is connected.
- Wi-Fi Connection Issues:
- Confirm your Wi-Fi network is 2.4GHz. The switch does not support 5GHz.
- Ensure the switch is within 10 meters of your Wi-Fi router.
- Check your Wi-Fi password for accuracy during pairing.
- Try restarting your Wi-Fi router and the switch.
- If pairing fails, try resetting the switch (refer to app instructions for specific reset procedure, usually holding a button for several seconds until indicator flashes differently).
- RF Remote Not Working:
- Check the remote control battery and replace if necessary.
- Ensure the switch has the "RF+Wi-Fi" marking for compatibility.
- If the remote was previously working, it might need re-pairing. Refer to the remote's manual for pairing instructions.
- Voice Control Not Working:
- Verify that the Smart Life/Tuya account is correctly linked to your Alexa or Google Home account.
- Ensure the device is discovered and enabled in your smart assistant app.
- Use the exact device name configured in the Smart Life/Tuya app.
9. Warranty and Support
The LoraTap Smart Roller Shutter Switch comes with a 3-year warranty from the date of purchase. This warranty covers manufacturing defects and ensures the product is free from defects in materials and workmanship under normal use.
For technical support, troubleshooting assistance, or warranty claims, please contact LoraTap customer service through the retailer where you purchased the product or visit the official LoraTap website for contact information.
Certifications: This product is CE and RoHS certified, ensuring compliance with European safety, health, and environmental protection requirements.


