1. Introduction
This user manual provides detailed instructions for the assembly, operation, and programming of the KEYESTUDIO Mini Tank Kit V2 Smart Car. Designed for enthusiasts and learners, this kit offers an engaging platform for exploring electronics, robotics, and programming concepts using Arduino and Mixly. Please read this manual thoroughly before beginning assembly or operation to ensure proper functionality and a rewarding experience.

Figure 1: Fully assembled KEYESTUDIO Mini Tank Kit V2 Smart Car, showcasing its tracked design and ultrasonic sensor array.
2. Product Overview
2.1 Key Features
- 2-in-1 Car Kit and Electronics Kit: Compatible with Arduino and Mixly for learning electronics and programming.
- Multiple Control Modes: Supports infrared (IR) remote control and Bluetooth APP control (iOS and Android).
- Autonomous Functions: Features obstacle detection, avoidance, following, light following, and ultrasonic following.
- Visual Feedback: Equipped with an 8x16 LED panel to display movement status and other information.
- Project-Based Learning: Includes 15 detailed online projects for coding and electronics education.
- Simple Assembly: Designed with clear instructions and organized parts for straightforward construction.
2.2 Components
The KEYESTUDIO Mini Tank Kit V2 includes a variety of electronic modules, mechanical parts, and fasteners necessary for assembly. Key components include:
- Arduino-compatible V4.0 Development Board
- V5 Sensor Shield
- L298P Motor Driver Shield
- Ultrasonic Sensor Module
- IR Receiver Module and Remote Control
- Bluetooth (BT-4.0) Module
- 8x16 LED Matrix Panel
- Photocell Sensors
- Metal Motors and Tracked Wheels
- Servo Motor
- Acrylic chassis plates and various fasteners (screws, nuts, standoffs)
- USB Cable for programming
- Battery case (requires 2x 18650 batteries, not included)

Figure 2: An organized display of all parts and components included in the kit, with labels for identification.
3. Safety Information
Please observe the following safety guidelines to prevent injury or damage to the product:
- Keep small components away from young children to avoid choking hazards.
- Ensure all power connections are correct before applying power to prevent short circuits or component damage.
- Use only recommended battery types (18650 lithium-ion batteries) and ensure correct polarity. Batteries are not included and must be purchased separately.
- Avoid contact with moving parts during operation.
- Do not expose electronic components to water or extreme temperatures.
- If any component appears damaged, do not use it. Contact support for replacements.
4. Setup and Assembly
The KEYESTUDIO Mini Tank Kit V2 requires assembly. A detailed online tutorial is available on the KEYESTUDIO website, which includes step-by-step instructions and visual aids.
4.1 Pre-Assembly Checklist
- Verify all components listed in Section 2.2 are present.
- Gather necessary tools (small screwdrivers, pliers, etc. - some tools are included).
- Obtain two 18650 rechargeable lithium-ion batteries. These are essential for powering the robot and are not included in the kit.
- Access the online assembly guide from the official KEYESTUDIO website.
4.2 Assembly Steps
Follow the comprehensive online assembly guide provided by KEYESTUDIO. The guide typically covers:
- Chassis construction and motor installation.
- Tracked wheel assembly.
- Mounting of the Arduino-compatible board, sensor shield, and motor driver.
- Wiring of all sensors (ultrasonic, photocell, IR receiver), LED panel, and Bluetooth module.
- Installation of the battery case and connection to the power system.
- Final checks and securing all components.

Figure 3: Detailed view of the stacked electronic boards (V4.0 Development Board, L298P Shield, V5 Sensor Shield) and the HM-10 BT-4.0 Module, illustrating the modular design.
5. Operating Instructions
Once assembled and programmed, the Mini Tank Kit V2 can perform various functions and be controlled through different methods.
5.1 Powering On
Insert the two charged 18650 batteries into the battery case, ensuring correct polarity. Connect the battery case to the robot's power input. The robot should power on, and the 8x16 LED panel may display an initial message or pattern.
5.2 Control Methods
- Infrared (IR) Remote Control: Use the provided IR remote to manually steer the tank. Ensure the remote is pointed towards the IR receiver on the robot.
- Bluetooth APP Control: Download the official KEYESTUDIO Bluetooth APP (available for iOS and Android). Pair your mobile device with the robot via Bluetooth. The app provides a graphical interface for controlling movement and activating various functions. Note: Some users have reported issues with Google Play Store versions of the app; refer to the official KEYESTUDIO website for the recommended app download link.

Figure 4: Operating the Mini Tank Kit V2 using the included infrared remote control.

Figure 5: Controlling the Mini Tank Kit V2 using a smartphone application, demonstrating wireless operation.
5.3 Autonomous Functions
The robot can be programmed to perform various autonomous tasks:
- Obstacle Avoidance: Utilizes the ultrasonic sensor to detect objects and navigate around them.
- Obstacle Following: Can be programmed to maintain a set distance from an object and follow its movement.
- Light Following: Uses photocell sensors to detect light sources and move towards them.
- Ultrasonic Following: Similar to obstacle following, but specifically uses ultrasonic data to track objects.
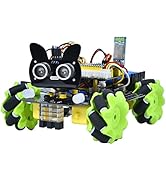
Figure 6: The robot demonstrating its light-following function, moving towards a light source.
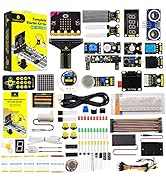
Figure 7: The robot performing obstacle following, maintaining a distance from a hand.
6. Programming Guide
The KEYESTUDIO Mini Tank Kit V2 is designed for programming education and supports two primary platforms: Arduino IDE (C language) and Mixly (block-based programming).
6.1 Software Installation
- Arduino IDE: Download and install the Arduino IDE from the official Arduino website. Ensure you install the necessary board definitions and libraries for the KEYESTUDIO V4.0 Development Board.
- Mixly: Download and install Mixly software from the KEYESTUDIO website. Mixly provides a visual, drag-and-drop programming environment, ideal for beginners.
6.2 Uploading Code
Connect the robot to your computer using the provided USB cable. Follow the instructions in the online tutorials to upload example code or your custom programs to the Arduino-compatible board.
6.3 Online Projects and Tutorials
KEYESTUDIO provides 15 detailed online projects that guide users through various programming concepts and robot functionalities. These projects range from basic movement to advanced sensor integration and control. Access these tutorials on the official KEYESTUDIO website.

Figure 8: Comparison of programming environments: C language code in Arduino IDE (left) and block-based programming in Mixly Software (right).
7. Maintenance
Regular maintenance ensures the longevity and optimal performance of your Mini Tank Kit V2.
- Cleaning: Gently wipe the robot's surfaces with a dry, soft cloth. Avoid using liquids or harsh chemicals.
- Battery Care: Always use fully charged 18650 batteries. Remove batteries if the robot will not be used for an extended period. Store batteries in a cool, dry place.
- Component Checks: Periodically inspect all connections and wires for looseness or damage. Ensure tracks are clean and free of debris.
- Software Updates: Check the KEYESTUDIO website for any firmware or software updates for improved functionality.
8. Troubleshooting
If you encounter issues with your Mini Tank Kit V2, refer to the following common problems and solutions:
| Problem | Possible Cause | Solution |
|---|---|---|
| Robot does not power on. |
|
|
| IR remote control is unresponsive. |
|
|
| Bluetooth APP cannot connect. |
|
|
| Robot moves erratically or not as expected. |
|
|
9. Specifications
- Model: Mini Tank Kit V2
- Brand: KEYESTUDIO
- ASIN: B07X4W7SZ5
- Package Dimensions: 11.57 x 5.91 x 3.03 inches (29.39 x 15.01 x 7.70 cm)
- Item Weight: 2.13 pounds (0.966 kg)
- Power Source: 2 x 18650 Lithium-ion batteries (not included)
- Control: IR Remote, Bluetooth APP (iOS/Android)
- Programming: Arduino IDE (C language), Mixly (Block-based)
- Sensors: Ultrasonic, Photocell, IR Receiver
- Display: 8x16 LED Matrix Panel
10. Warranty and Support
KEYESTUDIO is committed to providing quality products and customer satisfaction. While specific warranty details are not provided in this manual, KEYESTUDIO generally offers support for their products.
- For detailed assembly guides, programming tutorials, and software downloads, please visit the official KEYESTUDIO website.
- If you encounter missing parts, damaged components, or require technical assistance, please contact KEYESTUDIO customer support directly through their website or the platform where the product was purchased.
- Keep your purchase receipt as proof of purchase for any warranty claims.


