
Ariete 1318
Contents
Ariete 1318 Modern Espresso Machine User Manual
Model: 1318
Brand: Ariete
1. Introduction
This manual provides detailed instructions for the safe and efficient operation, maintenance, and troubleshooting of your Ariete 1318 Modern Espresso Machine. Designed for true coffee connoisseurs, this machine allows you to prepare authentic espresso and creamy cappuccinos at home, utilizing both coffee beans and pre-ground powder.
The Ariete 1318 features an integrated professional coffee grinder, a 15-bar pressure system, and a cappuccinatore for milk frothing. Please read this manual thoroughly before first use to ensure optimal performance and longevity of your appliance.

Figure 1.1: Front view of the Ariete 1318 Modern Espresso Machine.
2. Product Overview and Key Features
The Ariete 1318 is engineered to deliver a superior coffee experience with its advanced features:
- Integrated Grinder: Enjoy the intense aroma and flavor of freshly ground coffee beans thanks to the built-in professional coffee grinder.
- 15-Bar Pressure System: Ensures optimal extraction for a rich and authentic espresso.
- Cappuccinatore (Milk Frother): Prepare soft and thick milk cream in seconds for lattes and cappuccinos.
- Versatile Filter: Includes filters for preparing 1 or 2 cups of coffee, accommodating both coffee beans and powder.
- Hot Water Dispenser: The cappuccinatore spout can also dispense boiling water for infusions and herbal teas.

Figure 2.1: Top view showing the coffee bean hopper and water reservoir access.
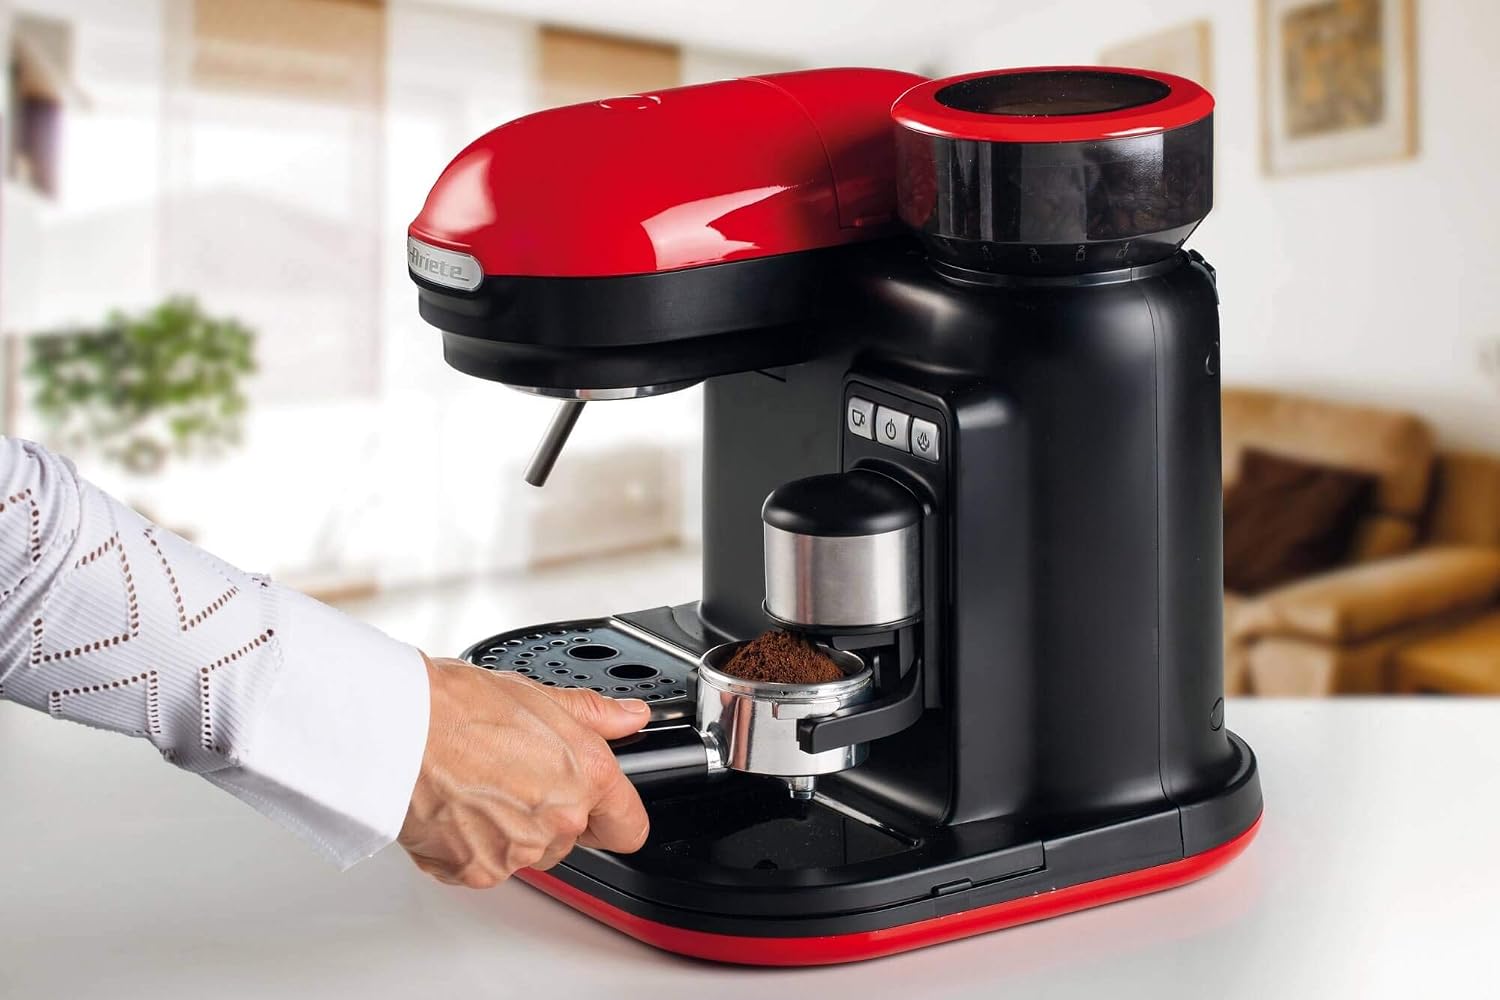
Figure 2.2: Inserting the portafilter with ground coffee.

Figure 2.3: Filling the removable water tank.
3. Setup Guide
Follow these steps to set up your Ariete 1318 Espresso Machine for the first time:
- Unpacking and Placement: Carefully remove all packaging materials. Place the machine on a stable, flat, and heat-resistant surface, away from water sources and direct sunlight. Ensure adequate ventilation around the unit. The machine dimensions are approximately 35.5 cm (D) x 35.5 cm (W) x 37 cm (H).
- Water Tank Filling: Remove the water tank from the back of the machine. Fill it with fresh, cold drinking water up to the MAX level indicator. Reinsert the tank securely into its position.
- Coffee Bean Hopper: If using whole beans, open the lid of the coffee bean hopper and fill it with your desired coffee beans. Close the lid securely. If using pre-ground coffee, you will add it directly to the portafilter later.
- Power Connection: Plug the power cord into a grounded electrical outlet. Ensure the voltage matches your local power supply (220 Volts).

Figure 3.1: Product dimensions for proper placement.
4. Operating Instructions
4.1. Making Espresso
- Pre-heating: Turn on the machine. Allow it to pre-heat until the indicator light signals it's ready (usually a few minutes).
- Grinding Coffee (for whole beans): Select your desired grind setting. Place the portafilter under the grinder spout and activate the grinding function. Grind enough coffee for 1 or 2 cups.
- Dosing and Tamping: For pre-ground coffee, add the desired amount to the filter in the portafilter. For freshly ground coffee, ensure the portafilter is filled evenly. Use the tamper to press the coffee grounds firmly and evenly.
- Inserting Portafilter: Attach the portafilter to the brewing head by aligning it and twisting firmly to the right until it locks into place.
- Brewing: Place your cup(s) under the portafilter spouts. Press the espresso brewing button (1-cup or 2-cup, if available). The machine will dispense espresso. Press the button again to stop the flow when your desired volume is reached.
- Removing Portafilter: After brewing, carefully remove the portafilter by twisting it to the left. Dispose of the used coffee grounds.
4.2. Frothing Milk (Cappuccinatore)
- Prepare Milk: Fill a stainless steel frothing pitcher with cold milk (dairy or non-dairy) up to one-third full.
- Activate Steam: Turn the steam knob or press the steam button to activate the frother. Wait for the steam indicator light to illuminate, indicating it's ready.
- Frothing: Submerge the tip of the steam wand just below the surface of the milk. Open the steam knob fully. Move the pitcher up and down slowly to create foam. Once desired foam and temperature are reached, close the steam knob.
- Clean Steam Wand: Immediately after frothing, wipe the steam wand with a damp cloth to remove any milk residue. Briefly open the steam knob again to purge any milk from inside the wand.
4.3. Hot Water Dispensing
To dispense hot water for teas or infusions, ensure the machine is pre-heated. Place a cup under the steam wand. Turn the steam knob or press the hot water button (if separate) to dispense hot water. Close the knob/button when done.
5. Maintenance and Cleaning
Regular cleaning and maintenance are crucial for the performance and lifespan of your espresso machine.
5.1. Daily Cleaning
- Drip Tray: Empty and rinse the drip tray daily.
- Portafilter and Filter: After each use, remove the used coffee grounds and rinse the portafilter and filter under hot water.
- Steam Wand: As mentioned in section 4.2, clean the steam wand immediately after each use to prevent milk residue buildup.
- Exterior: Wipe the exterior of the machine with a soft, damp cloth. Do not use abrasive cleaners.
5.2. Descaling
Over time, mineral deposits (limescale) can build up inside the machine, affecting performance. Descale your machine regularly, depending on your water hardness and usage frequency (e.g., every 2-3 months). Use a commercial descaling solution specifically designed for coffee machines and follow the product's instructions carefully. Always rinse the machine thoroughly with fresh water after descaling.
6. Troubleshooting
Refer to the table below for common issues and their solutions.
| Problem | Possible Cause | Solution |
|---|---|---|
| No coffee dispenses. | Water tank empty; clogged filter; machine not pre-heated. | Fill water tank; clean filter; wait for pre-heating indicator. |
| Coffee is too weak or watery. | Coffee grounds too coarse; insufficient coffee; tamping too light. | Adjust grinder to finer setting; use more coffee; tamp more firmly. |
| No steam from frother. | Steam wand clogged; machine not at steam temperature. | Clean steam wand; wait for steam indicator light. |
| Machine leaks water. | Water tank not seated correctly; seal issues; overfilling. | Ensure water tank is properly seated; contact support if seals are damaged; do not overfill. |
7. Technical Specifications
| Feature | Value |
|---|---|
| Brand | Ariete |
| Model Number | 1318 |
| Colour | Red |
| Product Dimensions | 35.5D x 35.5W x 37H Centimeters |
| Special Feature | Milk Frother, Integrated Grinder |
| Coffee Maker Type | Espresso Machine |
| Filter Type | Reusable |
| Recommended Uses | Home, Office |
| Included Components | Milk Frother |
| Operation Mode | Manual |
| Voltage | 220 Volts |
| Item Weight | 3 kg 500 g |
| Coffee Input Type | Ground, Whole Bean |
| Country of Origin | Italy |
8. Warranty and Support
Your Ariete 1318 Modern Espresso Machine comes with a 2-year warranty from the date of purchase, covering manufacturing defects. Please retain your proof of purchase for warranty claims.
For technical support, service, or warranty inquiries, please contact the authorized importer and packer in India:
Silveor Lifestyle India LLP
Plot-82 Patparganj Industrial Area, Patparganj, Delhi-110092
Contact: +91-888-230-6988
Email: Marketing@silveorindia.com
Please note that this product is exclusively imported and marketed in India by Silveor Lifestyle India LLP, who are the official and exclusive importer and distributor of "Ariete" in India.
9. Official Product Videos
No official product videos with creator type "Seller" and m3u8 format were provided in the product data for embedding in this manual.
Ask a question about this manual
Ask about setup, troubleshooting, compatibility, parts, safety, or missing instructions. Manuals+ will review the question and use this page’s manual context to help answer it.