Introduction
This manual provides comprehensive instructions for the installation, operation, and maintenance of your AUTO-VOX Aurora Dual Dash Cam. Please read this manual carefully before using the device to ensure proper functionality and safety.
Package Contents
Verify that all items listed below are included in your package:
- Dash cam x 1
- Magnetic bracket with Built-in GPS module x 1
- 11.5ft Car charger x 1
- 3M glue x 2
- Static Film x 2
- Trim Pry Tool x 1
- Cable Fixer x 5
Setup and Installation
Follow these steps to properly install your dash cam:
- Prepare the Windshield: Clean the area on your windshield where you intend to mount the dash cam. Ensure it is free from dust and grease. Apply one of the static films to the chosen area.
- Attach the Magnetic Bracket: Assemble the dash cam with the magnetic bracket. Remove the protective film from one of the 3M glue adhesives and attach the bracket firmly to the static film on the windshield. Choose a position that does not obstruct your view and allows both front and cabin cameras to capture desired angles.
Image: AUTO-VOX Aurora Dual Dash Cam with Magnetic Bracket

This image displays the AUTO-VOX Aurora Dual Dash Cam, highlighting its compact design with both front and interior cameras. The magnetic GPS bracket is visible on top, indicating easy attachment and removal. The screen shows a live view with dual recording enabled.
- Route the Power Cable: Insert the USB plug of the car charger into the dash cam. Route the 11.5ft power cable discreetly along the top ceiling, down the A-pillar, and towards your vehicle's cigarette lighter socket. Use the provided trim pry tool to tuck the cable under interior panels and the cable fixers to secure it.
- Connect to Power: Insert the car charger into your vehicle's cigarette lighter socket. The dash cam will power on automatically when the vehicle starts.
- Insert and Format SD Card: The dash cam requires a Class 10 SD card with FAT32 file type. Insert the SD card into the designated slot. Before first use, format the SD card through the dash cam's menu settings. A 64GB SD card is recommended.
- Initial Settings: Set the correct date and time in the dash cam's settings menu upon first use. Check these settings periodically, especially if the internal battery runs low.
Important Installation Tips:
- Avoid touching the lens directly during installation to prevent fingerprints, which can affect recording quality.
- Remove any protective film from the lens and clean it with water or alcohol before initial use.
- Ensure the dash cam is not installed in an area with reflective coating on the windshield, as this can interfere with GPS signal reception.
Operating Instructions
Automatic Recording
The dash cam will automatically begin recording when connected to power and your vehicle starts. It records continuously, overwriting the oldest files when the SD card is full (loop recording).
Dual Camera Recording (Front and Cabin)
The AUTO-VOX Aurora records simultaneously from both the front and cabin cameras at 1080P@30fps. The front camera can achieve 1080P@60fps when used alone, capturing license plate details effectively.
Image: Dual Camera Recording View
This image illustrates the dash cam's screen displaying a split view of both the front road and the vehicle's interior, confirming simultaneous dual recording capability.
Infrared Night Vision
Equipped with an IMX307 sensor, F1.8 aperture, and 4 infrared lights, the cabin camera provides clear footage even in low-light or dark conditions. This feature enhances security for professional drivers.
Image: Infrared Night Vision Comparison

This image compares typical night vision with the AUTO-VOX's infrared night vision, demonstrating superior clarity and detail capture within the vehicle's cabin in dark environments.
GPS Tracking
The built-in GPS module in the magnetic bracket records driving track, speed, and location data with exact time and date stamps. This information can serve as crucial evidence for incidents or disputes.
Image: GPS Tracking Display

This image illustrates the GPS tracking functionality, showing a digital speedometer indicating 100 km/h and a compass, representing the recorded speed and directional data.
Parking Mode (24/7 Surveillance)
When parking mode is active, the device's G-sensors detect vibrations. Upon detection, the dash cam automatically records and locks a 30-second video clip. The internal battery provides approximately 19 minutes of recording on a full charge, sufficient for monitoring overnight without a hardwire kit.
Image: Parking Monitoring View
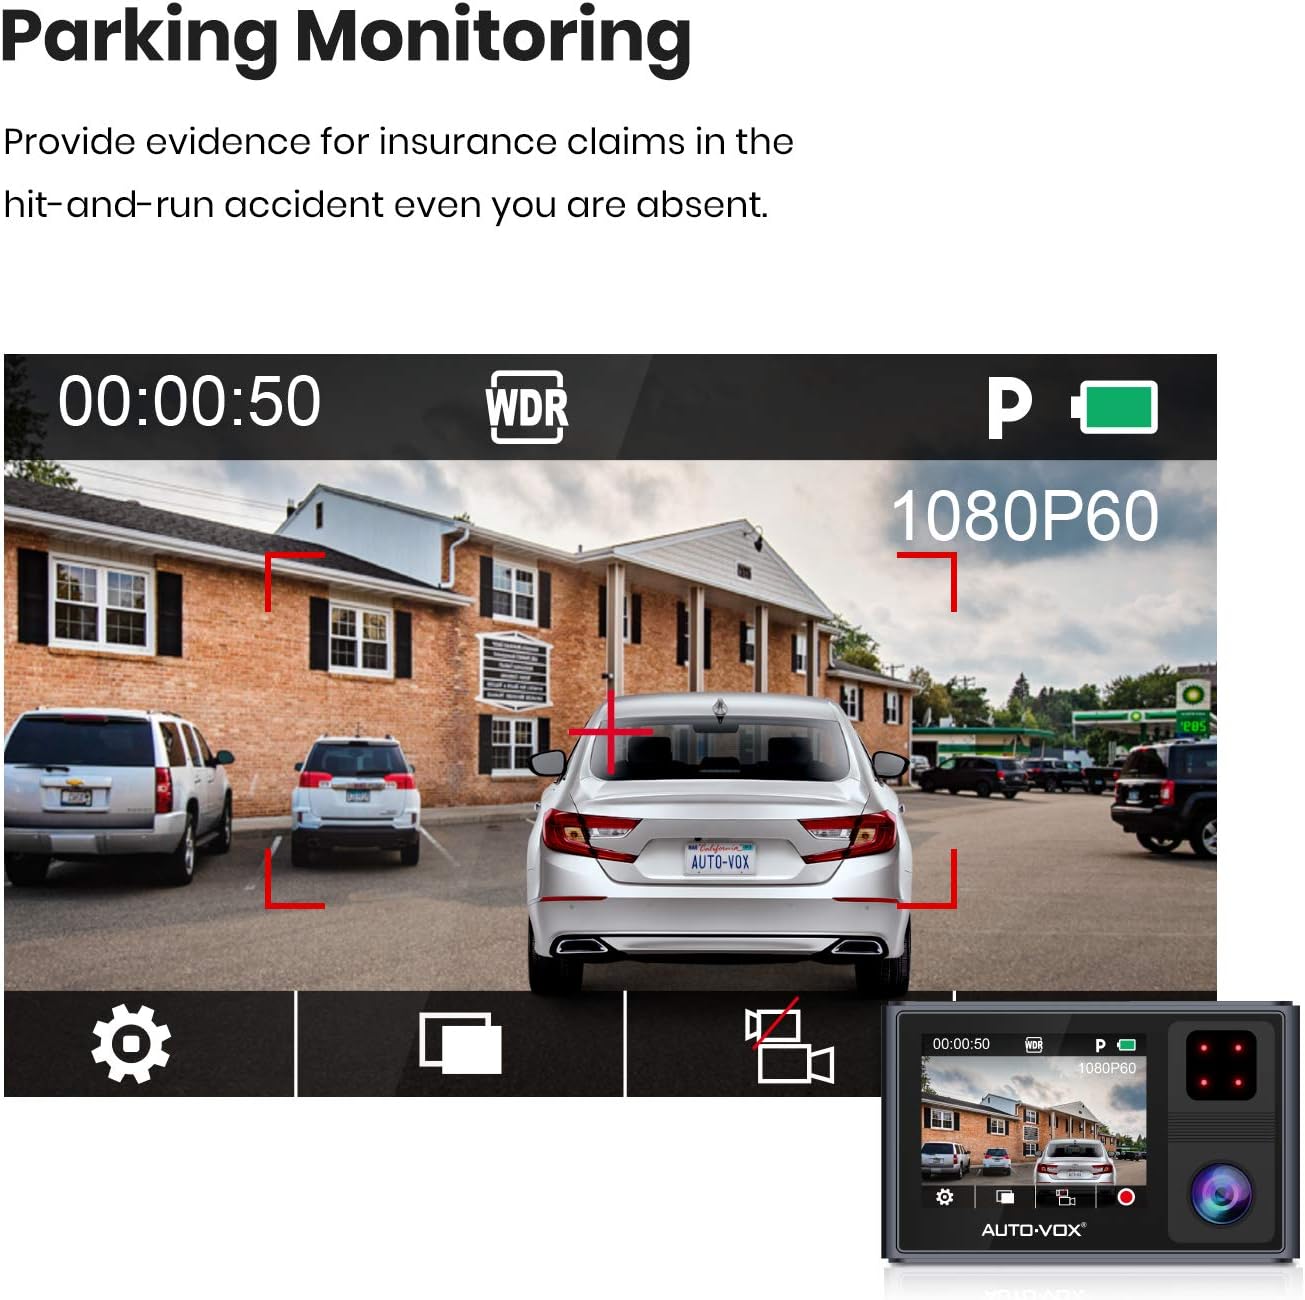
This image shows the dash cam's display in parking monitoring mode, with a car parked in a lot and visual indicators for motion detection, demonstrating its surveillance capability while the vehicle is stationary.
Wide Dynamic Range (WDR)
The WDR function automatically adjusts exposure levels to ensure clearer video footage, especially in challenging lighting conditions with high contrast.
Image: Wide Dynamic Range Comparison

This image provides a visual comparison of video quality before and after WDR processing, highlighting how WDR improves clarity and exposure balance in high-contrast lighting conditions.
Maintenance
- Lens Cleaning: Regularly clean the dash cam lenses with a soft, lint-free cloth. For stubborn marks, use a small amount of lens cleaning solution or alcohol.
- SD Card Management: Format the SD card periodically (e.g., once a month) to maintain optimal performance and prevent data corruption. Back up any important recordings before formatting.
- Firmware Updates: Check the AUTO-VOX official website for any available firmware updates. Keeping your dash cam's firmware updated can improve performance and add new features.
- Storage: When not in use for extended periods, store the dash cam in a cool, dry place away from direct sunlight.
Troubleshooting
- Dash cam does not power on:
- Ensure the car charger is securely plugged into both the dash cam and the vehicle's cigarette lighter socket.
- Check if the vehicle's cigarette lighter socket is receiving power. Test with another device if possible.
- Verify the car charger cable is not damaged.
- "Memory Error" or recording issues:
- Ensure you are using a Class 10 (or higher) SD card.
- Format the SD card within the dash cam's settings menu.
- Try a different, known-good SD card. SD cards have a limited lifespan and can become corrupted.
- Ensure the SD card is inserted correctly and fully into the slot.
- Poor video quality:
- Clean the camera lenses.
- Ensure the protective film has been removed from the lenses.
- Check the video resolution settings in the dash cam menu.
- Verify the windshield is clean and free of obstructions where the camera is mounted.
- GPS signal not acquired or inaccurate:
- Ensure the dash cam is mounted in an area of the windshield not covered by reflective coatings or tinting that could block GPS signals.
- Move the vehicle to an open area away from tall buildings or dense foliage.
- Verify the magnetic bracket with the built-in GPS module is securely attached.
Specifications
| Feature | Detail |
|---|---|
| Brand | AUTO-VOX |
| Model | Aurora |
| Video Capture Resolution | 1080p (Dual 1080P@30fps, Front 1080P@60fps alone) |
| Special Features | Built-In GPS, Infrared Night Vision, Parking Mode, WDR |
| Standing Screen Display Size | 2 Inches |
| Mounting Type | Magnetic Mount |
| Actual Viewing Angle | 170 Degrees |
| Connectivity Technology | USB |
| Battery Cell Composition | Lithium Ion (1 included) |
| Item Weight | 485 g |
Warranty and Support
For warranty information, technical support, or service inquiries, please refer to the official AUTO-VOX website or contact their customer service directly. Keep your purchase receipt as proof of purchase for warranty claims.
Official Website: www.auto-vox.com


