1. Introduction
Thank you for choosing the Lindby Curtis Wall Lamp. This instruction manual provides important information regarding the safe installation, operation, and maintenance of your new wall light. The Curtis wall lamp features an antique-style metal design with an extendable scissor arm and an integrated switch, making it ideal for various indoor settings such as living rooms, dining rooms, or bedrooms. Please read this manual thoroughly before installation and retain it for future reference.
2. Safety Instructions
- Electrical Safety: Installation must be performed by a qualified electrician or a person with appropriate electrical knowledge to prevent electric shock or fire hazards. Always disconnect power at the main circuit breaker before installation, maintenance, or bulb replacement.
- Indoor Use Only: This product is designed for indoor use (IP20 rated). Do not expose it to moisture, water, or extreme temperatures.
- Bulb Type: Use only E14 bulbs with a maximum wattage of 10W. Exceeding the maximum wattage can cause overheating and damage the lamp or create a fire hazard.
- Handling: Handle the lamp with care. Avoid dropping or subjecting it to strong impacts.
- Cleaning: Clean only with a dry, soft cloth. Do not use abrasive cleaners or solvents.
- Children: Keep packaging materials and small parts away from children.
3. Package Contents
Please check that all components are present and undamaged before proceeding with installation.
- Lindby Curtis Wall Lamp fixture (with integrated switch and E14 socket)
- Mounting bracket
- Screws and wall plugs for installation
- Instruction Manual (this document)
Note: The light bulb is not included and must be purchased separately.
4. Setup and Installation
Tools Required: Drill, screwdriver, wire strippers, voltage tester.
- Prepare for Installation:
- Turn off the main power supply at the circuit breaker before starting any electrical work.
- Ensure the mounting surface is suitable and can support the weight of the lamp.
- Attach Mounting Bracket:
Position the mounting bracket on the wall at the desired location. Mark the drilling points. Drill holes, insert wall plugs (if necessary), and secure the mounting bracket to the wall using the provided screws.

Image: The internal view of the lamp's base showing the mounting bracket and electrical connections.
- Electrical Connection:
- Carefully connect the household electrical wires to the lamp's terminals. Ensure correct polarity (Live to Live, Neutral to Neutral, Earth to Earth). If you are unsure, consult a qualified electrician.
- Ensure all connections are secure and insulated.
- Mount the Lamp Fixture:
Align the lamp fixture with the secured mounting bracket and attach it using the remaining screws. Ensure the fixture is firmly attached to the wall.
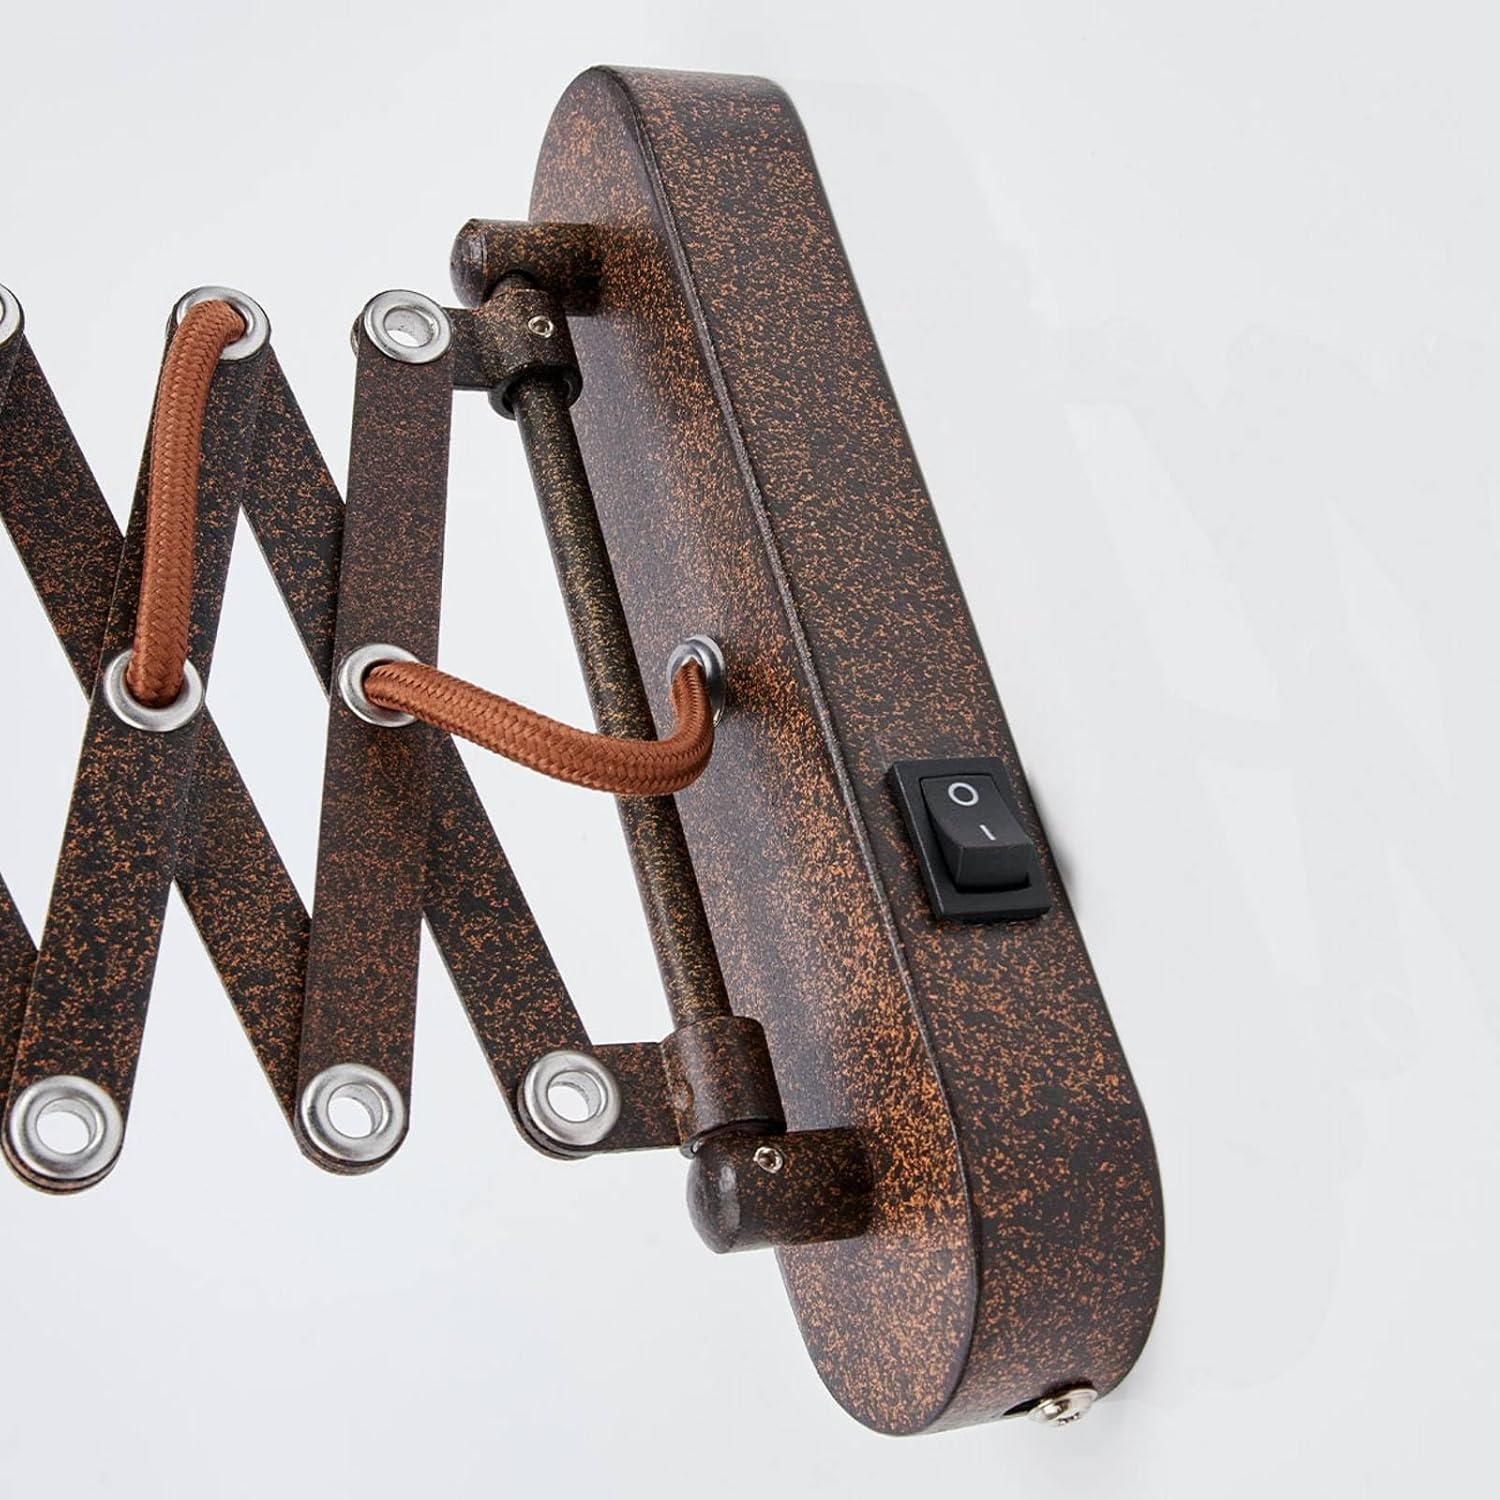
Image: The Lindby Curtis wall lamp's base, showing the integrated on/off switch.
- Install the Light Bulb:
Carefully screw an E14 bulb (max 10W) into the lamp holder. Do not overtighten.

Image: A close-up view of the E14 bulb socket inside the lamp shade.
- Restore Power:
Once installation is complete and all connections are secure, restore power at the main circuit breaker.
5. Operating Instructions
The Lindby Curtis Wall Lamp is designed for simple operation.
- Turning On/Off: Use the integrated switch located on the lamp's wall mount to turn the light on or off.
- Adjusting the Arm: The lamp features an extendable scissor arm. Gently pull or push the lamp head to adjust its distance from the wall and direct the light as needed. Avoid excessive force to prevent damage.

Image: The Lindby Curtis wall lamp extended, providing light over a bedside table.

Image: The Lindby Curtis wall lamp retracted, positioned closer to the wall.
6. Maintenance
- Cleaning: Always disconnect power before cleaning. Wipe the lamp with a soft, dry, lint-free cloth. Do not use liquid or aerosol cleaners, as they may damage the finish or electrical components.
- Bulb Replacement:
- Ensure the lamp is turned off and cool to the touch before attempting to replace the bulb.
- Unscrew the old E14 bulb counter-clockwise.
- Screw in a new E14 bulb (max 10W) clockwise until snug. Do not overtighten.
7. Troubleshooting
| Problem | Possible Cause | Solution |
|---|---|---|
| Lamp does not turn on. |
|
|
| Light flickers. |
|
|
If you encounter problems not listed here or if the suggested solutions do not resolve the issue, please contact customer support.
8. Specifications
| Brand | Lindby |
| Model Name | Curtis |
| Model Number | 4018142 |
| Material | Metal |
| Color | Rust, Gold (shade interior) |
| Dimensions (L x W x H) | 57 cm x 13 cm x 23 cm |
| Weight | 620 g |
| Lamp Holder | E14 |
| Max Wattage | 10W |
| Operating Voltage | 230V |
| Protection Class | IP20 (Indoor use) |
| Switch Type | Integrated |
| Energy Efficiency Class (EU) | A++ |
9. Warranty and Support
For warranty information or technical support, please contact the retailer or manufacturer directly. Refer to your purchase documentation for specific warranty terms and contact details.
Manufacturer: Lampenwelt
Brand: Lindby
You can also visit the official Lindby brand store for more information: Lindby Brand Store on Amazon.


