
1. Introduction and Overview
This manual provides comprehensive instructions for the installation, operation, and maintenance of your Jensen CDX3119 CD Receiver. Please read this manual thoroughly before using your new receiver to ensure proper functionality and safety. The Jensen CDX3119 is a single-DIN CD receiver designed for vehicle audio systems, featuring Bluetooth connectivity, CD playback, USB input, and auxiliary input.
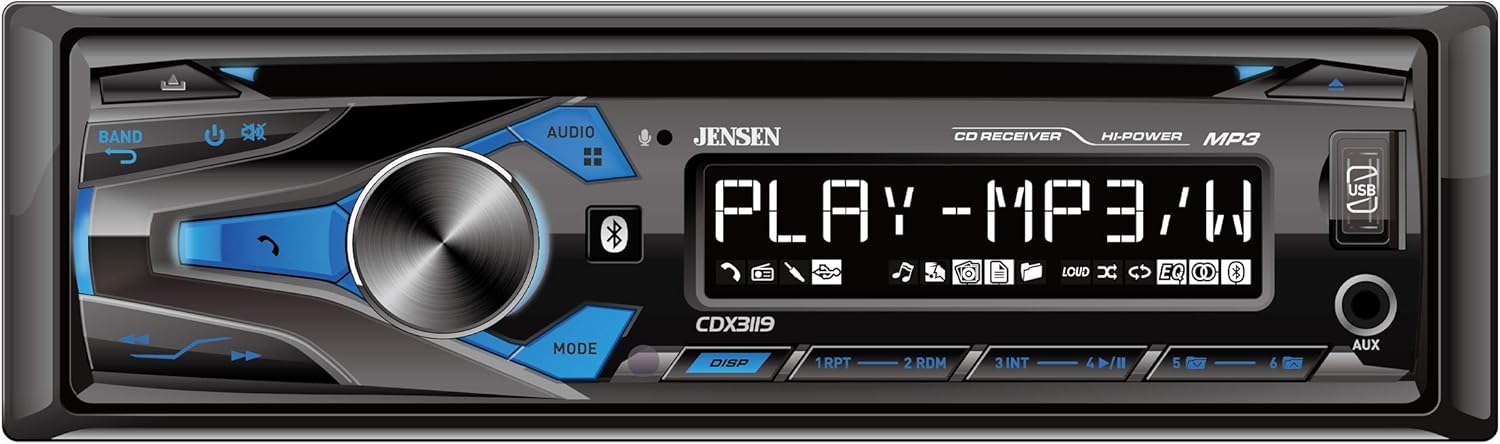
Figure 1: Front panel of the Jensen CDX3119 CD Receiver.
2. Product Features
- Bluetooth hands-free calling and audio streaming
- Plays MP3 music files
- Front panel USB input for media playback and device charging
- Front panel 3.5mm Auxiliary (AUX) input
- CD Player for audio CDs
- AM/FM Tuner with presets
- 2-channel preamp outputs for external amplifier connection
- Multiple preset EQ curves for sound customization
3. Setup
3.1 Installation
Professional installation is highly recommended for car audio systems. Incorrect wiring can cause damage to the vehicle's electrical system or the receiver. Refer to the detailed wiring diagram included in the separate installation guide for specific connections.
- Power Connection: Connect the yellow wire to a constant 12V power source, the red wire to an accessory 12V power source (switched with ignition), and the black wire to a good chassis ground.
- Speaker Connections: Connect speaker wires according to the color codes provided in the installation diagram. Ensure correct polarity for optimal sound.
- Antenna Connection: Connect the vehicle's antenna cable to the receiver's antenna input.
- Mounting: Secure the receiver in the vehicle's dashboard using the provided mounting hardware.
3.2 Initial Power-On
After installation, turn on your vehicle's ignition. The receiver should power on. If not, check all power connections and the vehicle's fuse box.
4. Operating Instructions
4.1 Basic Controls
- Power/Volume Knob: Press to turn the unit ON/OFF. Rotate to adjust the volume level.
- Source (SRC) Button: Press to cycle through available audio sources (Tuner, CD, USB, Bluetooth, AUX).
- Band Button: In Tuner mode, press to switch between FM1, FM2, FM3, AM1, and AM2 bands.
- Tune/Seek Buttons: Use to manually tune radio frequencies or seek for the next/previous station. In media playback, use to skip tracks.
4.2 Radio Operation
Press the SRC button until 'TUNER' is displayed. Use the BAND button to select FM or AM. Use the seek buttons to find stations. To store a preset, tune to the desired station, then press and hold one of the numeric preset buttons (1-6) until the station number flashes on the display.
4.3 CD Playback
Insert an audio CD into the disc slot. The unit will automatically switch to CD mode and begin playback. Use the track skip buttons to navigate between songs.
4.4 Bluetooth Connectivity
To pair your device:
- Ensure Bluetooth is enabled on your mobile device.
- On the CDX3119, press the SRC button to select 'BT AUDIO' or 'BT PHONE'.
- On your mobile device, search for available Bluetooth devices and select 'JENSEN CDX3119'.
- Confirm pairing if prompted. Once connected, 'CONNECTED' will appear on the receiver's display.
For hands-free calling, use the dedicated call buttons on the receiver's front panel. For audio streaming, play music from your paired device, and it will stream through the receiver.
4.5 USB and Auxiliary Input
- USB: Insert a USB flash drive containing MP3 files into the front USB port. The unit will automatically switch to USB mode and begin playback. The USB port also provides charging for compatible devices.
- AUX: Connect an external audio device (e.g., MP3 player, smartphone) to the front 3.5mm AUX input using an audio cable. Press the SRC button to select 'AUX'.
Video 1: Demonstration of a Single DIN Car Stereo with CD Player, Bluetooth, and USB functionality. This video illustrates general features and operation similar to the Jensen CDX3119.
5. Maintenance
- Cleaning the Unit: Use a soft, dry cloth to clean the front panel. Avoid abrasive cleaners or solvents.
- CD Care: Handle CDs by their edges. Keep them clean and free of scratches. Use a soft, lint-free cloth to wipe CDs from the center outwards.
- General Care: Avoid exposing the unit to extreme temperatures, direct sunlight for prolonged periods, or excessive moisture.
6. Troubleshooting
| Problem | Possible Cause | Solution |
|---|---|---|
| No Power | Incorrect wiring; Blown fuse; Vehicle ignition off. | Check power connections; Replace fuse; Turn vehicle ignition on. |
| No Sound | Volume too low; Mute activated; Incorrect speaker wiring. | Increase volume; Deactivate mute; Check speaker connections. |
| Bluetooth Not Connecting | Bluetooth not enabled on device; Device not in pairing mode; Incorrect pairing procedure. | Ensure Bluetooth is on; Put device in pairing mode; Re-attempt pairing as per instructions. |
| CD Error | Dirty or scratched CD; Incorrect disc format. | Clean or replace CD; Ensure disc is an audio CD. |
| USB Not Reading | Incompatible USB format; Corrupt files; USB device not supported. | Ensure USB is FAT32 format; Check file integrity; Try a different USB device. |
7. Specifications
- Model: CDX3119
- Item Weight: 3.36 pounds
- Product Dimensions: 9 x 9 x 3 inches
- Connectivity Technology: Auxiliary, Bluetooth, RCA, USB
- Controller Type: Push Button
- Special Feature: USB Port, Built-In Amplifier, High-Definition LCD Display
- Compatible Devices: Smartphone, Speaker
- Connector Type: 3.5mm Jack, USB
- Audio Output Mode: Stereo
- Surround Sound Channel Configuration: 2 Channel
- Output Power: 50 Watts
8. Warranty and Support
Your Jensen CDX3119 CD Receiver comes with a 3-year warranty. For warranty claims or technical support, please refer to the contact information provided in your product packaging or visit the official Jensen website. Keep your proof of purchase for warranty validation.


