
1. Safety Information
Please read and understand all safety instructions before using this product. Failure to follow these instructions may result in electric shock, fire, or serious injury.
- Risk of Electric Shock: Do not immerse the timer in water. Do not use if the cord or plug is damaged. Ensure the timer is plugged into a grounded outlet.
- Outdoor Use: This timer is designed for outdoor use and features a weatherproof housing. However, ensure the outlets are facing downwards to prevent water accumulation.
- Overload Protection: Do not exceed the maximum electrical ratings of 15A/125V/1875W. Overloading can cause overheating and fire.
- Children and Pets: Keep the timer and connected devices out of reach of children and pets.
- Maintenance: Disconnect power before cleaning or performing any maintenance.
2. Product Overview
Features
- 24-Hour mechanical ON/OFF timer with 30-minute intervals.
- Manual switch for Always-ON or Timer modes.
- Three (3) grounded outlets.
- 6-inch 14 AWG SJTW cord with flat plug.
- Weather-resistant and fireproof housing.
- ETL certified for safety.
Components
The BESTTEN Outdoor Timer consists of the following main components:
- Timer Dial: The central rotating dial with numbers representing hours and segments for 30-minute intervals.
- Pins: Small, push-down pins around the timer dial used to set ON/OFF times.
- Always-ON/Timer Switch: A slider switch to select between continuous power (Always-ON) or timed operation (Timer).
- Grounded Outlets: Three 3-prong outlets for connecting devices.
- Power Cord and Flat Plug: For connecting the timer to a wall outlet.
- Mounting Hole: A hole at the top for hanging the unit.

Image: BESTTEN Outdoor 24-Hour Timer with its retail packaging, showcasing the product's design and the included 6-inch power cord with a flat plug.

Image: Diagram highlighting key features of the BESTTEN Outdoor Timer, including the 24-hour mechanical timer, 30-minute intervals, Always-ON/Timer switch, 3 grounded outlets, 6-inch 15A extension cord, flat plug, mounting hole, weather-resistant & fireproof housing, and ETL certification.
3. Setup
Initial Setup
- Unpack the timer and inspect it for any damage.
- Ensure the timer is placed in a location where it is protected from direct heavy rain or snow, even though it is weatherproof.
- Plug the timer into a standard 125V grounded outdoor electrical outlet.
Mounting
The timer features a mounting hole at the top for convenient hanging. This can help keep the unit off the ground and ensure the outlets face downwards for optimal weather protection.

Image: The BESTTEN Outdoor Timer connected to an outdoor wall outlet, demonstrating its flat plug design for easy insertion and its rugged, weatherproof construction suitable for outdoor environments, such as illuminating garden lights.
4. Operating Instructions
Setting the Timer
- Set Current Time: Rotate the entire timer dial clockwise until the current time aligns with the arrow indicator on the top of the timer. The dial is marked with hours (1-12 AM/PM).
- Set ON/OFF Times: The timer dial has small, push-down pins around its circumference. Each pin represents a 30-minute interval.
- To set an ON period, push the pins DOWN for the desired duration.
- To set an OFF period, leave the pins UP for the desired duration.
- CAUTION: Carefully pull the pins up. Excessive force may break the timer dial.
- Connect Devices: Plug your outdoor lights or appliances into the grounded outlets of the timer.
- Select Timer Mode: Slide the switch on the side of the timer to the "Timer" position.
Manual Override (Always-ON Mode)
To bypass the timer settings and provide continuous power to the connected devices, slide the switch on the side of the timer to the "Always ON" position. The timer dial will continue to rotate, but the outlets will remain powered regardless of the pin settings.
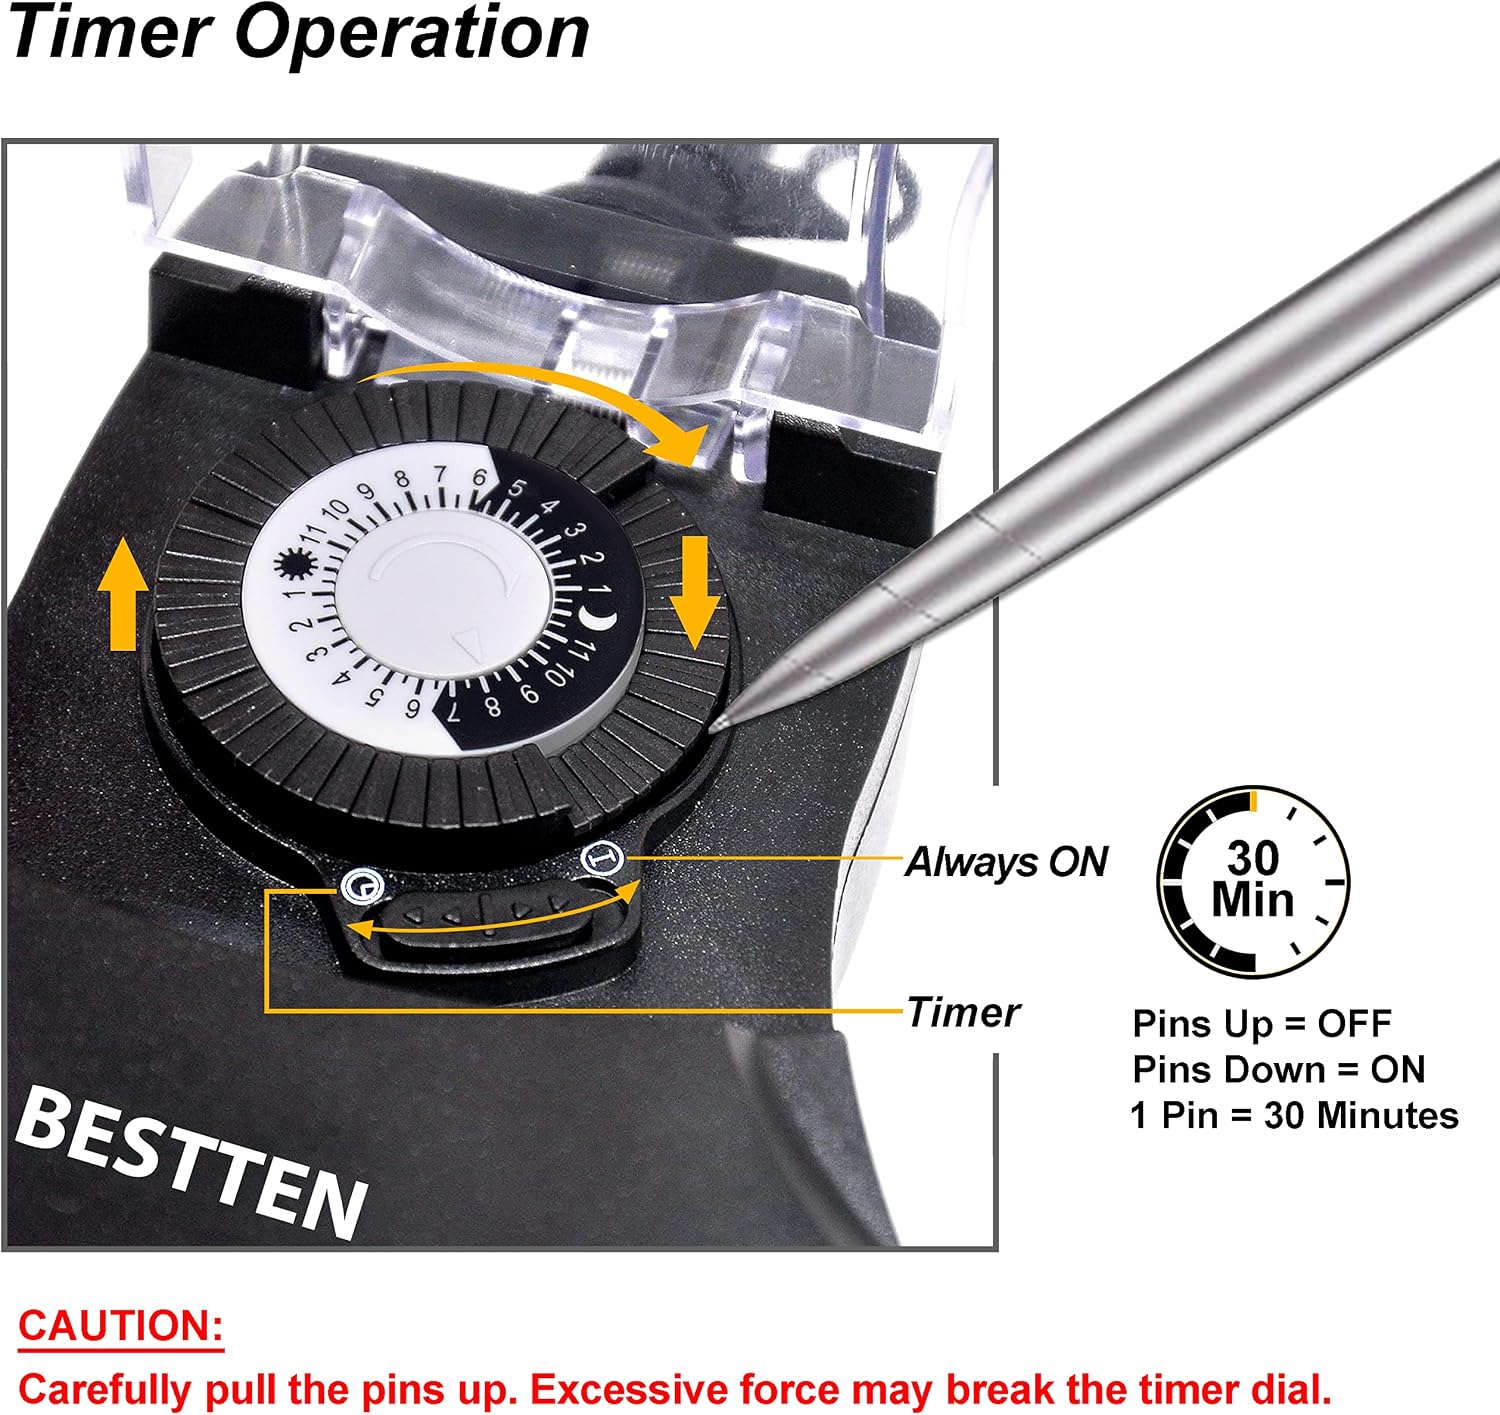
Image: A close-up view of the BESTTEN Outdoor Timer's dial, illustrating how to set the timer. It shows the pins that can be pushed down for ON (1 pin = 30 minutes) and left up for OFF, along with the Always ON/Timer switch. A stylus points to the dial for setting.
5. Maintenance
- Cleaning: Disconnect the timer from the power source before cleaning. Wipe the exterior with a damp cloth. Do not use harsh chemicals or abrasive cleaners.
- Inspection: Periodically inspect the power cord, plug, and housing for any signs of damage or wear. If damage is found, discontinue use and replace the unit.
- Storage: When not in use for extended periods, store the timer in a cool, dry place away from direct sunlight.
6. Troubleshooting
| Problem | Possible Cause | Solution |
|---|---|---|
| Timer is not turning ON/OFF at set times. |
|
|
| Connected device is not receiving power. |
|
|
| Timer dial is not rotating. |
|
|
7. Specifications
| Attribute | Value |
|---|---|
| Model Number | USOT-3-3A |
| Voltage | 125V AC |
| Frequency | 60Hz |
| Max Current | 15A |
| Max Wattage | 1875W (Resistive or General Purpose) |
| Tungsten Lamp Rating | 10A / 1250W |
| Motor Rating | 3/4 HP |
| Cord Length | 6 inches |
| Cord Type | 14 AWG SJTW |
| Outlets | 3 Grounded Outlets |
| Certification | ETL Listed (Conforms to UL STD. 60730-1 and 60730-2-7) |
| Material | Plastic |
| Dimensions (approx.) | 11.51 cm (4.53") L x 10.52 cm (4.14") W x 3.71 cm (1.46") H |

Image: A visual representation of the electrical specifications for the BESTTEN Outdoor Timer, including 125V, 60Hz, 15A Max, 1875W (Resistive or General Purpose), 10A (Tungsten Lamp), 3/4HP, and TV-5 ratings.

Image: A detailed diagram showing the product dimensions of the BESTTEN Outdoor Timer, including the 6-inch cord, 3-prong flat plug, timer dial, Always-ON/Timer switch, and the three grounded outlets, with measurements in both inches and centimeters.
8. Warranty and Support
BESTTEN products are manufactured to high-quality standards and are backed by a limited warranty. For specific warranty terms and conditions, please refer to the warranty card included with your purchase or visit the official BESTTEN website.
If you encounter any issues or have questions regarding your BESTTEN Outdoor Timer, please contact BESTTEN Customer Support. Contact information can typically be found on the product packaging or the official BESTTEN website.
When contacting support, please have your product model number (USOT-3-3A) and purchase date ready.