Introduction
The GTD Audio M-260 wireless microphone system provides high-quality audio and professional features for various applications. This system is designed with 200 adjustable channels, allowing for flexible use with multiple systems without frequency conflicts. Its design minimizes feedback and distortion, making it suitable for professional events.

Image: The GTD Audio M-260 wireless microphone system, featuring the main receiver unit and two handheld microphones.
Package Contents
Please verify that all items listed below are included in your package:
- GTD Audio M-260 Receiver Unit
- 2 Handheld Microphones (or 2 Lapel Microphones with bodypack transmitters, depending on variant)
- 2 Antennas
- Power Adapter (12-15V DC)
- Audio Cables (e.g., 1/4" TS to 1/4" TS)
- Rack Mount Ears
- Rack Connecting Plate
- Warranty Card
- User Manual (this document)

Image: A view of the various accessories provided with the GTD Audio M-260 wireless microphone system, including antennas, power supply, audio cables, and rack mounting hardware.
Setup Instructions
1. Receiver Placement and Connections
Place the receiver unit in a stable location, away from strong electromagnetic interference. Ensure proper ventilation. Connect the antennas to the ANTENNA jacks on the rear panel. Connect the power adapter to the DC INPUT and plug it into a power outlet.
For audio output, use the BALANCED XLR outputs (A and B) for individual microphone channels or the MIX A+B output for a combined signal. Connect these to your mixer or amplifier using appropriate audio cables.

Image: The rear panel of the GTD Audio M-260 receiver, illustrating the DC power input, SQUELCH adjustment knobs, individual balanced XLR outputs for channels A and B, and a combined MIX A+B audio output.
2. Microphone Setup
Insert fresh batteries into the handheld or bodypack microphones. Ensure the battery polarity is correct. Power on the microphones.
3. Frequency Synchronization
The system features automatic frequency scanning and synchronization. Power on the receiver. The LCD display will show RF level, AF level, Channel Frequency, and mute status. Use the automatic frequency scanning function on the receiver to find and set the best available channel. Then, use the automatic transmitter setup feature to synchronize the microphone's frequency with the receiver.
4. Rack Mounting (Optional)
The M-260 receiver can be rack-mounted. For single unit mounting, attach the provided rack ears to the sides of the receiver. For mounting two units together to create a 4-microphone system in a 19-inch rack, follow these steps:
- Remove the screws from the sides of both receiver units where they will connect.
- Align and mount the two receivers together.
- Secure the two receivers using the provided connecting plate and screws.
- Attach the rack ears to the outer sides of the combined unit.

Image: A visual guide demonstrating the process of combining two GTD Audio M-260 receiver units side-by-side for a wider rack-mount configuration.

Image: Various options for integrating multiple GTD Audio wireless microphone systems into a standard 19-inch equipment rack, showcasing different combinations of handheld and lavalier microphone setups.
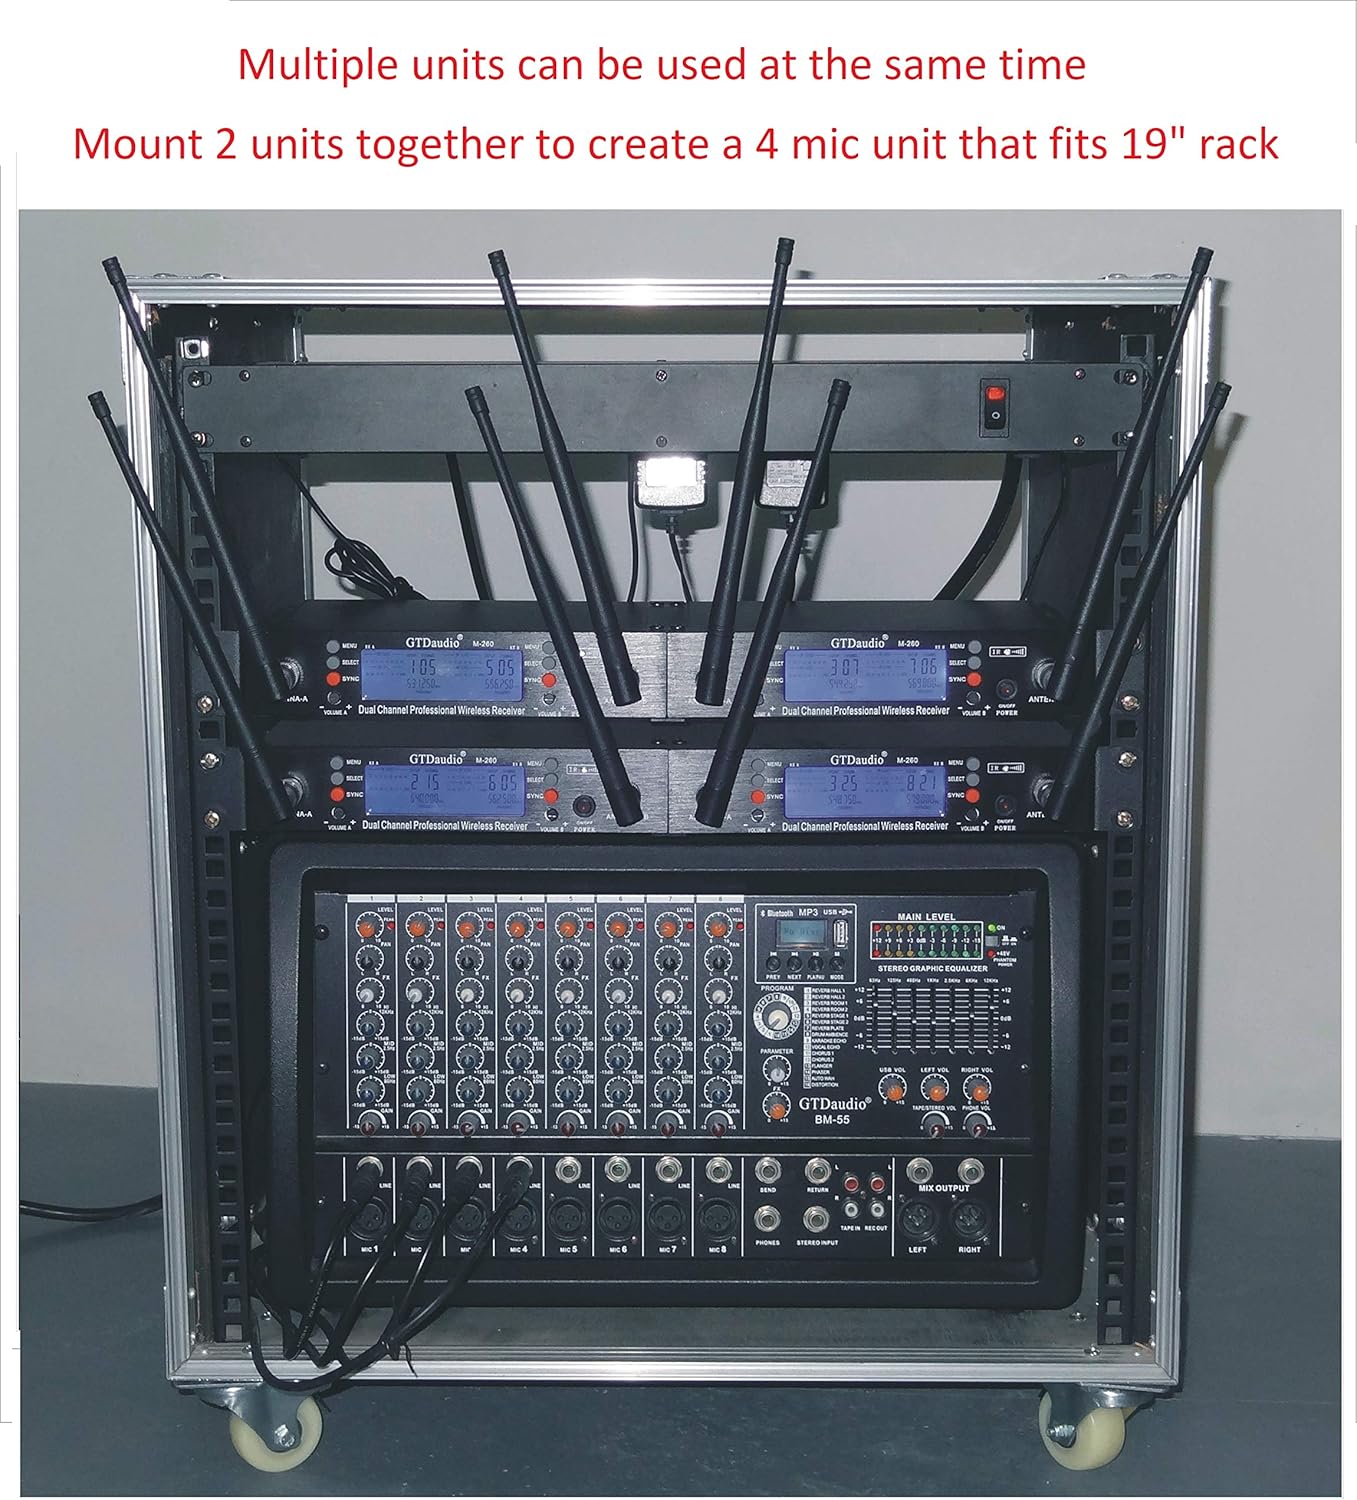
Image: An example of multiple GTD Audio wireless microphone systems neatly integrated within a professional audio equipment rack, demonstrating a complete setup.
Operating Instructions
1. Power On/Off
To power on the receiver, press the power button on the front panel. To power on the microphones, use the power switch located on each microphone unit. Power off all components when not in use to conserve battery life and prevent accidental sound transmission.
2. Channel Selection and Adjustment
The system offers 100 selectable frequencies per channel. After initial synchronization, you can manually adjust channels if interference occurs. Refer to the receiver's front panel controls and LCD display for channel selection. The LCD display shows RF level (radio frequency signal strength), AF level (audio frequency signal strength), current Channel Frequency, and mute status.
3. Squelch Control
The SQUELCH controls on the rear panel (refer to Setup Instructions image) help eliminate unwanted noise when no audio signal is present. Adjust these controls to the minimum setting that effectively mutes background noise without cutting off desired audio signals.
4. Operating Range
The system has an operating range of up to 400 feet (150 meters) under optimal conditions. Environmental factors, such as obstacles and other wireless devices, can affect this range. Maintain a clear line of sight between the microphones and the receiver for best performance.
Maintenance
- Cleaning: Use a soft, dry cloth to clean the receiver and microphones. Avoid liquid cleaners or abrasive materials.
- Battery Replacement: Replace microphone batteries regularly, especially before important events, to ensure consistent performance. Remove batteries if the microphones will not be used for an extended period to prevent leakage.
- Storage: Store the system in a cool, dry place, away from direct sunlight and extreme temperatures.
- Antennas: Handle antennas carefully to avoid bending or breaking.
Troubleshooting
| Problem | Possible Cause | Solution |
|---|---|---|
| No sound from microphone |
|
|
| Interference or static noise |
|
|
| Weak or dropping signal |
|
|
Specifications
| Model Number | M 260 |
| Brand | GTDaudio |
| Frequency Range | 530Mhz - 580Mhz (Adjustable) |
| Number of Channels | 2x100 (100 selectable frequencies per channel) |
| Operating Range | Up to 400 feet (150 meters) |
| Connectivity Technology | UHF Wireless, XLR |
| Microphone Form Factor | Handheld, Lapel (with bodypack) |
| Polar Pattern | Omnidirectional |
| Power Source | Battery Powered (microphones), DC Input (receiver) |
| Product Dimensions (Receiver) | 7 x 5 x 1 inches (approximate) |
| Hardware Platform | Karaoke Machine, DJ Equipment, Live Sound Systems |
| Manufacturer | GTD AUDIO Inc |
Warranty and Support
This product comes with a warranty. Please refer to the included warranty card for specific terms and conditions, including warranty duration and coverage details. For technical support, troubleshooting assistance, or inquiries regarding your GTD Audio M-260 system, please contact GTDaudio customer service. Contact information can typically be found on the warranty card or the official GTDaudio website.
Note: Keep your purchase receipt as proof of purchase for warranty claims.