1. Introduction
This manual provides essential information for the installation, operation, and maintenance of your Whirlpool Purasense RO+UF+UV+ Auto TDS Water Purifier. This appliance is designed to provide purified drinking water through a multi-stage filtration process. Please read this manual thoroughly before using the product to ensure proper function and longevity.

Image 1.1: Front view of the Whirlpool Purasense Water Purifier.
2. Safety Information
Observe the following safety precautions to prevent injury or damage to the appliance:
- Ensure the power supply matches the specifications indicated on the product label.
- Do not immerse the appliance, cord, or plug in water or other liquids.
- Keep the appliance away from direct sunlight, heat sources, and corrosive substances.
- Do not attempt to repair or modify the appliance yourself. Contact authorized service personnel for assistance.
- Ensure proper ventilation around the unit.
- Keep out of reach of children.
3. Package Contents
Carefully unpack the box and verify that all the following items are included:
- Water Purifier Unit
- Drip Tray & Drip Tray Cover
- Power Adaptor
- User Manual (this document)
- Water Tube
- Wall Mounting Sticker
- Wall Mounting Screws
- Stem Elbow
- Screw Anchor
- Blue Clip
- Inlet Diverter Valve Assembly
4. Product Features
The Whirlpool Purasense Water Purifier incorporates advanced technologies for comprehensive water purification:
- RO (Reverse Osmosis): Effectively removes dissolved solids, heavy metals, and other impurities.
- UF (Ultrafiltration): Filters out suspended solids, colloids, and large molecules.
- UV (Ultraviolet): Deactivates bacteria, viruses, and other microorganisms.
- 9 Stages of Purification: A multi-stage process ensures thorough purification.
- Calcium Booster Technology: Enhances water with essential minerals.
- Adaptive Intelligence Technology: Automatically senses TDS (Total Dissolved Solids) levels and adjusts purification for optimal results.
- Do-It-Yourself Filter Replacement: Designed for easy and convenient filter changes by the user.
5. Setup and Installation
5.1 Unpacking
Remove all packaging materials. Inspect the unit for any signs of damage. If damaged, do not proceed with installation and contact customer support.
5.2 Placement
The Whirlpool Purasense Water Purifier is designed for countertop installation. Choose a stable, flat surface near a water source and a power outlet. Ensure there is adequate space around the unit for ventilation and maintenance.
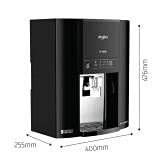
Image 5.1: Product dimensions for placement reference (approx. 31.1L x 47.2W x 57.3H Centimeters).
5.3 Connecting Water Supply
- Turn off the main water supply.
- Connect the inlet diverter valve assembly to your cold water line.
- Connect the water tube from the diverter valve to the water inlet port on the purifier. Ensure all connections are secure to prevent leaks.
- Place the drip tray and its cover at the base of the purifier.
5.4 Power Connection
Plug the power adaptor into the purifier's power input and then into a standard electrical outlet. Do not turn on the power immediately after connecting the water supply.
6. Operating Instructions
6.1 First Use and Flushing
- After connecting the water supply, slowly turn on the main water supply. Check for any leaks.
- Turn on the power to the purifier. The unit will begin filling its internal tank.
- For the first use, it is recommended to drain the first two full tanks of purified water. This flushes out any residual manufacturing impurities from the filters and tubing.
- After flushing, the purifier is ready for regular use.
6.2 Dispensing Water
To dispense purified water, place a container under the water outlet and press the dispense button or lever. Release to stop the flow.
6.3 Indicator Lights
Refer to the indicator lights on the front panel for operational status, filter life, and any alerts. Consult the troubleshooting section for specific light patterns.
7. Maintenance
Regular maintenance ensures optimal performance and water quality.
7.1 Filter Replacement
The Whirlpool Purasense features a do-it-yourself filter replacement system. When the filter indicator light illuminates, it is time to replace the corresponding filter. Follow these general steps:
- Turn off the water supply to the purifier and unplug the unit.
- Open the front panel or access door to locate the filters.
- Twist and pull out the old filter cartridge.
- Insert the new filter cartridge, ensuring it clicks into place.
- Close the panel, turn on the water supply, and plug in the unit.
- Flush the new filter by dispensing water for a few minutes as per the first-use instructions.
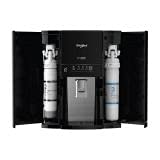
Image 7.1: Internal view showing filter cartridge locations for DIY replacement.
7.2 Cleaning
- Wipe the exterior of the purifier with a soft, damp cloth. Do not use abrasive cleaners or solvents.
- Regularly clean the drip tray to prevent water stagnation and maintain hygiene.
8. Troubleshooting
If you encounter issues with your water purifier, refer to the table below for common problems and solutions.
| Problem | Possible Cause | Solution |
|---|---|---|
| No water dispensing | No power; water supply off; tank empty; clogged filter. | Check power connection; ensure water supply is on; wait for tank to fill; check and replace filters if needed. |
| Slow water flow | Clogged filters; low water pressure. | Replace filters; check household water pressure. |
| Water leakage | Loose connections; damaged tubing/housing; cracked filter handle. | Check all connections and tighten; inspect tubing and housing for damage; if a filter handle is cracked, contact service. |
| Purifier runs frequently | Small leak; pressure sensor issue; high water consumption. | Check for subtle leaks; if no leaks, contact customer support. |
| Unpleasant taste/odor | Expired filters; new filters not flushed properly. | Replace filters; flush new filters thoroughly. |
If the problem persists after attempting these solutions, please contact Whirlpool customer support.
9. Specifications
| Feature | Specification |
|---|---|
| Brand | Whirlpool |
| Model Name | Purasense RO+UF+UV+Auto TDS |
| Special Features | RO, UF, UV, Auto TDS, Calcium Booster, 9 Stages Purification, DIY Filter Replacement |
| Product Dimensions (L x W x H) | 31.1 cm x 47.2 cm x 57.3 cm |
| Installation Type | Countertop |
| Power Source | Adaptor |
| Item Weight | 8.5 kg |
| Material | Plastic |
| Capacity | 7 liters |
10. Warranty and Support
10.1 Warranty Information
This Whirlpool Purasense Water Purifier comes with a 1 Year Warranty from the date of purchase. Please retain your purchase receipt for warranty claims. The warranty covers manufacturing defects under normal use conditions. It does not cover damage due to improper installation, misuse, neglect, or unauthorized repairs.
10.2 Customer Support
For technical assistance, service requests, or to purchase genuine replacement parts, please contact Whirlpool customer support. Refer to the contact information provided with your product packaging or visit the official Whirlpool website.


