1. Introduction
This manual provides comprehensive instructions for assembling the Sankei MP07-37 Studio Ghibli Series Kiki's Delivery Service Diorama Paper Craft. This kit allows you to recreate the charming world of Kiki's Delivery Service using pre-cut paper components. Please read all instructions carefully before beginning assembly to ensure a successful and enjoyable building experience.
2. Product Overview
The Sankei MP07-37 is a detailed paper craft kit designed to commemorate the 30th anniversary of the release of Kiki's Delivery Service. It features intricately laser-cut hard paper components that, when assembled, form a three-dimensional diorama. No painting is required, as the paper is pre-colored.

Figure 2.1: Front view of the completed Kiki's Delivery Service diorama, showcasing the main building, street, and Kiki flying.

Figure 2.2: The product packaging, displaying the assembled diorama and the Kiki's Delivery Service logo.
3. Safety Information
- This product contains small parts and is not suitable for children under 3 years old due to choking hazards.
- Use caution when handling sharp tools such as craft knives or scissors, which may be required for assembly.
- Ensure adequate ventilation if using adhesives. Follow the adhesive manufacturer's safety instructions.
- Keep all packaging materials away from children to prevent suffocation.
4. Package Contents
Before starting assembly, verify that all components are present. The kit includes:
- Multiple sheets of laser-cut hard paper components in various colors.
- Flocking material for creating grass and foliage textures.
- Detailed instruction manual (often pictorial, with Japanese text that can be translated if needed).

Figure 4.1: An overview of the kit's contents, including pre-cut paper sheets and decorative elements.
5. Assembly Instructions
This diorama requires careful assembly. The estimated assembly time is approximately 35 hours. Patience and attention to detail are key for a successful outcome.
5.1. Recommended Tools (Not Included)
- Craft knife or precision scissors
- Cutting mat
- Tweezers (for handling small parts)
- Craft glue (e.g., white glue, quick-drying craft adhesive)
- Ruler
- Pencil
5.2. General Assembly Steps
- Review Instructions: Carefully examine the included pictorial instructions. Although text may be in Japanese, the diagrams are highly detailed and provide clear guidance.
- Identify Parts: Before detaching, identify all parts for a specific section of the diorama. The laser-cut sheets are often numbered or grouped logically.
- Detach Components: Gently detach the pre-cut paper components from their sheets. Use a craft knife for cleaner cuts on intricate parts if necessary.
- Fold and Score: Fold along indicated score lines. Use a ruler to ensure crisp, straight folds.
- Apply Adhesive: Apply a small amount of craft glue to the designated tabs or areas. Avoid excessive glue, which can warp the paper or create visible residue.
- Assemble Sections: Assemble smaller sections first (e.g., individual buildings, characters, trees) before integrating them into the larger diorama base.
- Add Details: Once the main structures are assembled, add smaller details like characters, street lamps, and foliage. Use the provided flocking material for grass and greenery.
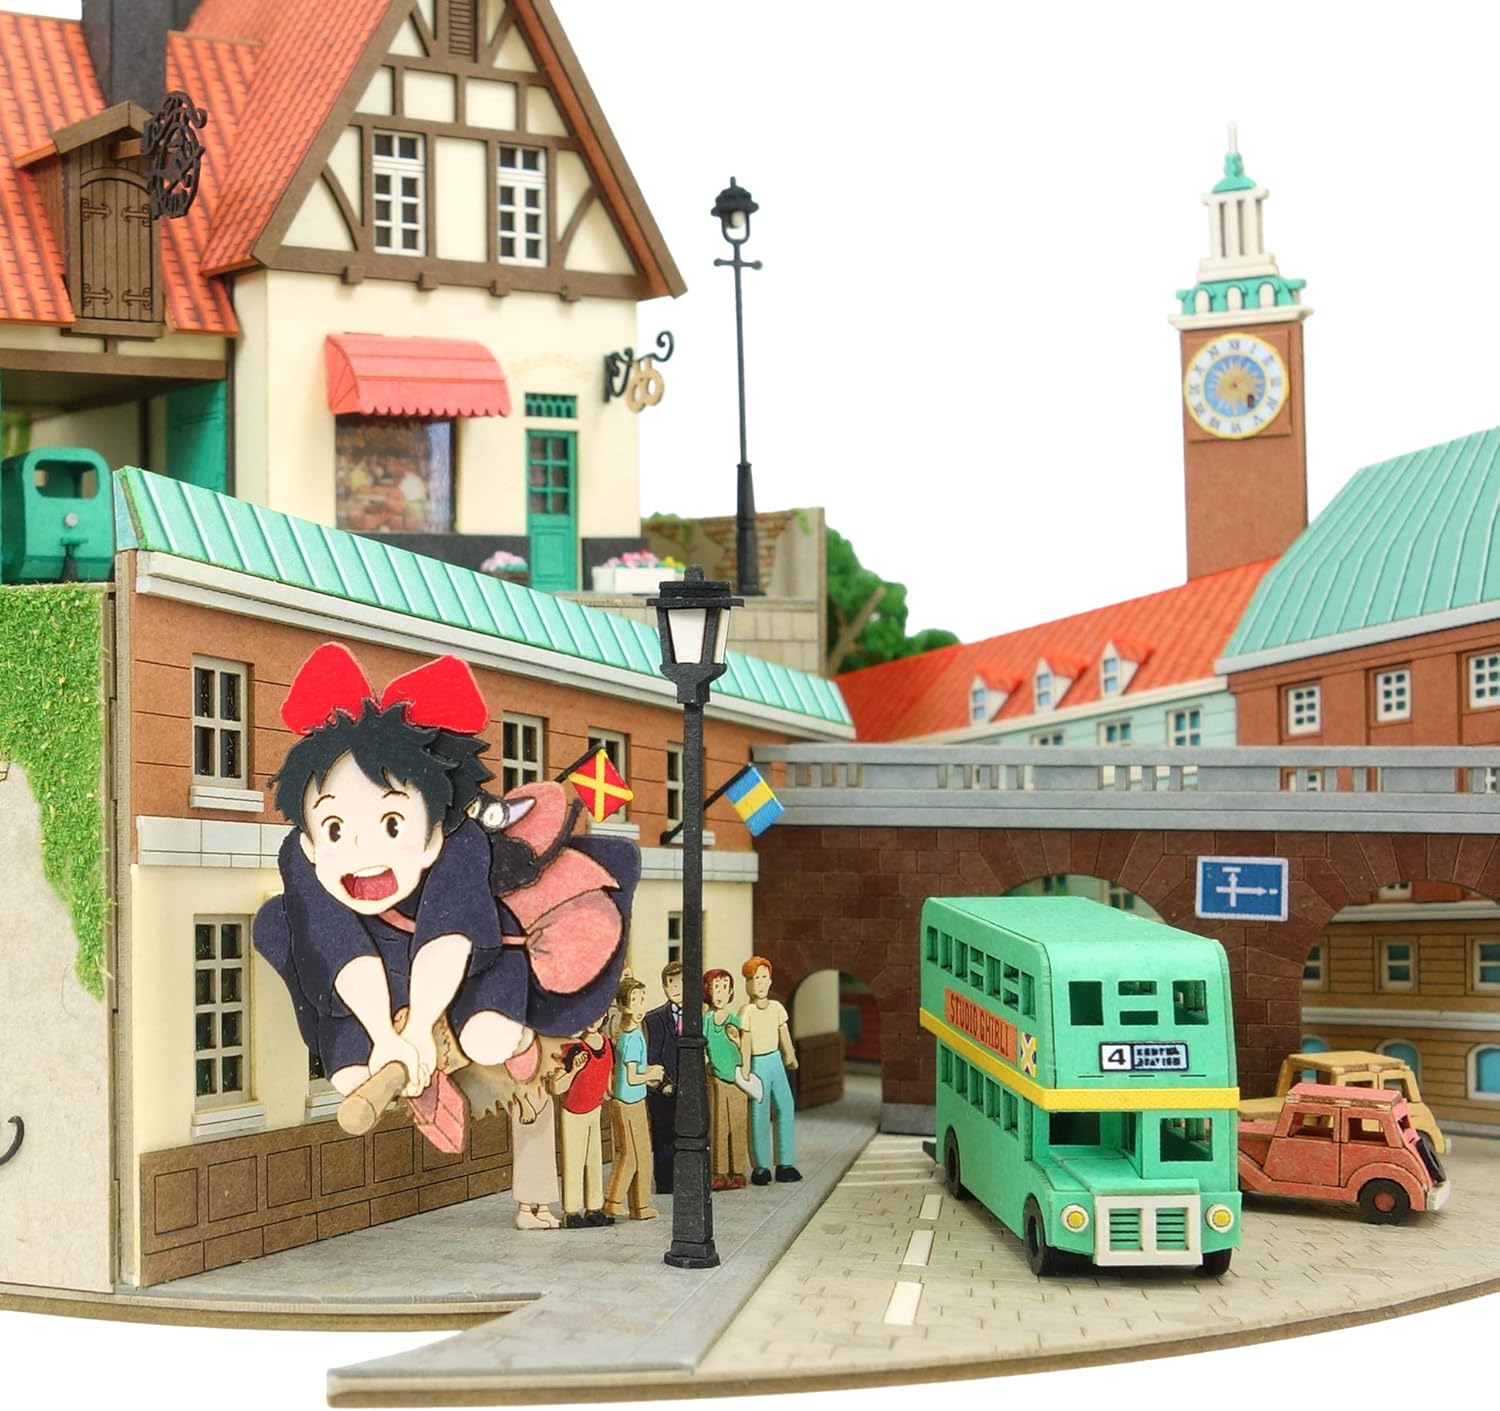
Figure 5.1: Detailed view of Kiki flying above the street, demonstrating the intricate paper construction.

Figure 5.2: Another detailed section showing Kiki near the clock tower, highlighting the layered paper construction.

Figure 5.3: A scene depicting Kiki and Tombo on a bicycle, illustrating character integration into the diorama.
6. Maintenance
- Cleaning: Dust the diorama gently with a soft brush or a can of compressed air. Avoid using wet cloths or cleaning solutions, as they can damage the paper.
- Display: Display the diorama in a dry environment, away from direct sunlight, high humidity, and extreme temperatures to prevent fading, warping, or degradation of the paper.
- Handling: Handle the completed diorama with care, supporting the base to prevent damage to delicate components.
7. Common Assembly Challenges
- Parts Not Fitting: Double-check the part numbers against the instructions. Ensure all score lines are properly folded.
- Glue Residue: Use a minimal amount of glue. If excess glue is visible, try to gently wipe it away with a dry cotton swab before it dries completely.
- Warped Paper: Excessive moisture from glue or high humidity can cause warping. Allow parts to dry completely under light pressure if possible.
- Lost Parts: Work in a clean, organized area to minimize the risk of losing small components.
8. Specifications
| Model Number | MP07-37 (Also referred to as MK07-37) |
| Product Dimensions (Assembled) | Approximately 9.1 x 7.1 x 4.5 inches (230 x 180 x 115 mm) |
| Item Weight | 1.8 pounds (0.82 kg) |
| Assembly Level | Advanced (★★★★☆) |
| Estimated Assembly Time | Approximately 35 hours |
| Manufacturer | Sankei |
| First Available Date | May 2, 2020 |
9. Warranty and Support
Specific warranty information for this paper craft kit is not provided. For product support or inquiries regarding missing parts, please contact the manufacturer, Sankei, directly through their official channels. Please retain your proof of purchase.


