
1. Introduction
This manual provides instructions for the proper installation, operation, and maintenance of the Taidacent XH-M542 Mono Audio Amplifier Board. The XH-M542 is a high-power digital audio amplifier module utilizing the TPA3116D2 chip, designed to deliver 100W of mono audio output. It operates within a 12-24V DC power supply range, making it suitable for various audio projects requiring a compact yet powerful amplification solution.

Image 1.1: Top view of the Taidacent XH-M542 Mono Audio Amplifier Board, showing the heatsink and main components.
2. Safety Information
Please read and understand all safety instructions before operating this device. Failure to follow these instructions may result in electric shock, fire, or damage to the product.
- Power Supply: Use a stable DC power supply within the specified voltage range of 12V to 24V. Exceeding 24V may damage the amplifier. Ensure correct polarity when connecting the power supply.
- Short Circuits: Avoid short circuits between output terminals, input terminals, or power terminals. This can cause severe damage to the amplifier and power supply.
- Heat Dissipation: The amplifier generates heat during operation. Ensure adequate ventilation and do not cover the heatsink. Prolonged operation at high power without proper cooling can lead to overheating.
- Handling: Electronic components can be sensitive to static electricity. Handle the board by its edges and avoid touching exposed components.
- Environment: Do not expose the amplifier to moisture, dust, or extreme temperatures. Operate in a clean, dry environment.
- Professional Installation: If you are unfamiliar with electronic circuits, seek assistance from a qualified professional for installation and wiring.
3. Features
The Taidacent XH-M542 amplifier board offers the following key features:
- High Power Output: Delivers up to 100W of mono audio power.
- Efficient Class D Amplification: Utilizes the TPA3116D2 digital amplifier chip for high efficiency and low heat generation.
- Wide Voltage Range: Operates with a DC input voltage from 12V to 24V.
- Integrated Volume Control: Features an onboard potentiometer for convenient volume adjustment.
- Compact Design: Small form factor for easy integration into various audio projects.
- Protection Features: Includes over-voltage, under-voltage, over-temperature, and short-circuit protection (inherent to TPA3116D2 chip).
4. Specifications
Refer to the table below for detailed technical specifications of the XH-M542 amplifier board:
| Parameter | Value |
|---|---|
| Model | XH-M542 |
| Amplifier Chip | TPA3116D2 |
| Channel Type | Mono |
| Output Power | 100W |
| Supply Voltage | DC 12V - 24V (Maximum 26V) |
| Dimensions (L x W x H) | 79mm x 54mm x 16mm (approx. 3.11 x 2.13 x 0.67 inches) |
| Mounting Type | Surface Mount (for chip) |
| UPC | 681413653979 |
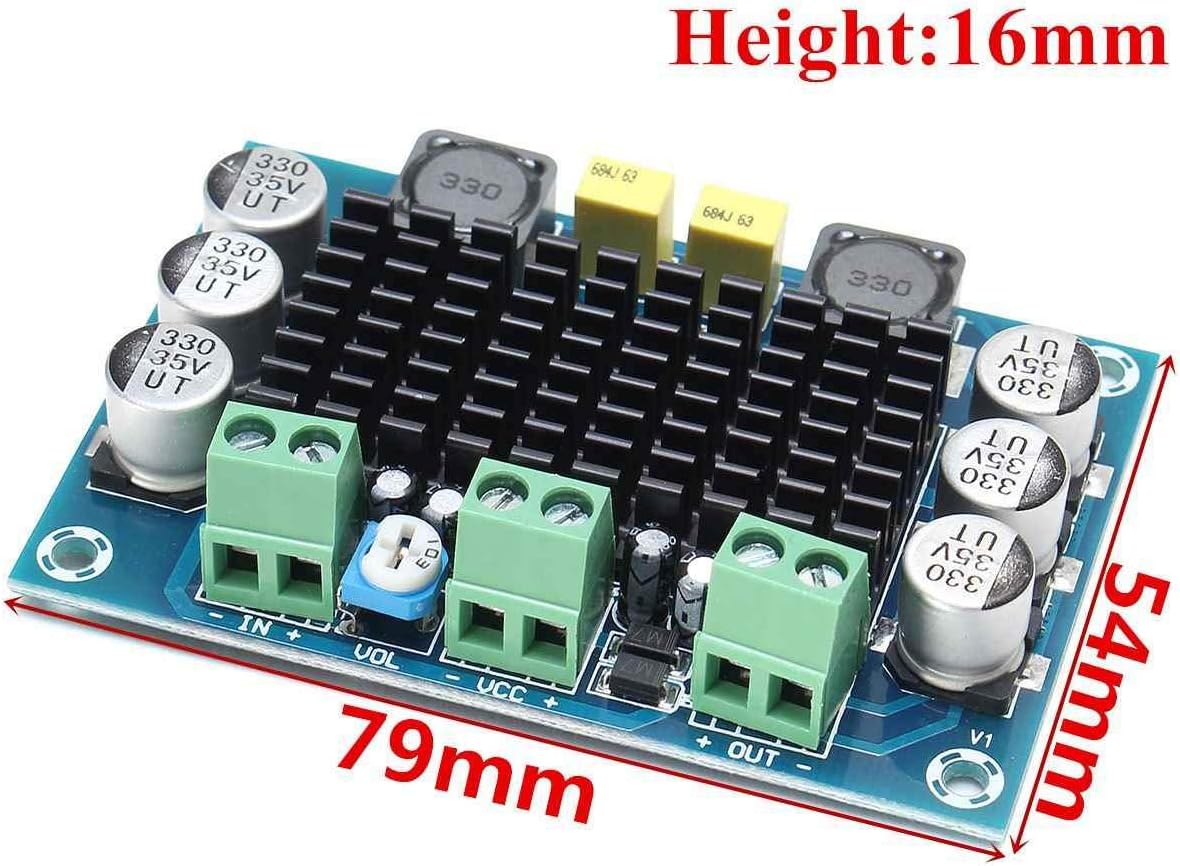
Image 4.1: The amplifier board displaying its physical dimensions (79mm length, 54mm width, 16mm height).
5. Setup Instructions
Follow these steps to correctly connect your XH-M542 amplifier board. Refer to the connection diagram below for visual guidance.
- Identify Terminals: Locate the following terminals on the amplifier board:
- IN+ / IN-: Audio input terminals.
- VCC+ / VCC-: DC power input terminals.
- OUT+ / OUT-: Audio output terminals for connecting a speaker.
- VOL: Volume control potentiometer.
- Connect Audio Input: Connect your audio source (e.g., smartphone, MP3 player, preamplifier) to the IN+ and IN- terminals. Ensure proper signal polarity.
- Connect Audio Output (Speaker): Connect your speaker to the OUT+ and OUT- terminals. Observe speaker polarity if applicable for your speaker system. This amplifier is mono, so connect a single speaker or combine channels from a stereo source before input.
- Connect Power Supply: Connect a DC power supply (12V-24V) to the VCC+ (positive) and VCC- (negative) terminals. Crucially, ensure correct polarity to prevent damage to the board.
- Initial Volume Setting: Before applying power, turn the VOL potentiometer to its minimum setting (fully counter-clockwise) to avoid sudden loud sounds.

Image 5.1: Connection diagram illustrating how to connect audio input, power supply, and audio output (speaker) to the XH-M542 amplifier board.
6. Operating Instructions
Once the amplifier is correctly wired, follow these steps for operation:
- Power On: Apply power to the DC power supply connected to the amplifier board.
- Adjust Volume: Slowly rotate the VOL potentiometer clockwise to increase the volume to your desired listening level.
- Audio Playback: Begin playing audio from your connected source.
- Power Off: To turn off the amplifier, disconnect the power supply. It is recommended to turn the volume down before powering off.
7. Maintenance
Proper maintenance ensures the longevity and optimal performance of your amplifier board:
- Cleaning: Keep the board clean and free from dust. Use a soft, dry brush or compressed air to remove dust. Do not use liquid cleaners.
- Environment: Ensure the amplifier is operated in a dry, well-ventilated area, away from direct sunlight, moisture, and corrosive substances.
- Connections: Periodically check all wiring connections to ensure they are secure and free from corrosion.
- Heat Management: Ensure the heatsink remains unobstructed for effective heat dissipation.
8. Troubleshooting
If you encounter issues with your XH-M542 amplifier, refer to the following common problems and solutions:
| Problem | Possible Cause | Solution |
|---|---|---|
| No sound output |
|
|
| Distorted or unclear sound |
|
|
| Amplifier overheating |
|
|
| Power LED not lighting up |
|
|
9. Warranty & Support
This product is covered by a standard manufacturer's warranty against defects in materials and workmanship. For specific warranty terms, please refer to the purchase documentation or contact your retailer. For technical support or further assistance, please reach out to the Taidacent customer service through your point of purchase.