1. Introduction
The Andonstar AD407 is a high-definition 3D HDMI digital microscope designed for detailed observation and precision work. Featuring a 4MP UHD camera, a 7-inch adjustable IPS LCD screen, and HDMI output, it is an ideal tool for various applications including phone repair, SMT/SMD soldering, DIY electronics, and general inspection tasks. This manual provides comprehensive instructions for setting up, operating, and maintaining your AD407 digital microscope.

Figure 1.1: Andonstar AD407 Digital Microscope with Remote Control.
This image displays the complete Andonstar AD407 digital microscope setup, including the main unit with its 7-inch LCD screen, the adjustable stand, flexible LED lights, and the wireless remote control. The microscope is positioned on its base, ready for use.
2. Safety Information
Please read all safety instructions carefully before using the Andonstar AD407 digital microscope to ensure safe and proper operation.
- Power Supply: Use only the provided power adapter. Ensure the voltage matches the requirements specified for the device.
- Environment: Operate the microscope in a dry, stable environment. Avoid exposure to extreme temperatures, humidity, dust, or direct sunlight.
- Handling: Handle the microscope with care. Avoid dropping or subjecting it to strong impacts.
- Lens Care: Do not touch the lens directly with your fingers. Use a soft, lint-free cloth for cleaning.
- UV Filter: The UV filter is designed to protect the lens from heat, smoke, and dust, especially during soldering. Ensure it is properly installed.
- Ventilation: Ensure adequate ventilation around the device to prevent overheating.
- Children: Keep the device out of reach of small children.
3. Package Contents
Verify that all items listed below are included in your package:
- AD407 Microscope host
- UV filter (pre-assembled in front of the lens)
- Metal base plate
- Metal Column
- Wrench
- Metal clips
- HDMI cable
- Switch cable
- Power plug
- Remote control
- Instructions manual

Figure 3.1: Contents of the AD407 Package.
This image illustrates all the components included in the Andonstar AD407 digital microscope package, laid out clearly for verification. It shows the microscope unit, stand components, cables, power adapter, remote control, and the instruction manual.
4. Product Overview
Familiarize yourself with the main components and controls of your Andonstar AD407 digital microscope.
4.1 Main Unit and Screen Controls

Figure 4.1: Adjustable Screen and Control Buttons.
This image highlights the adjustable 7-inch LCD screen of the AD407 microscope, demonstrating its range of motion. It also clearly labels the control buttons located beneath the screen: (1) Power on/off, (2) Mode/Menu, (3) Up, (4) Down, (5) OK/Start video record, (6) Picture capture, and (7) Infrared sensor for remote control.
4.2 Ports and Connections

Figure 4.2: Connectivity Ports and Power Setup.
This diagram illustrates the various ports on the microscope unit, including the Memory card (not included) port, USB port, and HDMI output. It also shows the connections for the main power supply (USB to power up the microscope) and the separate power connection for the adjustable side spotlights, along with their brightness control switch.
4.3 Wireless Remote Control

Figure 4.3: Remote Control Button Functions.
This image provides a detailed layout of the wireless remote control, labeling each button with its corresponding function, such as Capture, Menu, Mode, Zoom in/out, Brightness up/down, Sharpness, Contrast, Black & White, Inverse, and file management options. This remote allows for convenient operation from a distance.
5. Setup
Follow these steps to assemble and prepare your AD407 digital microscope for first use.
- Assemble the Stand: Attach the metal column to the metal base plate using the provided wrench and screws.
- Mount the Microscope: Securely attach the microscope host to the adjustable bracket on the metal column.
- Connect Power: Connect the USB power cable to the microscope's USB port and then to the power plug. Plug the power plug into a suitable electrical outlet. Connect the switch cable for the side lights to their respective ports and to the main power supply.
- Insert Micro SD Card (Optional): If you plan to capture photos or videos, insert a Class 10 high-speed Micro SD card (up to 64GB, not included) into the designated slot on the microscope.
- Adjust Screen Angle: The 7-inch LCD screen can be tilted and adjusted for optimal viewing comfort.
- Position Side Lights: Adjust the flexible arms of the two metal base plate side lights to illuminate your working area effectively.
6. Operating Instructions
Learn how to operate your Andonstar AD407 digital microscope for various tasks.
6.1 Powering On/Off
Press the Power on/off button (1) located below the screen to turn the microscope on or off.
6.2 Adjusting Focus and Working Distance
Rotate the metal focusing wheel on the microscope body to adjust the focus. Use the bracket knob to fine-tune the working distance between the lens and the object. The adjustable stand allows for significant working space, suitable for soldering and other tasks requiring clearance.

Figure 6.1: Demonstrating Real 3D Effect and Depth of Field.
This image illustrates the microscope's capability to produce a real 3D effect with great depth of field, allowing users to observe objects with enhanced perception of their three-dimensional structure. This feature is particularly useful for intricate tasks like soldering.
6.3 Adjusting LED Lights
The AD407 features 8 intensity levels of LED lights, including two flexible side lights. Use the brightness control switch on the power cable for the side lights to adjust their intensity. The flexible arms allow you to direct light precisely onto your subject, optimizing image brightness and clarity.
6.4 Capturing Photos and Videos
With a Micro SD card inserted, you can easily capture images and record videos:
- Photo Capture: Press the Picture capture button (6) on the screen or the 'Capture' button on the remote control to take a still image.
- Video Recording: Press the OK/Start video record button (5) on the screen or the 'OK' button on the remote control to start/stop video recording.
Captured files are saved directly to the Micro SD card.
6.5 HDMI Output
The AD407 supports simultaneous dual-screen display via HDMI output. Connect an HDMI cable from the microscope's HDMI port to an external monitor or TV to view the microscopic world on a larger screen. Both the microscope's screen and the external display will show the image simultaneously.
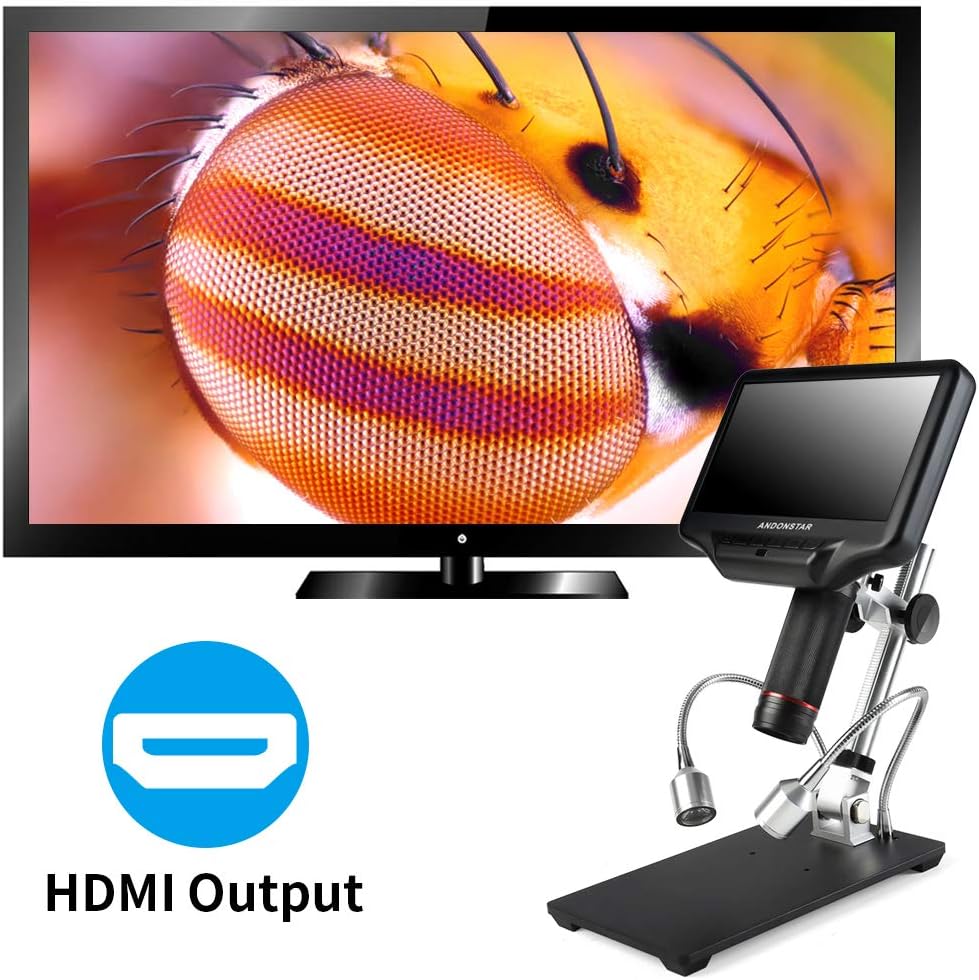
Figure 6.2: HDMI Output Functionality.
This image demonstrates the HDMI output capability of the Andonstar AD407 microscope, showing the microscope connected to an external television. The detailed image of an insect's eye is displayed on the large screen, illustrating the clarity and utility of the HDMI feature for shared viewing or larger display needs.
6.6 Using the Remote Control
The wireless remote control provides convenient access to various functions from a distance, minimizing device shake. Point the remote towards the infrared sensor (7) on the microscope. Functions include digital zoom, image discoloration, menu navigation, and more (refer to Figure 4.3 for button layout).
7. Maintenance
Proper care and maintenance will extend the lifespan and performance of your AD407 digital microscope.
- Cleaning the Lens and Screen: Use a soft, lint-free cloth specifically designed for optical lenses to clean the microscope lens and LCD screen. For stubborn smudges, a small amount of lens cleaning solution can be applied to the cloth (not directly to the lens/screen).
- UV Filter Care: The unique UV filter is designed to protect the metal lens from soldering heat, smoke, and dust. Regularly inspect and clean the UV filter. If it becomes excessively dirty or damaged, it can be replaced.
- General Cleaning: Wipe the microscope body and stand with a dry, soft cloth. Avoid using abrasive cleaners or solvents.
- Storage: When not in use, store the microscope in a clean, dry place, away from direct sunlight and extreme temperatures. Consider covering it to prevent dust accumulation.

Figure 7.1: UV Filter Functionality.
This image illustrates the purpose of the UV filter located at the bottom of the microscope lens. It highlights how the filter prevents interfering lights, clears the image, and protects the lens from external elements such as smoke, heat, and dust, making it ideal for soldering and maintenance professionals.
8. Troubleshooting
If you encounter issues with your AD407 microscope, refer to the following common problems and solutions:
| Problem | Possible Cause | Solution |
|---|---|---|
| Microscope does not power on. | No power, loose connection, faulty adapter. | Ensure power adapter is securely connected and plugged into a working outlet. Check the power switch. |
| Image is blurry or out of focus. | Incorrect focus, improper working distance, dirty lens. | Adjust the focusing wheel. Adjust the height of the microscope on the stand. Clean the lens and UV filter. |
| No image on external HDMI display. | HDMI cable not connected properly, incorrect input source on TV/monitor. | Ensure HDMI cable is securely connected to both microscope and display. Select the correct HDMI input source on your TV/monitor. |
| Cannot capture photos/videos. | No Micro SD card, card full, card not formatted, card error. | Insert a Micro SD card. Delete unnecessary files or use a new card. Format the card (refer to menu options). |
| Remote control not working. | Low battery, remote not pointed at sensor, obstruction. | Replace remote control battery. Ensure remote is pointed directly at the infrared sensor on the microscope. Remove any obstructions. |
| LED lights are not working or dim. | Loose connection, brightness setting too low. | Check the connection of the light switch cable. Adjust the brightness using the switch. |
9. Specifications
Key technical specifications for the Andonstar AD407 Digital Microscope:
| Feature | Specification |
|---|---|
| Model Name | AD407 |
| Item Model Number | AD407-JP |
| Product Dimensions | 8.66 x 3.94 x 12.6 inches (22 x 10 x 32 cm) |
| Item Weight | 3.32 pounds (1.5 kg) |
| Screen Size | 7 inch IPS LCD |
| Video Output | HDMI, USB |
| Video Resolution | 2160P UHD (for video record) |
| Image Sensor | 4MP |
| Magnification Maximum | 270.00x |
| Light Source Type | LED (8 levels adjustable) |
| Material | Plastic, Metal |
| Color | Black |
| Power Input | 5 Volts |
| Batteries | Lithium Polymer batteries required (included for remote control) |
| Compatible Devices | Television (via HDMI) |
| Objective Lens Description | Achromatic |
| Country of Origin | China |
10. Warranty and Support
Andonstar provides professional after-sales service for its products. For warranty information, technical support, or service inquiries, please refer to the contact information provided with your product packaging or visit the official Andonstar website. Please retain your purchase receipt for warranty claims.


