1. Introduction
This manual provides essential information for the safe assembly, operation, and maintenance of your Schwinn Voyageur Electric Bike. Please read this manual thoroughly before your first ride and retain it for future reference. Adherence to these instructions will ensure optimal performance and longevity of your electric bicycle.

Figure 1.1: The Schwinn Voyageur Electric Bike. This image displays the full bicycle from a slight angle, highlighting its dark blue frame, mid-drive motor, front suspension fork, and disc brakes.

Figure 1.2: Schwinn Quality and Safety Certifications. This image shows the Schwinn logo with 'Quality' and the text 'The Brand You Trust', alongside an SGS certification mark indicating conformity to ANSI/CAN/UL2849 standards for electric bicycles.
2. Safety Guidelines
Always wear a helmet when riding. Obey all local traffic laws and regulations. Perform a pre-ride safety check before each use. Do not ride under the influence of alcohol or drugs. Ensure the battery is securely locked in place before riding.
3. Product Components
Familiarize yourself with the main parts of your Schwinn Voyageur Electric Bike.

Figure 3.1: Key Features of the Electric Bike. This diagram highlights various components including comfort-tuned geometry, lightweight aluminum frame, suspension fork with lockout, 8-speed Shimano drivetrain, mid-drive motor, and mechanical disc brakes.
3.1. Handlebars and Controls

Figure 3.2: Handlebar Assembly. This image shows the handlebars, brake levers, gear shifters, and the mounting point for the LCD display and controller.
3.2. Mid-Drive Motor

Figure 3.3: Mid-Drive Motor. A detailed view of the 250-watt mid-drive motor integrated into the bike's frame, connected to the crankset and chain.
3.3. Battery

Figure 3.4: Integrated Battery Pack. This image shows the removable battery pack, labeled 'Voyageur', integrated into the downtube of the bicycle frame, with its charge indicator visible.
3.4. Suspension Fork and Disc Brakes
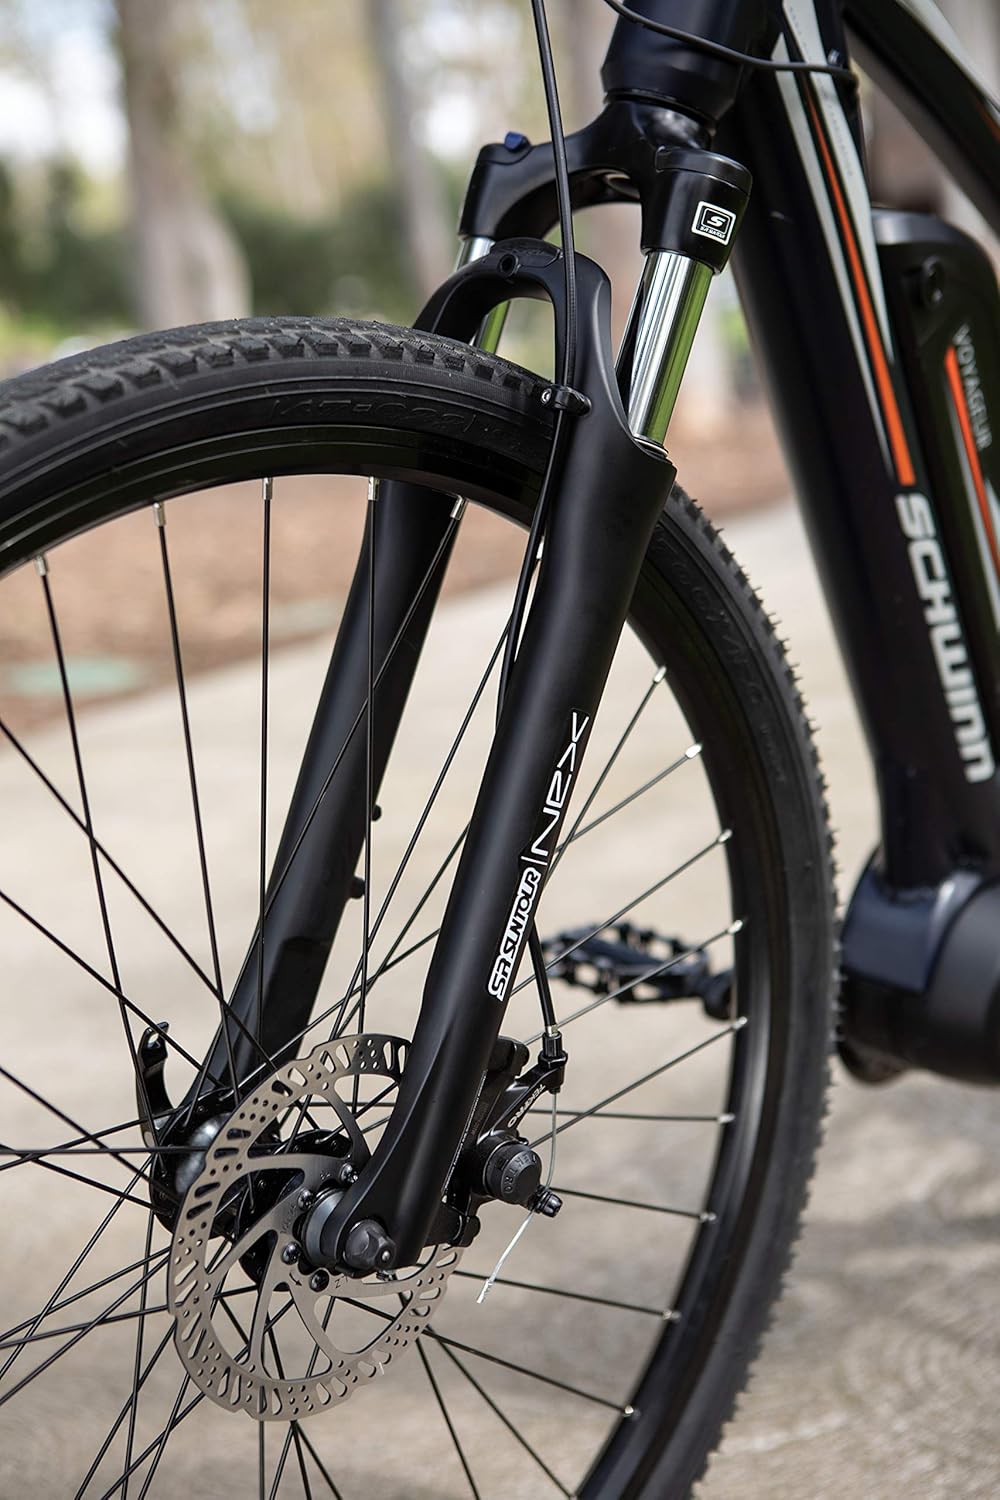
Figure 3.5: Front Suspension and Disc Brake. A close-up view of the SR Suntour NEX suspension fork and the mechanical disc brake caliper and rotor on the front wheel.
3.5. Saddle

Figure 3.6: Bicycle Saddle. A close-up of the comfortable saddle, designed for extended rides.
3.6. Drivetrain
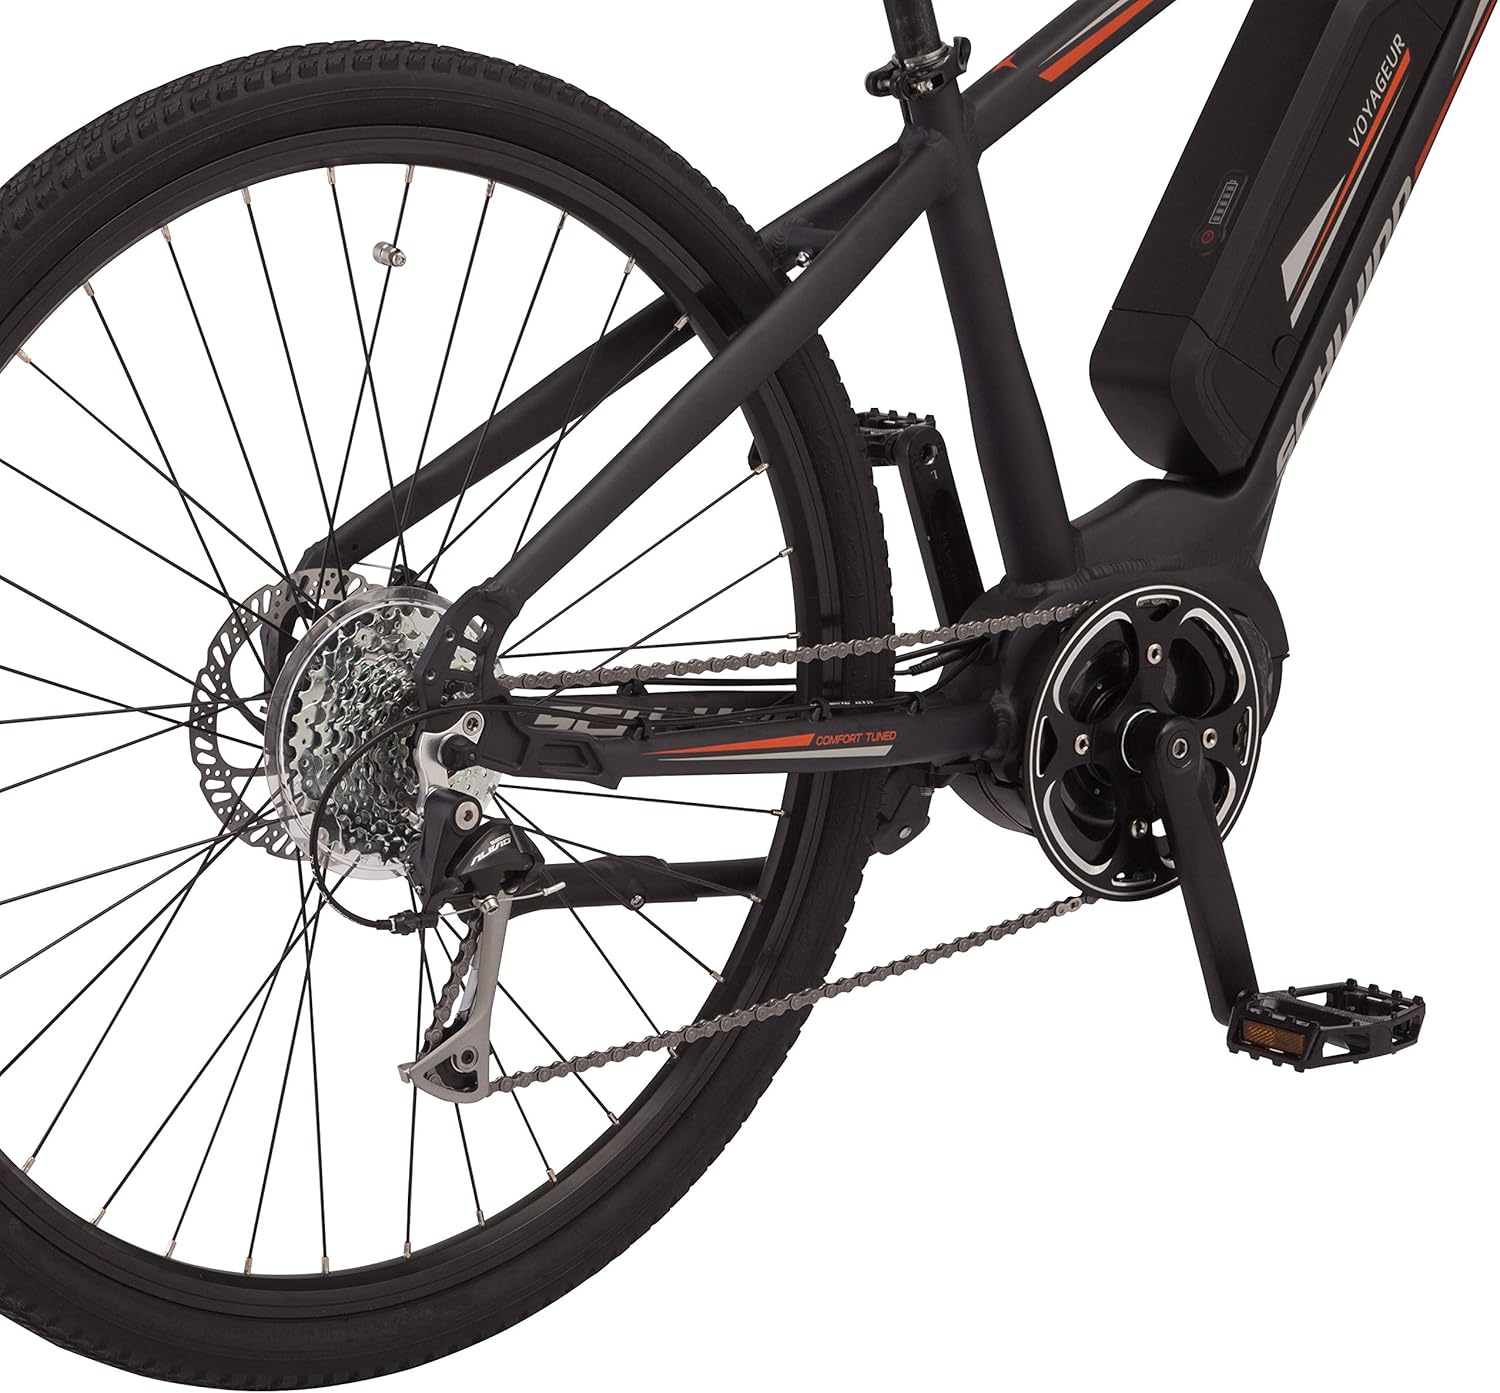
Figure 3.7: Rear Drivetrain. This image details the rear wheel's cassette, chain, and Shimano derailleur, part of the 8-speed drivetrain.
4. Setup and Initial Preparation
4.1. Unpacking and Assembly
Carefully remove all components from the packaging. Refer to the separate assembly guide for detailed instructions on attaching the front wheel, handlebars, pedals, and seat post. Ensure all bolts are tightened to the manufacturer's specifications.
4.2. Battery Installation and Initial Charge
Before first use, fully charge the battery. The battery can be charged while installed on the bike or removed.
- Unlock the battery using the provided key.
- Slide the battery out of the frame.
- Connect the charger to the battery and a power outlet. The indicator light on the charger will show charging status.
- Once fully charged, disconnect the charger and re-install the battery, ensuring it clicks securely into place and is locked with the key.

Figure 4.1: Battery Removal/Installation. This image demonstrates the process of removing or installing the battery pack from the bike's downtube, showing the key slot and the battery partially disengaged.
4.3. Adjusting Rider Fit
Proper bike fit is crucial for comfort and safety. Adjust the seat height so that your leg has a slight bend at the knee when the pedal is at its lowest point. Ensure handlebars are at a comfortable height and angle.

Figure 4.2: Rider Height and Frame Size Guide. This chart provides recommendations for frame size and wheel size based on rider height, ensuring a proper fit for optimal riding experience.
5. Operating Instructions
5.1. Powering On and Off
To power on the electric system, press and hold the power button on the handlebar controller. The LCD display will illuminate. To power off, press and hold the power button again.

Figure 5.1: LCD Display and Controller. This image shows the handlebar-mounted controller with buttons for power, mode, and information, alongside the LCD display showing speed, battery level, and pedal assist level.

Figure 5.2: Detailed View of Display and Controller. A closer look at the Bafang LCD display and the control unit, illustrating the interface for managing pedal assist levels and viewing ride data.
5.2. Pedal Assist Levels
Your Schwinn Voyageur Electric Bike features 5 levels of pedal assistance. Use the '+' and '-' buttons on the controller to adjust the assist level. Level 0 provides no assistance, while Level 5 provides maximum assistance. The chosen level will be displayed on the LCD screen.

Figure 5.3: Riding with Pedal Assistance. A rider on the Schwinn Voyageur electric bike, demonstrating the benefit of pedal assistance for extended and faster rides.
5.3. Shifting Gears
The bike is equipped with an 8-speed Shimano drivetrain. Use the shifters on the handlebars to change gears according to terrain and desired pedaling effort. Shift to a lower gear for climbing hills and a higher gear for flat terrain or descents.
5.4. Braking
The bike features mechanical disc brakes for reliable stopping power. Apply both brake levers simultaneously for controlled braking. Avoid sudden, hard braking, especially at high speeds or on loose surfaces.
6. Maintenance
Regular maintenance ensures the safety and performance of your electric bike.
6.1. Battery Care
- Charge the battery regularly, even if not in use, to maintain its health.
- Avoid fully discharging the battery.
- Store the battery in a cool, dry place, away from direct sunlight and extreme temperatures.
- Do not expose the battery to water or moisture.
6.2. Tire Pressure
Check tire pressure before each ride. Maintain the pressure recommended on the tire sidewall for optimal performance and puncture resistance.
6.3. Cleaning
Clean the bike with a damp cloth and mild soap. Avoid using high-pressure washers directly on electrical components, bearings, or the motor.
6.4. General Inspection
Periodically check the following:
- Brake function and pad wear.
- Chain lubrication and tension.
- Tightness of all bolts and quick releases.
- Condition of tires and wheels.
7. Troubleshooting
| Problem | Possible Cause | Solution |
|---|---|---|
| Motor not assisting | Battery low or not installed correctly; System not powered on; Pedal assist level set to 0. | Charge battery and ensure it's locked; Power on the system; Increase pedal assist level. |
| Display not turning on | Battery discharged; Loose cable connection. | Charge battery; Check all cable connections to the display and controller. |
| Brakes feel weak | Worn brake pads; Cable tension too loose. | Inspect and replace brake pads if necessary; Adjust brake cable tension. Consult a bike mechanic if unsure. |
| Unusual noises | Loose components; Dry chain; Derailleur misalignment. | Check all bolts; Lubricate chain; Have derailleur adjusted by a professional. |
8. Specifications
| Feature | Detail |
|---|---|
| Model | Schwinn Voyageur Electric Bike (S7516LGAZ) |
| Frame | Large Step-Through, Lightweight Aluminum |
| Motor | 250 Watt Mid-Drive |
| Battery | Lithium Ion, 400 Watt Hours |
| Pedal Assist Levels | 5 Levels |
| Drivetrain | 8-Speed Shimano |
| Brakes | Mechanical Disc Brakes |
| Fork | Suspension Fork with Lockout |
| Wheel Size | 700c or 28" (for Medium frame) |
| Item Weight | 29 kg (63.9 lbs) |
| Parcel Dimensions | 151.76 x 80.01 x 24.76 cm |
| Model Year | 2019 |

Figure 8.1: Power Specifications. This image highlights the 250 Watt mid-drive motor and the pedal assist capability up to 20 mph.
9. Warranty Information
Schwinn electric bikes typically come with a limited warranty covering manufacturing defects. Specific warranty terms and duration may vary by component (frame, motor, battery, other parts). Please refer to the warranty card included with your purchase or visit the official Schwinn website for the most current and detailed warranty information.
Important: Keep your proof of purchase for warranty claims.
10. Customer Support
For technical assistance, parts, or warranty inquiries, please contact Schwinn customer support. You can find contact information on the official Schwinn website or through your retailer.
Schwinn Official Website: www.schwinnbikes.com


