1. Introduction
This manual provides detailed instructions for the Nobsound NS-21G Mini Bluetooth 5.0 2.1 Channel HiFi Stereo Bass Class D Amplifier. Please read this manual thoroughly before operating the device to ensure proper use and to prevent damage.
The NS-21G is a versatile 2.1 channel amplifier designed for home audio systems, offering multiple input options including Bluetooth 5.0, AUX, TF card, U disk, and FM radio. It delivers powerful and clear audio output for both speakers and subwoofers.
2. Package Contents
Verify that all items listed below are included in your package:
- 1 x Nobsound NS-21G 2.1CH Amplifier
- 1 x 19V Power Supply
- 1 x Remote Control
- 1 x English User Manual (this document)
3. Product Overview
Familiarize yourself with the amplifier's front and rear panels, and internal components.
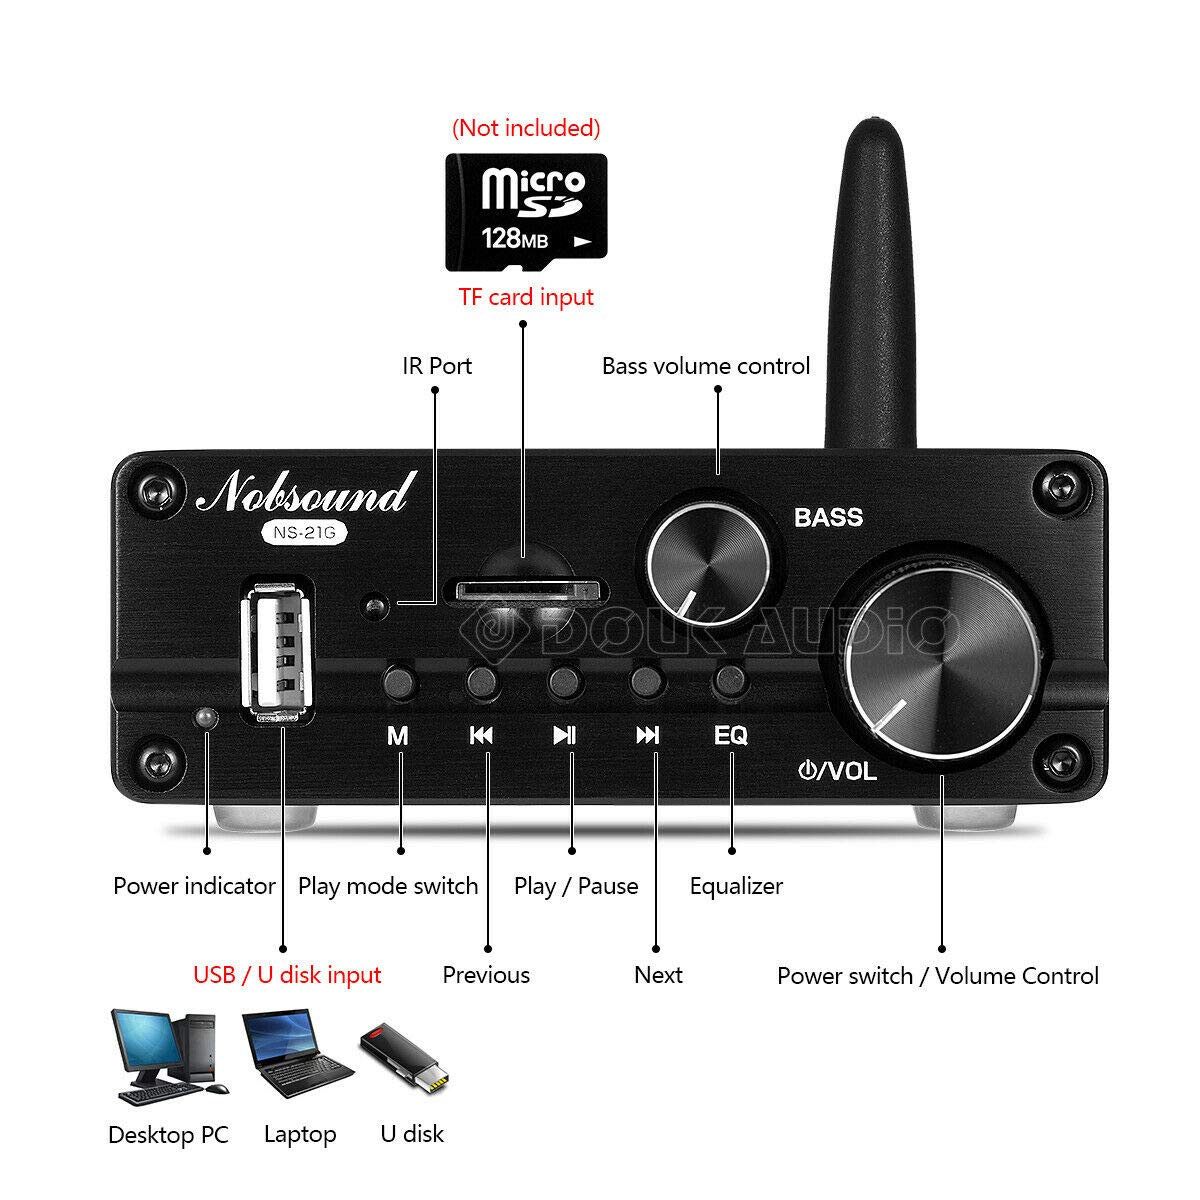
Figure 3.1: Front Panel Layout
- USB / U Disk Input: For playing audio files from a USB drive.
- Power Indicator: LED light indicating power status.
- Play Mode Switch (M): Cycles through input modes (Bluetooth, AUX, TF, U Disk, FM).
- Previous (◀◀): Skips to the previous track.
- Play / Pause (►▌▌): Toggles play/pause.
- Next (►►): Skips to the next track.
- Equalizer (EQ): Adjusts sound equalization settings.
- Power Switch / Volume Control (●/VOL): Turns the unit on/off and adjusts master volume.
- Bass Volume Control (BASS): Adjusts the bass level.
- IR Port: For remote control signal reception.
- TF Card Input: For playing audio files from a MicroSD/TF card (not included).

Figure 3.2: Rear Panel Layout
- Bluetooth Antenna (BT): For wireless Bluetooth connection.
- AUX Input: 3.5mm stereo input for external audio devices.
- Speaker Output (R, L, B): Binding posts for connecting passive speakers (Right, Left, Bass/Subwoofer).
- DC IN 12V-24V: Power input jack for the included power adapter.
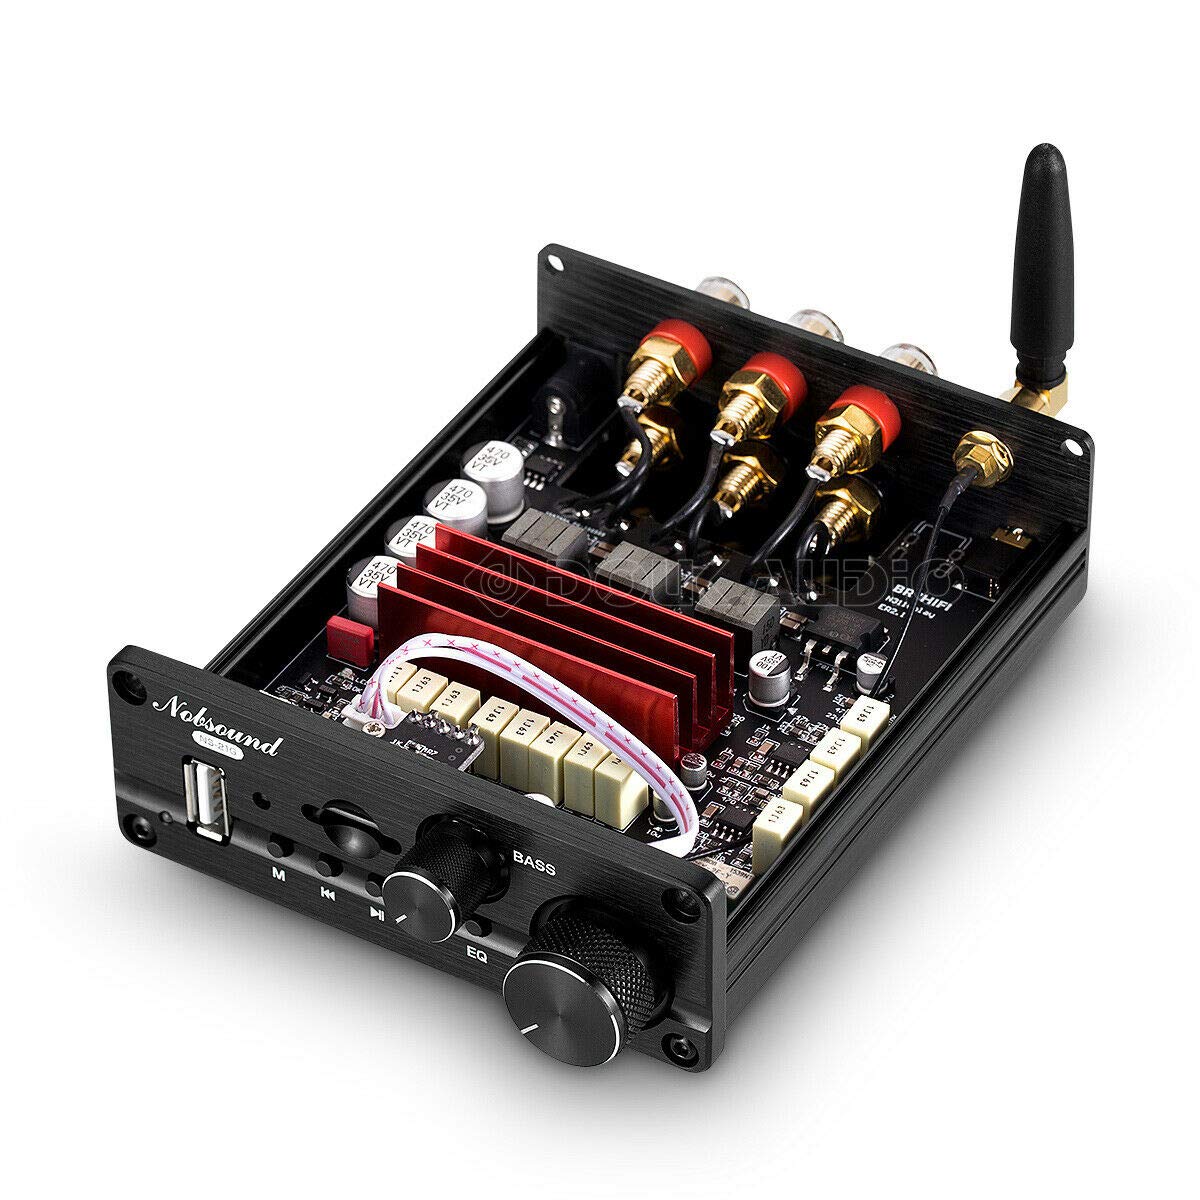
Figure 3.3: Internal Components Overview
This image displays the internal layout of the amplifier, highlighting the circuit board, heat sinks, and various electronic components responsible for audio processing and amplification. It demonstrates the compact and efficient design of the unit.
4. Setup
4.1 Connecting Speakers
- Ensure the amplifier is turned off and unplugged from the power source.
- Connect your passive speakers to the "SPEAKER OUTPUT" binding posts on the rear panel.
- Connect the right speaker to the "R" terminal, the left speaker to the "L" terminal, and your subwoofer (if applicable) to the "B" (Bass) terminal. Ensure correct polarity (+ to + and - to -) for optimal sound quality.
Figure 4.1: Speaker Connection Diagram
This diagram illustrates how to connect 2.1 channel passive speakers to the amplifier's speaker output terminals. It shows the right, left, and bass (subwoofer) connections.
4.2 Power Connection
- Connect the included 19V power adapter to the "DC IN 12V-24V" port on the rear panel of the amplifier.
- Plug the power adapter into a suitable wall outlet. The power indicator LED on the front panel will illuminate.
Figure 4.2: Power Connection Diagram
This diagram shows the connection of the 19V power supply to the DC input port on the amplifier's rear panel.
5. Operating Instructions
5.1 Power On/Off and Volume Control
- To power on the amplifier, rotate the "Power Switch / Volume Control" knob clockwise. The power indicator LED will light up.
- Continue rotating clockwise to increase the volume. Rotate counter-clockwise to decrease the volume.
- To power off, rotate the knob counter-clockwise until it clicks.
5.2 Input Mode Selection
The amplifier supports 5 audio input modes:
- Bluetooth 5.0
- AUX (3.5mm)
- TF Card
- U Disk (USB)
- FM Radio
Press the "M" (Mode) button on the front panel or the remote control to cycle through the available input modes.

Figure 5.1: Multiple Audio Input Options
This image highlights the amplifier's capability to connect to various audio sources, including Bluetooth 5.0 devices like smartphones, laptops, and other media players.
5.3 Bluetooth Connection
- Switch the amplifier to Bluetooth mode using the "M" button. The Bluetooth indicator will flash.
- On your device (smartphone, tablet, etc.), enable Bluetooth and search for "Nobsound NS-21G" or a similar name.
- Select the amplifier from the list to pair. Once connected, the Bluetooth indicator will stop flashing and remain solid.
5.4 USB / TF Card Playback
- Insert a USB flash drive into the "USB / U Disk Input" port or a TF card into the "TF Card Input" slot.
- Switch the amplifier to U Disk or TF Card mode using the "M" button.
- The amplifier will automatically detect and play audio files from the storage device. Use the "Previous" (◀◀), "Play / Pause" (►▌▌), and "Next" (►►) buttons to control playback.
5.5 FM Radio Operation
Note: For FM radio functionality, a high-gain antenna is recommended. Performance may vary by region.
- Switch the amplifier to FM Radio mode using the "M" button.
- Use the "Previous" (◀◀) and "Next" (►►) buttons to scan for radio stations.
5.6 Equalizer (EQ) Adjustment
Press the "EQ" button on the front panel or remote control to cycle through preset equalizer modes (e.g., Pop, Rock, Jazz, Classic, etc.) or to activate custom EQ settings if available.
Note: EQ function is not available in AUX input mode. The frequency adjustment range is 30 Hz to 500 Hz.
5.7 Remote Control Operation
The included remote control provides convenient access to all amplifier functions, including power, volume, input mode selection, playback control, and EQ settings.
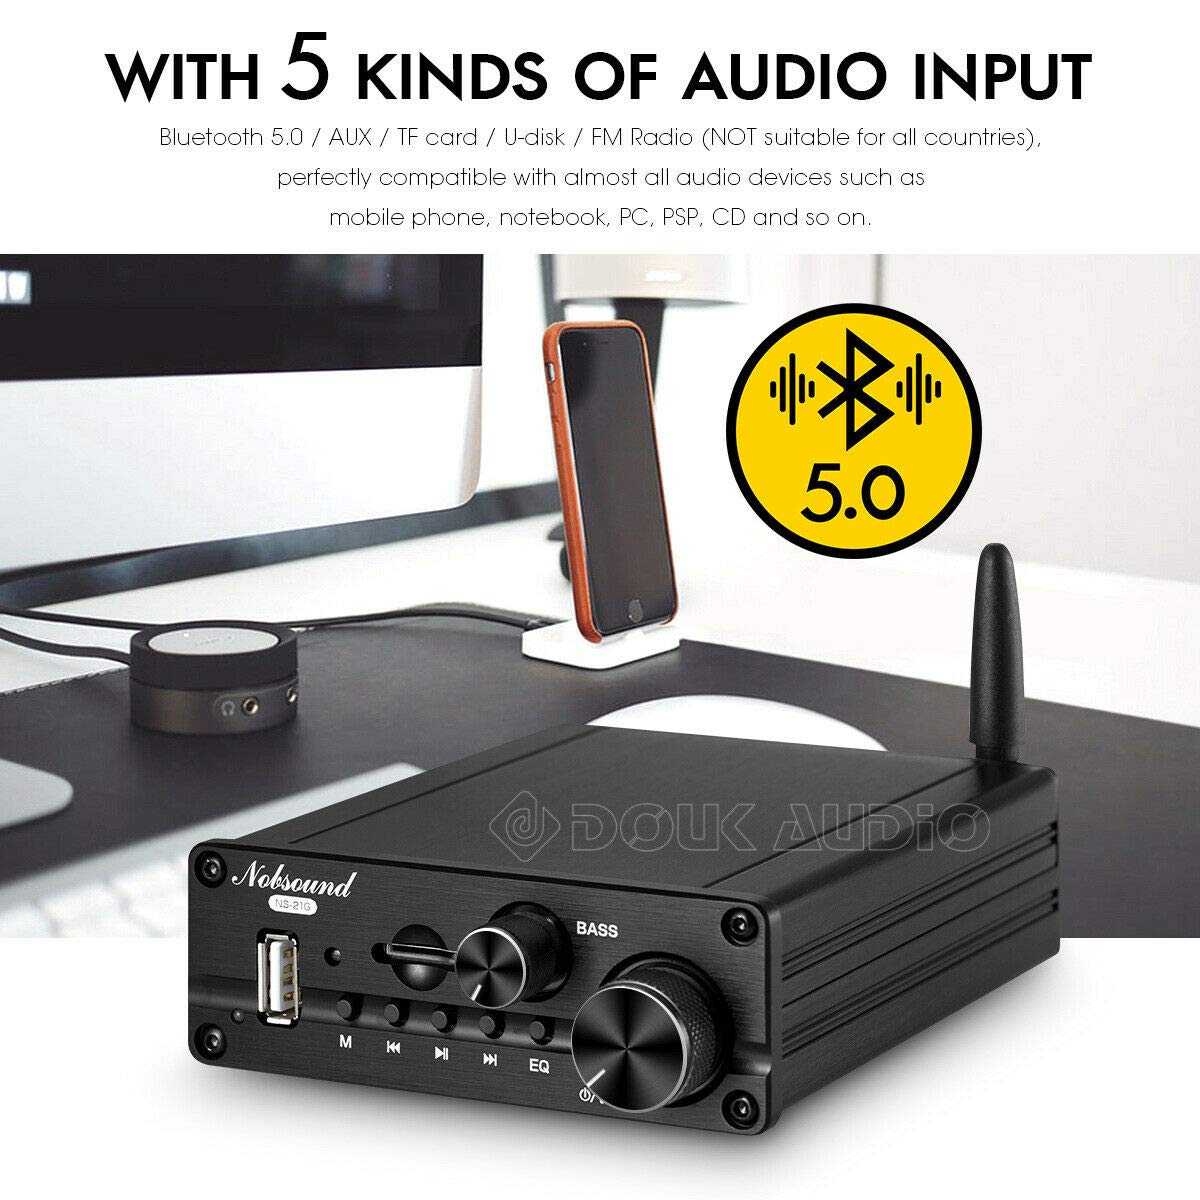
Figure 5.2: Control Methods
This image illustrates the various ways to control the amplifier, including the physical buttons and knobs on the unit, the included remote control, and potentially a mobile application (though app control is not explicitly detailed in the product description, it's mentioned in feature bullets).
6. Specifications
| Parameter | Value |
|---|---|
| Rated Power Output | 50W x 2 (Stereo) + 100W (Subwoofer) |
| Frequency Response | 20 Hz - 50 kHz |
| Signal-to-Noise Ratio (SNR) | > 90 dB |
| Distortion Rate | < 1% |
| Bluetooth Version | 5.0 |
| Power Supply | DC 15-24V (5.5 x 2.5 mm) |
| Dimensions (L x W x H) | 103 x 122 x 38 mm (4.06 x 4.80 x 1.50 inches) |
| Net Weight | 420 g (0.93 lbs) |
| Supported Features | Quick Tone, LED Indicator, FM Radio, Remote Control |
| Model Number | DZ073_DE |
7. Troubleshooting
| Problem | Possible Cause | Solution |
|---|---|---|
| No power | Power adapter not connected or faulty; power outlet not working. | Ensure power adapter is securely connected. Test the power outlet with another device. Try a different power adapter if available. |
| No sound output | Incorrect input mode selected; speakers not connected properly; volume too low; faulty audio cable. | Verify the correct input mode is selected. Check speaker connections and polarity. Increase volume. Test with a different audio cable. |
| Bluetooth pairing failure | Amplifier not in Bluetooth mode; device too far; interference; device already paired with another unit. | Ensure amplifier is in Bluetooth mode. Move device closer to amplifier. Turn off other Bluetooth devices. Disconnect from other devices and try pairing again. |
| Poor FM radio reception | No antenna connected; weak signal; environmental interference. | Connect a high-gain FM antenna. Try repositioning the amplifier or antenna. |
| Remote control not working | Batteries dead or inserted incorrectly; IR port blocked; remote out of range. | Replace batteries. Ensure correct battery polarity. Remove any obstructions between remote and amplifier. Use remote within effective range. |
8. Maintenance
- Cleaning: Use a soft, dry cloth to clean the exterior of the amplifier. Do not use liquid cleaners or aerosols.
- Storage: When not in use for extended periods, store the amplifier in a cool, dry place away from direct sunlight and extreme temperatures.
- Ventilation: Ensure proper ventilation around the amplifier to prevent overheating. Do not block ventilation openings.
- Power Off: Always turn off and unplug the amplifier before cleaning or performing any maintenance.
9. Warranty and Support
For warranty information or technical support, please refer to the contact details provided by your retailer or visit the official Nobsound website. Keep your purchase receipt as proof of purchase for warranty claims.
Manufacturer: Nobsound


