
1. Introduction
This manual provides detailed instructions for the installation, operation, and maintenance of your ZUDKSUY carburetor replacement. This product is designed to restore optimal fuel delivery and engine performance for compatible lawn and garden equipment. Please read this manual thoroughly before proceeding with installation or operation to ensure proper function and safety.
2. Compatibility and Fitment
This carburetor replacement is compatible with a range of engines and equipment models. Verify your engine's specifications against the list below to ensure proper fitment.
- Replacement for John Deere L100 17HP Engine (Model 31F707)
- Replacement for John Deere LX288 18HP Engine (Model 350777-1154-E1)
- Replacement for Briggs & Stratton 14HP V-Twin Engine (Model 808728)
- Replacement for Briggs & Stratton 7.5HP Engine (Model 699475)
- Replacement for Murray 405000X8C 13.5HP
- Replacement for Nikki 697203 18HP
- Replacement for Nikki 795873 21HP Single Cylinder
- Replacement for Nikki 808891 Rider
Important: Always compare your existing carburetor with the provided images and part numbers to confirm compatibility before installation.
3. Package Contents
The package includes the following components:
- 1 x Carburetor
- 1 x Gasket
- 2 x Hose Clamps
- Additional accessories as pictured (e.g., fuel line, linkage parts)

Image 3.1: Contents of the ZUDKSUY Carburetor Replacement Kit. This image displays the main carburetor unit along with a gasket, two hose clamps, and other small components such as a fuel line and linkage parts, which are included for a complete installation.
4. Setup and Installation
Installation of the carburetor requires basic mechanical knowledge. If you are unsure about any step, it is recommended to consult a qualified technician.
4.1 Safety Precautions
- Ensure the engine is cool before starting work.
- Disconnect the spark plug wire to prevent accidental starting.
- Work in a well-ventilated area.
- Have a fire extinguisher nearby.
- Wear appropriate personal protective equipment, such as gloves and eye protection.
4.2 Installation Steps
- Drain Fuel: Turn off the fuel supply and drain any fuel from the fuel tank and fuel lines into an approved container.
- Remove Air Filter Assembly: Carefully remove the air filter housing and any associated components to gain access to the carburetor.
- Disconnect Linkages and Fuel Line: Detach the throttle and choke linkages from the old carburetor. Disconnect the fuel line, being prepared for any residual fuel.
- Remove Old Carburetor: Unbolt the old carburetor from the engine intake manifold. Note the orientation of any gaskets or spacers.
- Clean Mounting Surfaces: Ensure all mounting surfaces on the engine and air filter housing are clean and free of old gasket material.
- Install New Gasket: Place the new gasket onto the engine's intake manifold studs.
- Mount New Carburetor: Carefully position the new ZUDKSUY carburetor onto the studs, ensuring it aligns correctly with the gasket.
- Secure Carburetor: Install the mounting bolts and tighten them evenly to the manufacturer's recommended torque specifications (if available) to prevent air leaks.
- Reconnect Linkages and Fuel Line: Reattach the throttle and choke linkages to the new carburetor. Connect the fuel line, securing it with the provided hose clamps.
- Reinstall Air Filter Assembly: Reassemble the air filter housing and any other components removed earlier.
- Refill Fuel: Add fresh fuel to the tank.

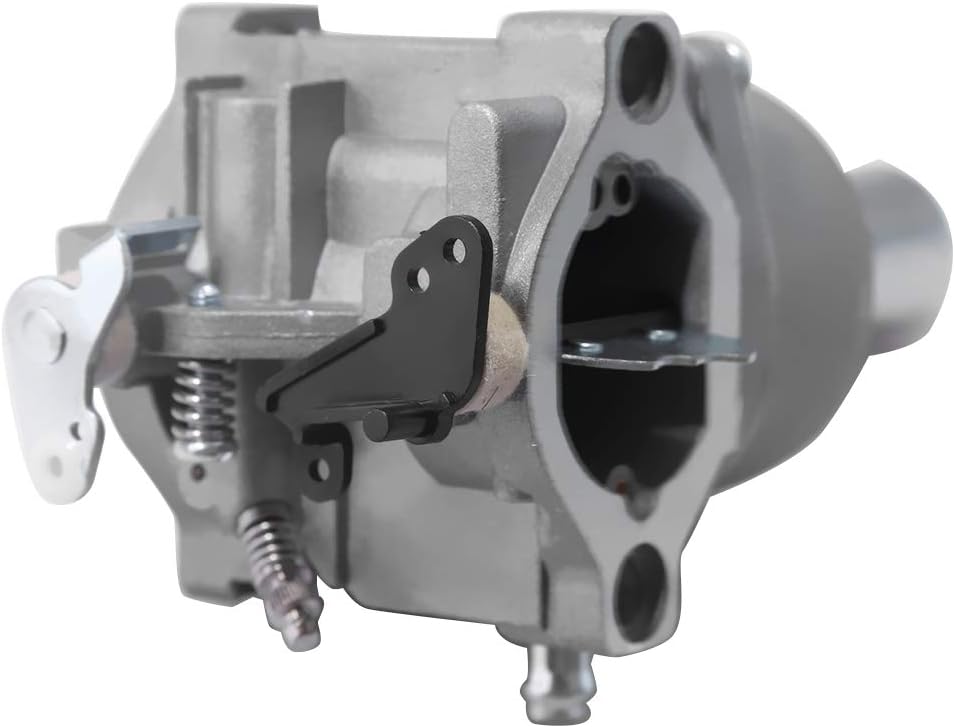
Image 4.1: Front and side views of the ZUDKSUY carburetor. These images highlight the various connection points for fuel lines and linkages, crucial for correct installation.
5. Operating Instructions
After successful installation, follow these steps to start and operate your engine:
- Prime the Carburetor: If your engine has a primer bulb, press it several times until fuel is visible in the fuel line or bulb.
- Set Choke: Move the choke lever to the 'FULL CHOKE' position for cold starts. For warm starts, the choke may not be necessary or only partially needed.
- Set Throttle: Set the throttle to the 'FAST' or 'RUN' position.
- Start Engine: Pull the starter rope firmly or turn the ignition key.
- Adjust Choke: As the engine warms up (usually within 30 seconds to a minute), gradually move the choke lever to the 'OFF' or 'RUN' position.
- Monitor Performance: Listen for smooth engine operation. The engine should idle steadily and respond to throttle input without hesitation.
Note: Some carburetors may require minor idle speed or mixture adjustments after installation for optimal performance. Refer to your engine's specific service manual for adjustment procedures.
6. Maintenance
Regular maintenance ensures the longevity and reliable performance of your carburetor.
- Fuel Quality: Always use fresh, clean fuel. Stale or contaminated fuel is a primary cause of carburetor issues. Consider using a fuel stabilizer, especially during storage.
- Fuel Filter: Regularly inspect and replace the fuel filter according to your engine manufacturer's recommendations. A clogged fuel filter can restrict fuel flow to the carburetor.
- Air Filter: Keep the air filter clean. A dirty air filter can cause the engine to run rich and affect carburetor performance.
- Storage: Before long-term storage, run the engine until it runs out of fuel, or drain the fuel system to prevent gum and varnish buildup in the carburetor.
- Inspection: Periodically inspect the carburetor for any signs of leaks, loose connections, or damage.
7. Troubleshooting
If you encounter issues after installing the carburetor, refer to the following common problems and solutions:
| Problem | Possible Cause | Solution |
|---|---|---|
| Engine will not start | No fuel, incorrect choke setting, spark plug issue, air leak | Check fuel level, ensure choke is set correctly for cold start, inspect spark plug, check for air leaks around carburetor gaskets. |
| Engine runs rough or sputters | Fuel quality, air filter clogged, minor adjustments needed, air leak | Use fresh fuel, clean/replace air filter, check for air leaks, consult engine manual for idle/mixture adjustments. |
| Fuel leaks from carburetor | Loose connections, damaged gasket, float issue | Tighten fuel line connections, inspect and replace gaskets if damaged, ensure carburetor is mounted flush. |
| Engine lacks power | Clogged fuel filter, dirty air filter, improper fuel mixture | Replace fuel filter, clean/replace air filter, check for proper carburetor adjustments. |
8. Specifications
Key specifications for the ZUDKSUY Carburetor Replacement:
- Brand: ZUDKSUY
- Model Numbers: 808728, 699475, 31F707, LX288
- Flange Type: Bolt On
- Recommended Uses: Tractor, Lawn Mower
- Item Weight: Approximately 13.7 ounces
- Package Dimensions: Approximately 6.97 x 3.43 x 2.91 inches
- UPC: 778992010054
9. Warranty and Support
For information regarding product warranty, returns, or technical support, please contact the manufacturer or your point of purchase. Keep your purchase receipt as proof of purchase.