Introduction
The UltraPro 24-Hour Mechanical In-Wall Timer provides convenient automation for hardwired lighting and other devices. This timer allows for customized daily schedules using 30-minute interval push pins. It is designed to replace any indoor-installed, single-pole switch and includes an override option to temporarily pause settings. Automate your home's lighting to enhance security and convenience.
Safety Information
WARNING: Risk of electric shock. Installation requires working with high voltage wiring. Always turn off power at the circuit breaker or fuse box before installation. If you are unsure about any part of these instructions, consult a qualified electrician. Do not use this timer with appliances that could cause dangerous conditions if left unattended, such as sunlamps, saunas, heaters, etc.
- Ensure power is OFF at the circuit breaker before installation.
- This device is for indoor use only.
- Requires a neutral wire for proper operation.
- Do not exceed the electrical ratings: 125VAC, 15A General/Resistive, 1250W Tungsten, ½ HP Motor, 500VA Electronic Ballast/LED.
Package Contents
- UltraPro 24-Hour Mechanical In-Wall Timer (Model 41092)
- Installation Instructions
- Mounting Screws
Product Overview
The UltraPro 24-Hour Mechanical In-Wall Timer is designed for daily control of various hardwired devices. Key features include:
- 24-Hour Timer: Provides daily control with a convenient override switch to interrupt the timer cycle when not needed.
- 30-Minute Intervals: Simple mechanical operations in 30-minute intervals accommodate varied schedules, saving time and energy.
- Compatibility: Controls LED, CFL, incandescent, and halogen bulbs or other hard-wired devices.
- Single-Pole: Replaces standard single-pole switches and fits rocker-style wallplates (not included) to match existing switches.
- Electrical Rating: 125VAC, 15A General/Resistive, 1250W Tungsten, ½ HP Motor, 500VA Electronic Ballast/LED.

Image: UltraPro Mechanical In-Wall Timer with features such as direct wire (neutral wire required), programmable daily cycle, convenient override switch, and replacement for any single-pole switch.
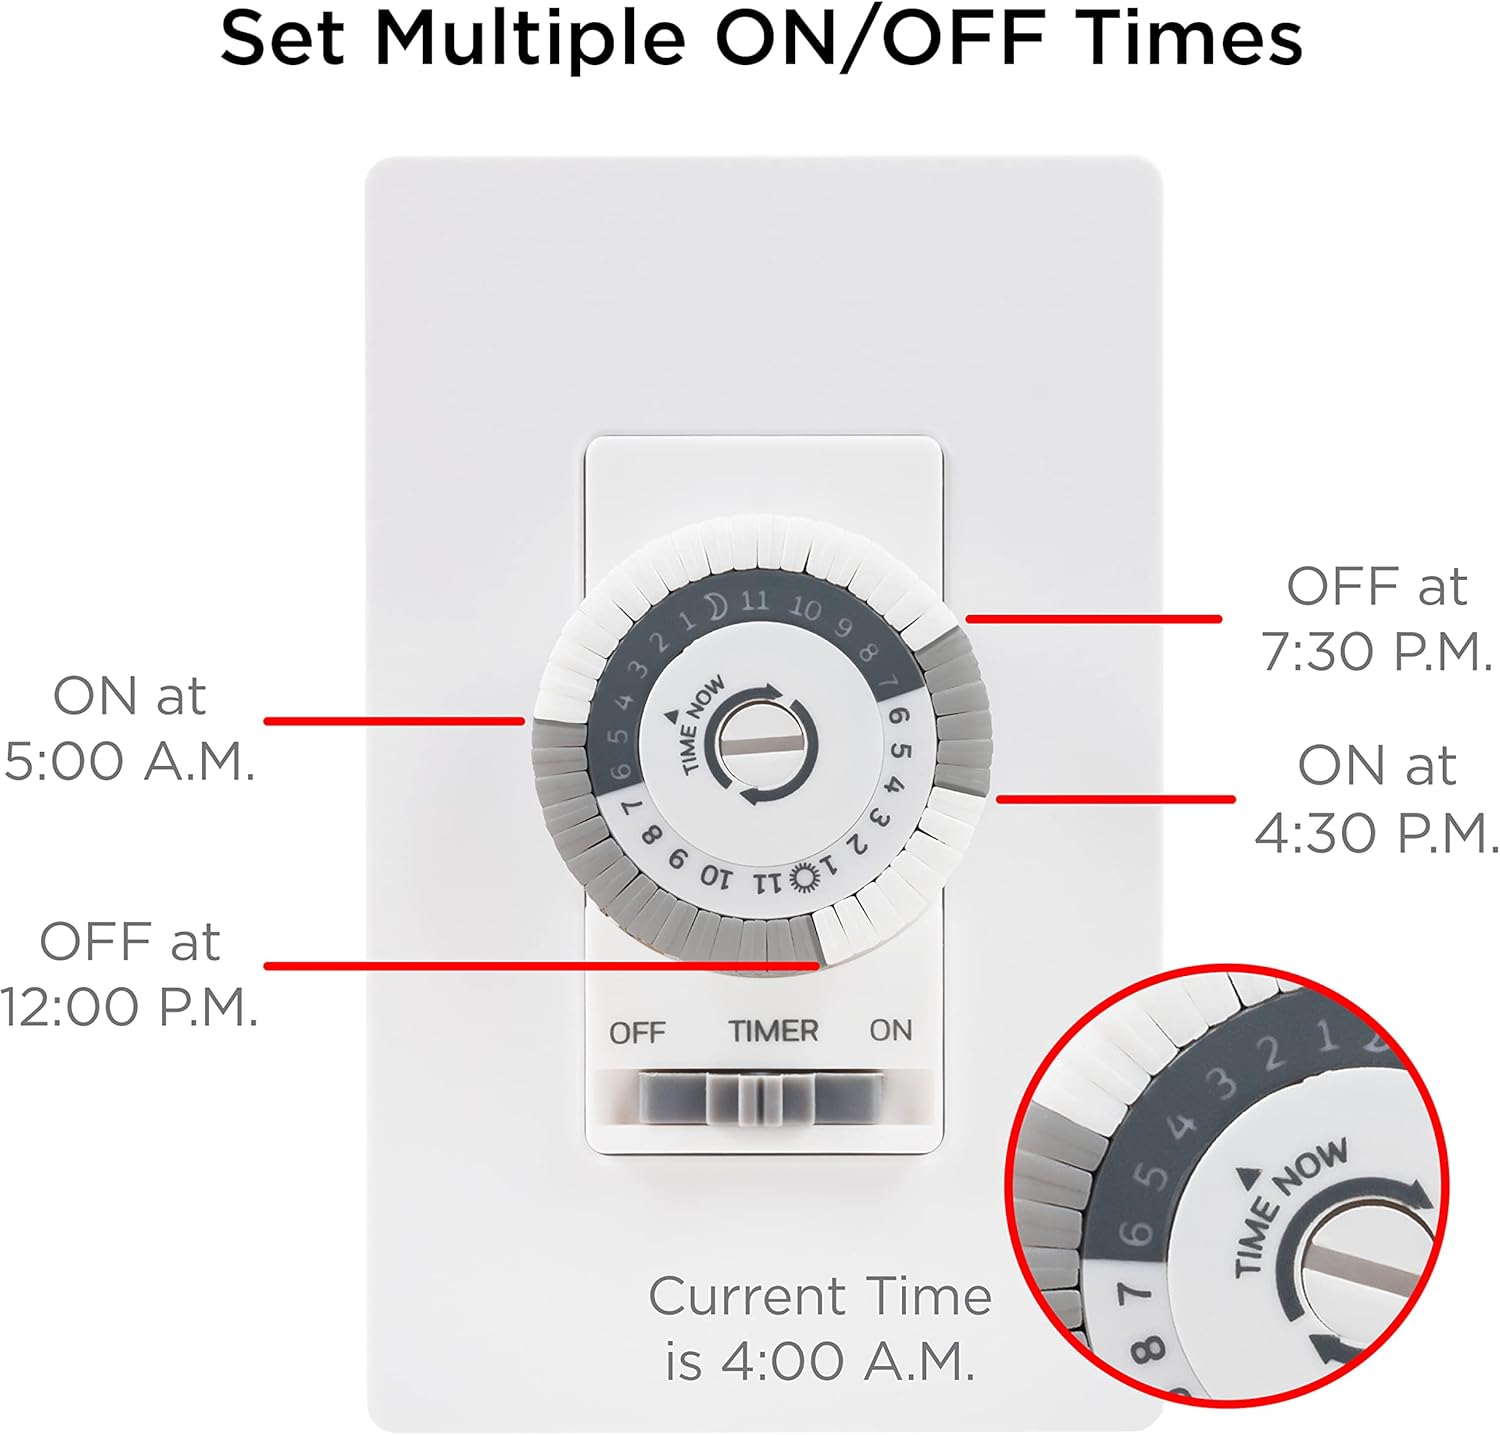
Image: Diagram illustrating how to set multiple ON/OFF times on the timer dial, with examples for 5:00 A.M. ON, 12:00 P.M. OFF, 4:30 P.M. ON, and 7:30 P.M. OFF. The current time is shown as 4:00 A.M.
Installation
Follow these steps carefully to install your UltraPro In-Wall Timer. Ensure power is OFF at the circuit breaker before beginning.
- Prepare the Timer: Before installation, remove the screw in the center of the dial and lift the dial from the timer.
- Turn Off Power: Shut off power to the switch at the circuit breaker or fuse box. Verify power is off using a voltage tester.
- Remove Existing Switch: At the existing switch, remove the wall plate, followed by the mounting screws. Carefully pull the switch from the box, taking care not to disconnect any of the wires.
- Identify Wires: You should see three terminals on the switch: Line, Load, and Ground. Label the wires connected to these terminals for easy identification.
- Disconnect Wires: With the wires labeled accordingly, disconnect them from the existing switch.
- Connect Ground Wire: Connect the green or bare copper ground wire from the wall box to the copper ground lead of the timer using a wire nut.
- Connect Load Wire: Take the black load wire from the wall box and secure it to the red load lead of the timer using a wire nut.
- Connect Line Wire: Attach the black line wire from the wall box to the black hot lead of the timer using a wire nut.
- Connect Neutral Wire: Connect the white neutral wire from the wall box to the white neutral lead of the timer using a wire nut.
- Mount the Timer: Carefully push your timer back into the switch box, ensuring wires aren't pinched or crushed. Secure the timer using the supplied screws.
- Install Wallplate: Install a rocker-style wallplate (not included).
- Attach Timer Dial: Attach the timer dial. To prevent damaging the timer, do not over-tighten the dial screw.
- Restore Power: Reapply power at the fuse box or circuit breaker to complete installation.
Note: If the timer does not work after installation, switch the line and load wires.
Video: Official UltraPro installation and programming guide for the 24-Hour Mechanical In-Wall Timer. This video demonstrates how to identify wires, connect the timer, and set up daily schedules.
Programming
The UltraPro timer allows you to set daily ON/OFF schedules in 30-minute intervals.
- Set Current Time: Rotate the dial until the indicator arrow points to the current time of day. The gray background on the dial indicates night hours.
- Set ON/OFF Times: Each segment around the dial represents 30 minutes. To set an ON period, push down the pins corresponding to the desired time frame. To set an OFF period, leave the pins in the up position. Segments aligned with the current time cannot be pushed down.
- Manual Override: The switch below the dial provides manual control. Slide the switch to "OFF" or "ON" to override the programmed schedule. To resume automatic operation, slide the switch to "TIMER".
Example: To turn on a connected device from 6:00 PM to 11:00 PM, push down all the pins aligned with 6 PM and 11 PM, and all the segments in between.
Image: Diagram illustrating how to set multiple ON/OFF times on the timer dial, with examples for 5:00 A.M. ON, 12:00 P.M. OFF, 4:30 P.M. ON, and 7:30 P.M. OFF. The current time is shown as 4:00 A.M.
Operation
Once programmed, the timer will automatically turn your connected device ON and OFF according to your set schedule. The dial will continuously rotate, indicating the current time.
- Automatic Mode: Ensure the switch below the dial is set to "TIMER" for automatic operation.
- Manual ON/OFF: To manually turn the device ON or OFF, slide the switch to the "ON" or "OFF" position. This will override the programmed schedule until the switch is returned to "TIMER".
Maintenance
The UltraPro In-Wall Timer requires minimal maintenance. Keep the device clean and free from dust. Do not attempt to disassemble or repair the unit yourself, as this may void the warranty and pose a safety risk.
- Clean with a soft, dry cloth.
- Do not use liquid cleaners or aerosols.
Troubleshooting
If your timer is not functioning as expected, refer to the following common issues and solutions:
| Problem | Possible Cause | Solution |
|---|---|---|
| Device does not turn ON/OFF. | Power is off at the circuit breaker. Incorrect wiring. Switch is in manual ON/OFF mode. Pins are not pushed down for desired ON times. | Check and restore power at the circuit breaker. Recheck wiring connections (Line/Load). Slide the switch to "TIMER" mode. Ensure pins are pushed down for the desired ON periods. |
| Timer dial is not rotating. | Screw in the center of the dial is too tight. Power is not supplied to the timer. | Loosen the center screw slightly until the dial rotates freely. Check power at the circuit breaker and wiring connections. |
| Schedule is inconsistent. | Current time not set correctly. Pins are not fully engaged. | Rotate the dial to align the indicator arrow with the current time. Ensure all desired pins are fully pushed down. |
Specifications
- Model Number: 41092
- Electrical Rating: 125VAC, 15A General/Resistive, 1250W Tungsten, ½ HP Motor, 500VA Electronic Ballast/LED
- Intervals: 30-minute segments
- Power Source: Hardwire
- Mounting Type: Wall Mount
- Material: Plastic
- Product Dimensions: 2"D x 2"W x 4.1"H
- Item Weight: 4.2 ounces (0.12 Kilograms)
- Color: White (Mechanical)
- Neutral Wire: Required
Warranty and Support
UltraPro products are backed by a limited warranty. For warranty details, technical support, or to register your product, please visit the official UltraPro website or contact customer service. Keep your purchase receipt as proof of purchase.
Manufacturer: Jasco Products Company, LLC


