1. Introduction
This manual provides detailed instructions for the installation, operation, and maintenance of your Ciglow Digital Electronic Coded Lock. This lock is designed to provide secure access control for various applications such as cabinets, drawers, mailboxes, and school lockers. Please read this manual thoroughly before installation and use to ensure proper function and longevity of the product.

Figure 1: Front view of the Ciglow Digital Electronic Coded Lock, featuring a black touch screen with numbers 1-6 and an 'OK' button, encased in a silver-colored body.
2. Product Features
- Durable Construction: Made from zinc alloy material, ensuring strength, durability, and dust resistance. The design incorporates a full touch screen for high sensitivity and reliability.
- Easy Installation: Designed for simple insertion into a mounting hole (19x15.8mm), requiring no screws. Suitable for cabinet thicknesses ranging from 0.5mm to 12mm.
- Customizable Passcode: Supports a 1 to 15-digit combination passcode. The factory default passcode is 1-2-3-4.
- Low Voltage Alarm: Alerts the user to replace the battery when its voltage drops to approximately 3.3V ± 0.2V. A buzzer will sound during unlocking to indicate low battery status.
- Versatile Application: Ideal for various storage units including toolboxes, cabinets, drawers, mailboxes, and school lockers.
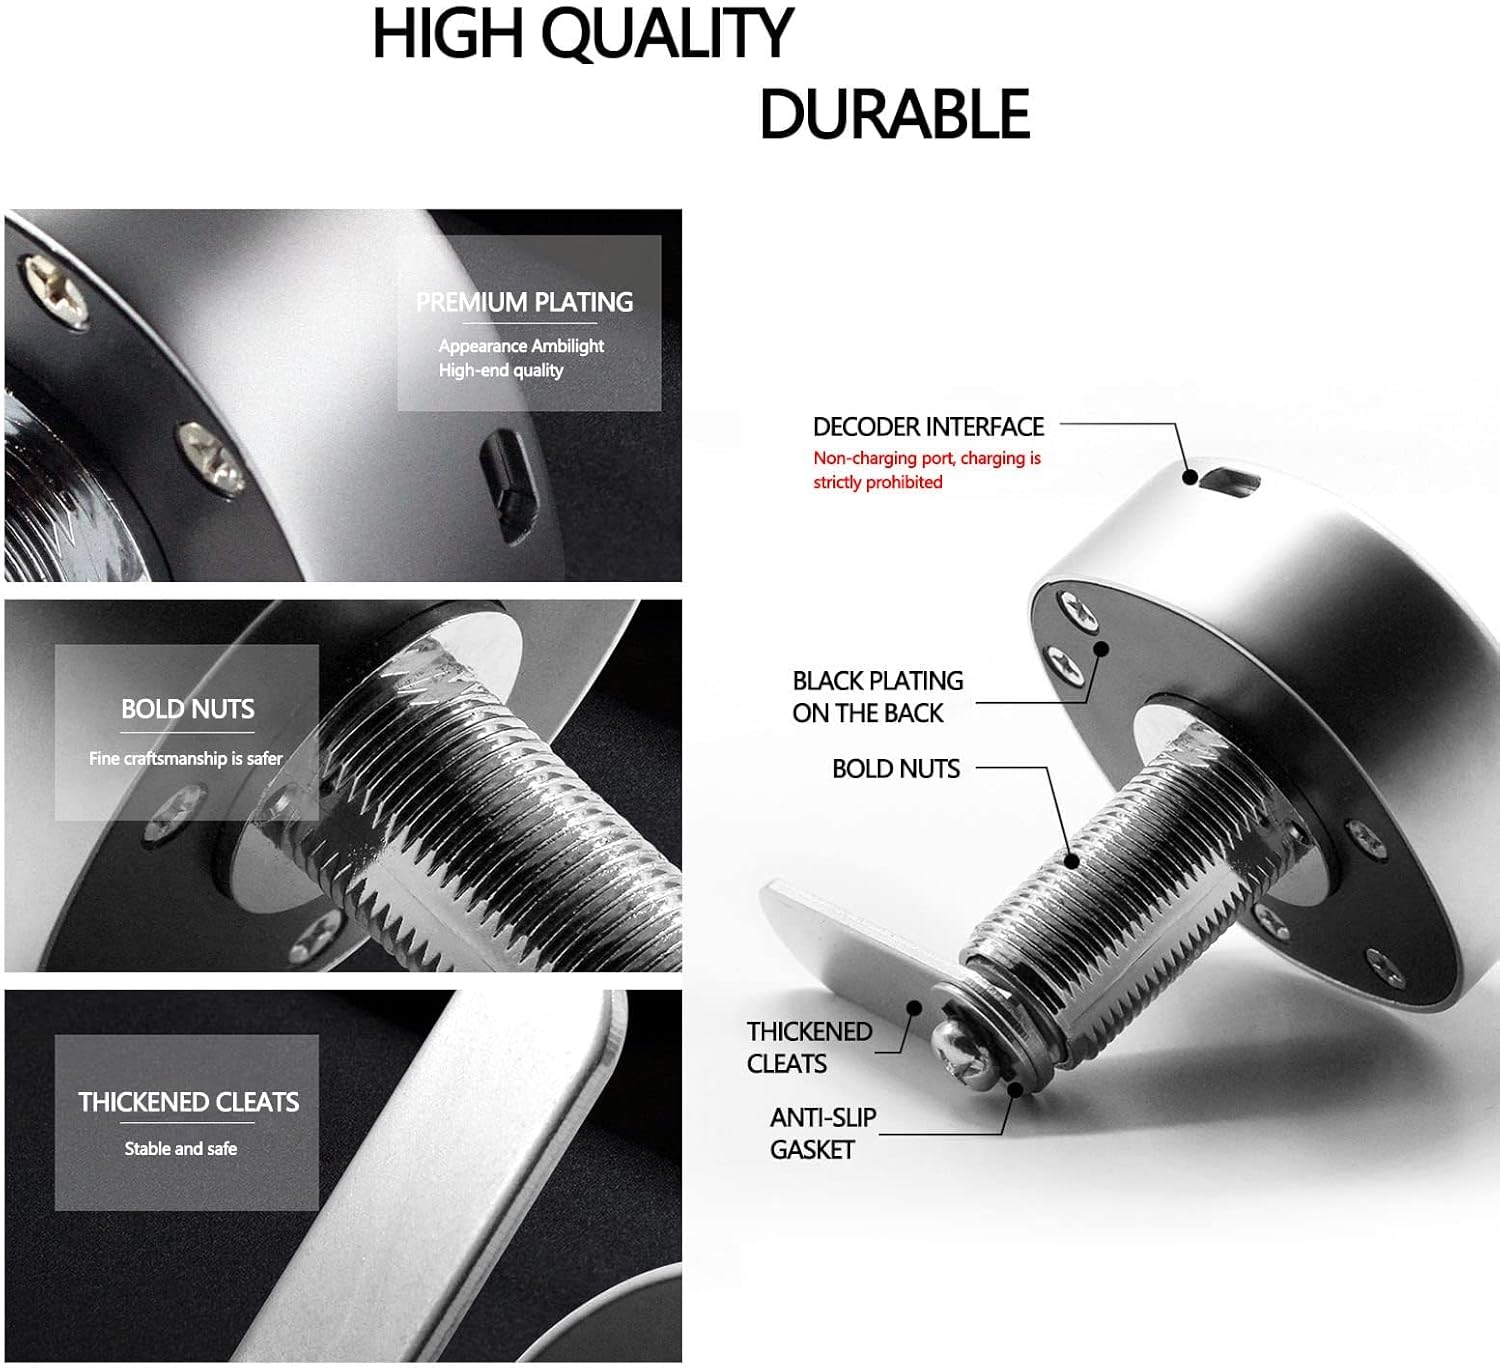
Figure 2: Exploded view highlighting the durable components of the lock, including premium plating, bold nuts, thickened cleats, and an anti-slip gasket, indicating robust construction.
3. Package Contents
Please verify that all components are present in the package:
- 1 x Lock Body
- 1 x Nut
- 1 x Lock Tongue
- 1 x English Manual (this document)
- 1 x Gasket
4. Specifications
| Feature | Detail |
|---|---|
| Brand | Ciglow |
| Model Number | Ciglow3kc47u28rm |
| Material | Zinc Alloy |
| Color | Black, Silver |
| Lock Type | Combination Lock |
| Control Method | Touch |
| Item Dimensions (L x W x H) | 0.39 x 0.39 x 0.39 inches (approx. 6.5 x 6.5 x 6.5 cm) |
| Item Weight | 5.6 ounces (approx. 173g) |
| Battery Type | 3V Button Cell (CR2032) (Not Included) |
| Mounting Hole Size | 19mm x 15.8mm |
| Suitable Cabinet Thickness | 0.5mm to 12mm |
5. Installation
The Ciglow Digital Electronic Coded Lock is designed for straightforward installation. Follow these steps:
- Prepare the Mounting Hole: Ensure the cabinet or drawer has a mounting hole with dimensions of approximately 19mm x 15.8mm. The lock is compatible with material thicknesses between 0.5mm and 12mm.
- Insert the Lock Body: Carefully insert the lock body into the prepared mounting hole from the exterior side of the cabinet.
- Secure with Nut and Gasket: From the interior side, place the gasket over the threaded part of the lock body, then thread and tighten the nut to secure the lock firmly in place. No screws are required for this process.
- Attach Lock Tongue: Position and attach the lock tongue to the mechanism on the interior side of the lock body. Ensure it aligns correctly with the cabinet frame for proper locking.

Figure 3: Technical diagram illustrating the precise dimensions of the lock body and the required fixing hole size for installation. Dimensions are provided in millimeters.
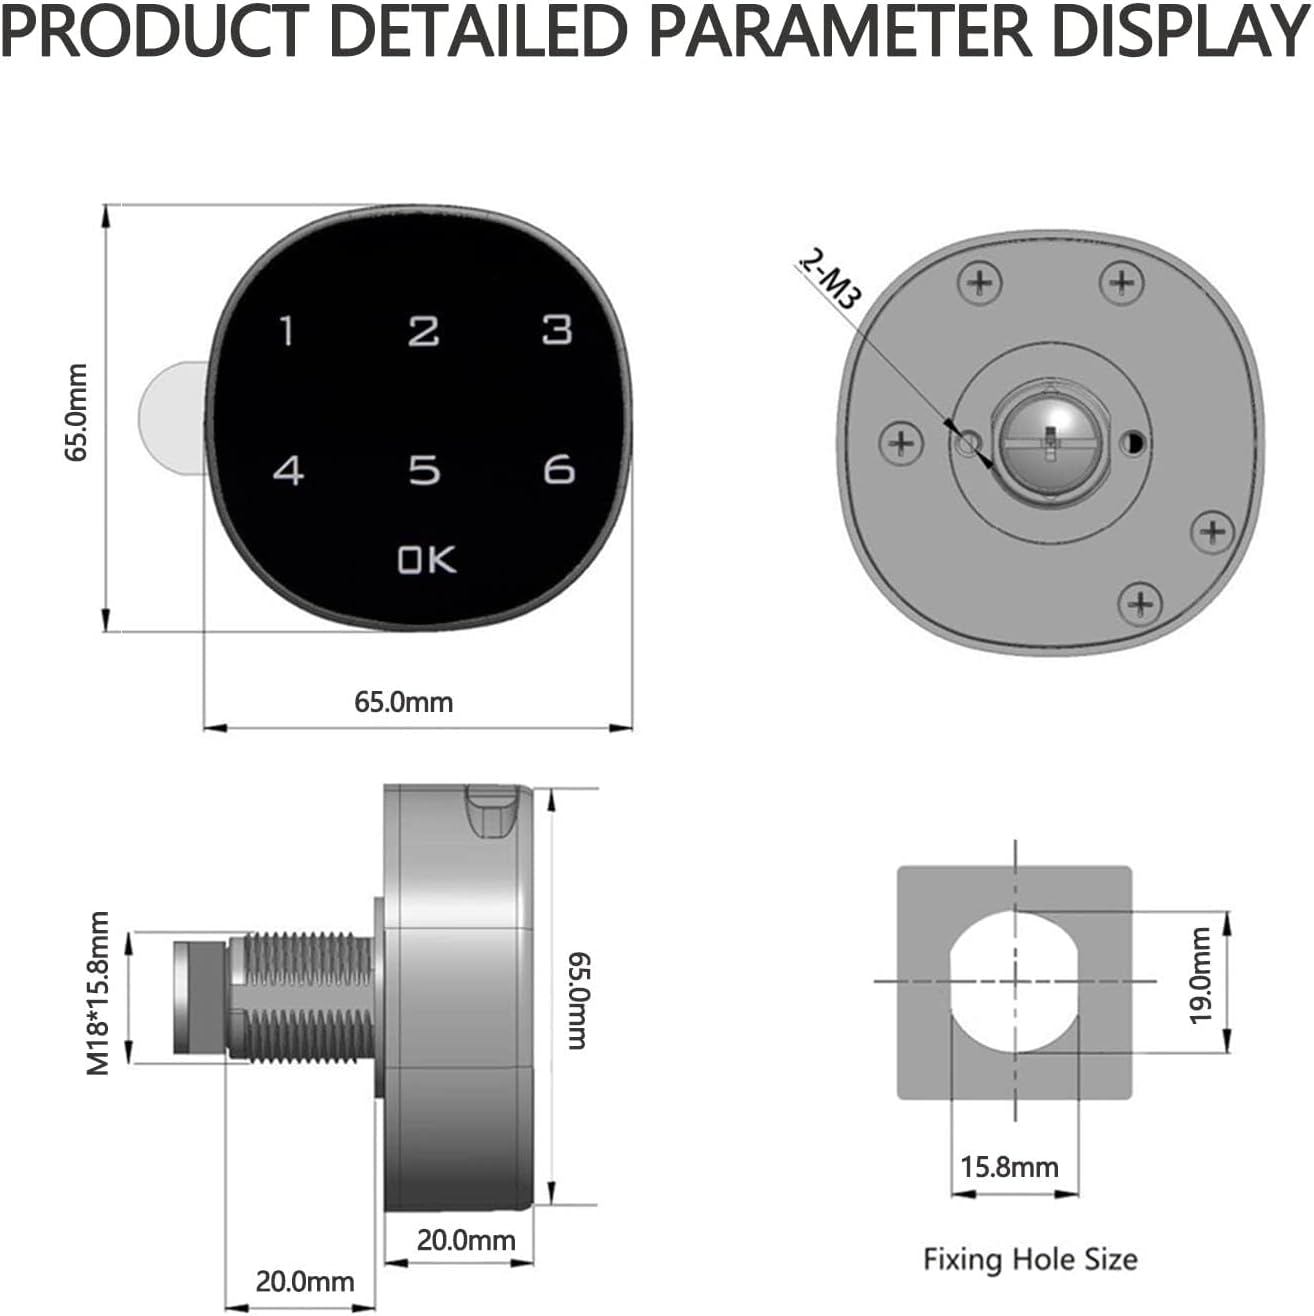
Figure 4: Visual guide demonstrating the installation steps for both wooden and metal cabinet applications, showing how the lock body, gasket, and nut are assembled.

Figure 5: Examples of common applications for the lock, including drawers, lockers, letter boxes, shoeboxes, and file cabinets, illustrating its versatility.
6. Operation
6.1 Unlocking the Lock
To unlock the device, enter your 1 to 15-digit passcode on the touch screen, then press the 'OK' button. The lock will disengage, allowing you to open the cabinet or drawer. The factory default passcode is 1-2-3-4.
Video 1: Demonstration of the Digital Electronic Coded Lock in operation, showing the touch screen interface and unlocking mechanism.
7. Setting and Changing the Passcode
The lock allows for a customizable passcode of 1 to 15 digits. The initial factory default passcode is 1-2-3-4.
7.1 To Change the Passcode:
- Ensure the lock is in the unlocked state.
- Press and hold the 'OK' button for approximately 3 seconds until the lock emits a beep.
- Enter your current passcode (default is 1-2-3-4), then press 'OK'.
- Enter your new passcode (1 to 15 digits), then press 'OK'.
- Re-enter your new passcode to confirm, then press 'OK'.
- A confirmation beep indicates the passcode has been successfully changed.
It is recommended to test the new passcode with the cabinet door open before closing it to ensure it has been set correctly.

Figure 6: The digital lock's face, illustrating the capability to set a passcode ranging from 1 to 15 digits. The default passcode is 1-2-3-4.
8. Battery Replacement and Low Voltage Alarm
The lock is powered by a 3V CR2032 button cell battery (not included). The device features a low voltage alarm to notify you when the battery needs replacement.
8.1 Low Voltage Alarm:
When the battery voltage drops to approximately 3.3V ± 0.2V, the lock will emit a series of beeps during unlocking. This indicates that the battery should be replaced soon to ensure continued operation.
8.2 Battery Replacement:
- Unlock the lock and open the cabinet/drawer.
- Locate the battery compartment on the interior side of the lock body.
- Carefully pull up the battery button cover to access the battery.
- Remove the old CR2032 battery.
- Insert a new 3V CR2032 button cell battery, ensuring the positive (+) and negative (-) poles are correctly oriented.
- Close the battery button cover securely.

Figure 7: Illustration detailing the process of replacing the 3V button battery, emphasizing the correct orientation of the positive and negative terminals.

Figure 8: Diagram showing the battery compartment and an external interface, which can be used for emergency power if the internal battery is completely depleted.
9. Troubleshooting
| Problem | Possible Cause | Solution |
|---|---|---|
| Lock does not respond to touch. | Battery is dead or incorrectly installed. | Replace the battery (CR2032) ensuring correct polarity. If battery is dead, use the external interface for emergency power to unlock and then replace the battery. |
| Lock beeps continuously or flashes green but does not open. | Low battery voltage. Incorrect passcode entered. | Replace the battery. Verify the passcode and re-enter carefully. |
| Cannot change passcode. | Incorrect current passcode entered. Lock not in unlocked state. | Ensure the lock is unlocked before attempting to change the passcode. Double-check the current passcode. |
| Lock feels loose after installation. | Nut not tightened sufficiently. | Ensure the securing nut on the interior side is fully tightened. |
10. Warranty and Support
For any questions, technical assistance, or warranty inquiries regarding your Ciglow Digital Electronic Coded Lock, please contact the seller or manufacturer directly. Refer to your purchase documentation for specific warranty terms and contact information.
We recommend retaining your proof of purchase for warranty purposes.