1. Introduction
This user manual provides comprehensive instructions for the operation, setup, maintenance, and troubleshooting of your TOPVISION Portable Projector, model TP-98. Please read this manual thoroughly before using the projector to ensure proper functionality and to maximize your viewing experience. Keep this manual for future reference.
2. Product Overview
The TOPVISION TP-98 projector is designed to deliver a high-quality visual experience with its advanced features and versatile connectivity. It is suitable for both home entertainment and professional presentations.
2.1 Key Features
- Native 1080P Full HD Resolution: Provides clear and detailed images, supporting 4K video input.
- High Brightness: 9500 Lumens for vibrant and bright projections.
- Large Display Size: Capable of projecting images up to 350 inches for an immersive viewing experience.
- Built-in Hi-Fi Stereo Speakers: Dual integrated speakers with SRS sound for enhanced audio.
- Extended Lamp Life: LED lamp designed for up to 150,000 hours of use.
- Multiple Connectivity Options: Includes HDMI, USB, AV, and 3.5mm audio output ports.
- Efficient Cooling System: Designed for low power consumption and reduced fan noise.
2.2 Product Components

Image 2.1: The TOPVISION TP-98 Portable Projector shown with its included carrying case. The projector is white with a black control panel on top and a prominent lens on the front. The carrying case is black with the TOPVISION logo.

Image 2.2: A close-up view of the TOPVISION projector's control panel located on the top surface. It features buttons for power, menu navigation, source selection, and volume control, designed for intuitive operation.
3. Setup
3.1 Placement
For optimal projection, place the projector on a stable, flat surface. Ensure there is adequate ventilation around the unit. The distance from the screen will determine the image size. Refer to the "Display Adjustment" section for recommended projection distances.

Image 3.1: Diagram illustrating the relationship between projection distance and screen size. It shows that a 45-inch display requires approximately 2 meters, a 120-inch display requires 3.5 meters, a 240-inch display requires 5 meters, and a 350-inch display requires 8 meters.
3.2 Power Connection
- Connect the power cord to the projector's power input port.
- Plug the other end of the power cord into a standard electrical outlet.
- The power indicator light on the projector will illuminate, indicating it is ready for use.
4. Operating Instructions
4.1 Power On/Off
- To power on the projector, press the power button on the control panel or the remote control.
- To power off, press the power button again. Confirm shutdown if prompted.
4.2 Source Selection
After powering on, select your desired input source (HDMI, USB, AV) using the 'Source' button on the control panel or remote. Navigate through the options using the arrow keys and confirm with 'OK'.
4.3 Menu Navigation
Use the 'Menu' button to access settings such as picture mode, sound settings, and system preferences. Use the arrow keys to navigate and 'OK' to select. 'Exit' or 'Return' button to go back.
5. Connectivity
The TOPVISION projector offers a variety of ports for connecting different devices:
- HDMI (x2): For connecting laptops, game consoles (PS4, Xbox), TV boxes, and other HDMI-enabled devices.
- USB (x2): For connecting USB flash drives to play media files directly.
- AV: For connecting older devices using an AV cable.
- 3.5mm Audio Out: For connecting external speakers or headphones.

Image 5.1: An illustration demonstrating the various connectivity options of the TOPVISION projector. It highlights HDMI, USB, and AV inputs, along with a line out. Below, icons show compatibility with mobile phones/tablets, USB disks, laptops, Chromecast, audio devices, Fire TV Stick, Xbox/PS4, and DVD players.

Image 5.2: A visual guide detailing how to connect various devices to the projector. It shows: (a) iOS devices requiring a Lightning to HDMI adapter, (b) iOS devices using an Airplay/Miracast dongle for wireless connection, (c) Android phones using a Miracast dongle for wireless connection, and (d) PCs/laptops/PS4/TV Boxes connecting directly via an HDMI cable.
Note on Streaming Services: Due to copyright restrictions, direct streaming of content from apps like Netflix, Prime Video, or Hulu is not supported via direct phone connection. To view these services, connect a laptop, Chromecast, wireless dongle, TV Stick, or Roku device to the projector's HDMI port.
6. Display Adjustment
6.1 Focus Adjustment
Rotate the focus ring located near the projector lens until the projected image appears sharp and clear. This adjustment compensates for different projection distances.
6.2 Keystone Correction
If the projected image appears trapezoidal (wider at the top or bottom), use the keystone correction dial (usually located near the focus ring) to adjust the image geometry. This corrects the distortion when the projector is not perfectly perpendicular to the screen. The projector supports ±30 degrees keystone correction.
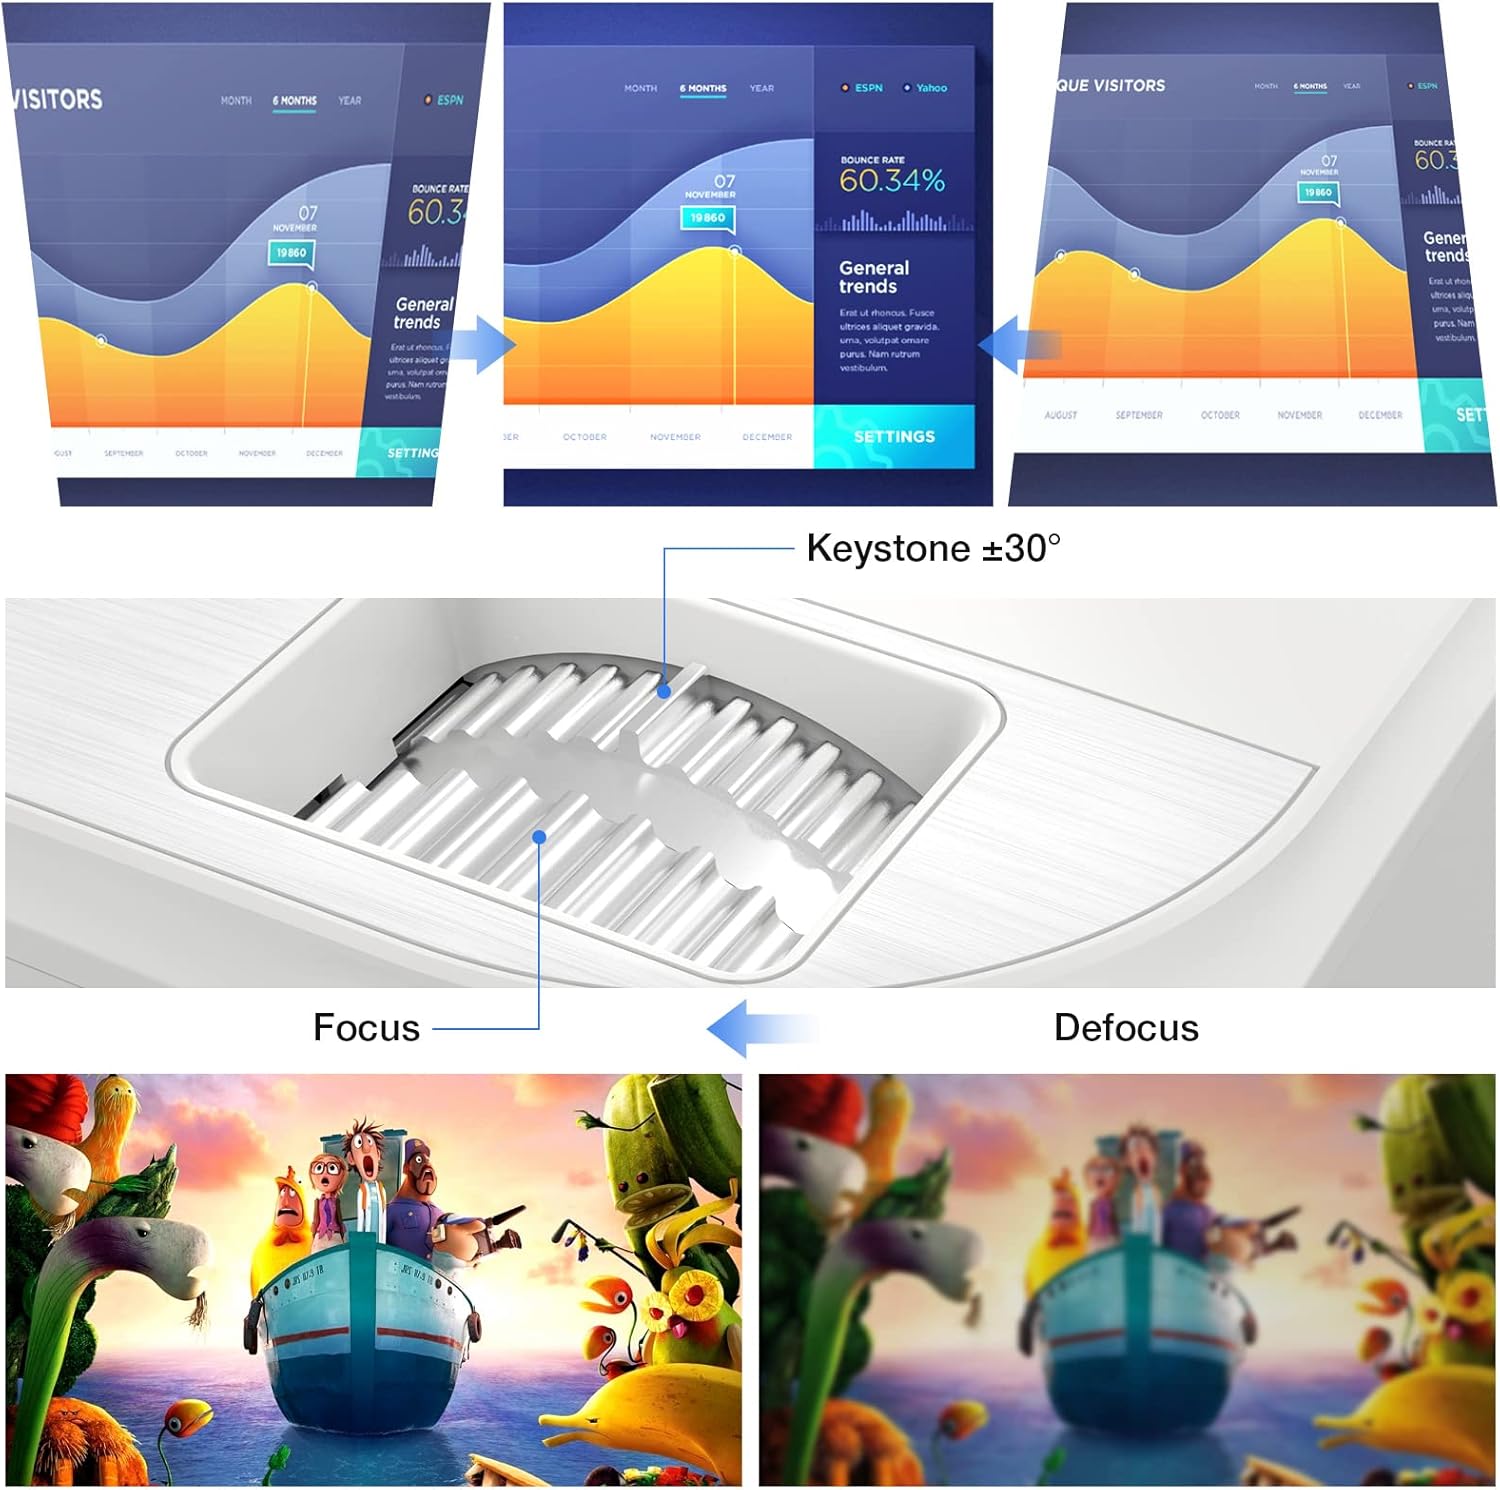
Image 6.1: A diagram illustrating the focus and keystone adjustment mechanisms on the projector. It shows the keystone dial for correcting trapezoidal distortion (up to ±30 degrees) and the focus ring for sharpening the image, with visual examples of focused versus defocused projections.
7. Maintenance
7.1 Cleaning
- Lens: Use a soft, lint-free cloth specifically designed for optical lenses. Do not use abrasive cleaners.
- Projector Body: Wipe the surface with a soft, dry cloth. For stubborn marks, a slightly damp cloth can be used, but ensure no liquid enters the device.
- Ventilation Ports: Regularly check and clean the ventilation ports to prevent dust buildup, which can affect cooling performance. Use a soft brush or compressed air.
7.2 Lamp Life
The projector's LED lamp has an estimated lifespan of 150,000 hours, providing long-term, consistent performance without frequent lamp replacements.
7.3 Cooling System
The projector features an optimized cooling system to maintain stable operating temperatures and minimize fan noise. Ensure proper airflow around the projector by not blocking the ventilation openings.
8. Troubleshooting
| Problem | Possible Cause | Solution |
|---|---|---|
| No image projected | Power cable loose; Incorrect input source; Device not connected properly. | Check power connection; Select correct input source (HDMI, USB, AV); Ensure source device is powered on and connected securely. |
| Image is blurry | Focus not adjusted; Projector too close/far from screen. | Adjust the focus ring; Adjust projection distance. |
| Image is trapezoidal | Projector not perpendicular to screen. | Use keystone correction dial to adjust. |
| No sound | Volume too low; Muted; External speakers not connected; Source device audio settings. | Increase volume; Unmute projector; Connect external speakers if desired; Check audio output settings on source device. |
| Remote control not working | Batteries dead/incorrectly inserted; Obstruction between remote and projector. | Replace batteries; Ensure clear line of sight to IR receiver on projector. |
9. Specifications
| Feature | Detail |
|---|---|
| Brand | TOPVISION |
| Model Number | TP-98 |
| Native Resolution | 1920 x 1080P Full HD |
| Max Display Resolution | Supports 4K UHD |
| Brightness | 9500 Lumens |
| Contrast Ratio | 12000:1 |
| Lamp Life | 150,000 Hours |
| Projection Size | 45 - 350 Inches |
| Keystone Correction | ±30 Degrees |
| Connectivity | 2x HDMI, 2x USB, 1x AV, 1x 3.5mm Audio Out |
| Product Dimensions | 30L x 25W x 11H cm |
| Weight | 4.3 kg |
| Display Type | LCD |
| Special Features | Built-in Stereo Speakers, Touch Sensitive Panel |
10. Warranty and Support
TOPVISION provides a 3-year free repair service for this product. Additionally, lifetime professional technical support is available. If you encounter any issues or require assistance, please do not hesitate to contact TOPVISION customer service.
For support, please refer to the contact information provided on the TOPVISION official website or your purchase documentation.


