
1. Introduction
This manual provides detailed instructions for the installation, operation, and maintenance of your VSDISPLAY 10.4-inch IPS LCD Screen with Resistive Touch Panel and VGA DVI Controller Board. Please read this manual thoroughly before using the product to ensure proper function and safety.
2. Safety Information
- Power Supply: Use only a 12V DC power adapter with a current output of 3A or more. Using an incorrect power supply can damage the device and pose a fire hazard.
- Handling: Handle the LCD screen and circuit boards with care. Avoid applying excessive pressure to the screen surface. Static electricity can damage electronic components; consider using anti-static precautions.
- Environment: Do not expose the device to moisture, extreme temperatures, or direct sunlight. Operate in a clean, dry environment.
- Disassembly: Do not attempt to disassemble or modify the components. Refer all servicing to qualified personnel.
3. Package Contents
Verify that all items listed below are included in your package:
- 1 × VGA DVI LCD Controller Board (Model 68676)
- 1 × 10.4-inch VS104T-003A 1024x768 IPS LCD Screen with Resistive Touch Panel (VS104TP-A1)
- 1 × LVDS Cable
- 1 × Inverter Board
- 1 × Keyboard with Cable (for OSD control)
- 1 × Touch Panel USB Controller Board
- 1 × USB Cable (for touch panel)

Figure 3.1: Visual representation of the components included in the shipping list. This image displays the main LCD controller board, the inverter board, the touch panel controller, the LCD screen, and various connecting cables such as LVDS, keyboard, and USB cables.
4. Product Overview
4.1. LCD Controller Board (Model 68676)
The controller board is the central unit for managing video input and output to the LCD panel. It supports DVI and VGA video inputs and features audio input/output capabilities.
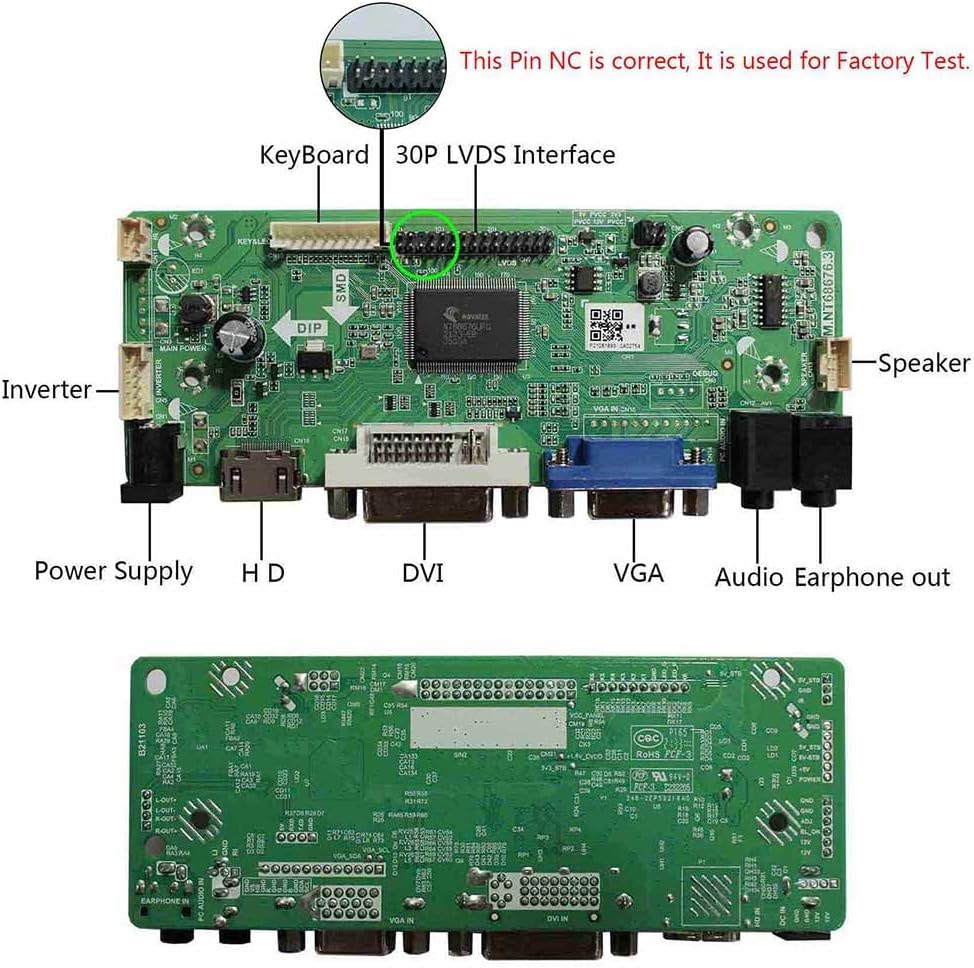
Figure 4.1: Top view of the LCD Controller Board (P21081893-0A02754) with key components labeled. From left to right, it shows the Inverter connector, Power Supply input, Keyboard connector, 30-pin LVDS Interface, HD (HDMI) port, DVI port, VGA port, Speaker output, and Audio Earphone out. A detail inset highlights the 30-pin LVDS interface, noting that a specific pin is for factory testing.

Figure 4.2: The LCD Controller Board with approximate dimensions. The board measures approximately 4.9 inches in length and 2.3 inches in width, providing a compact form factor for integration.
4.2. 10.4-inch IPS LCD Screen (Model VS104T-003A)
This is a 10.4-inch IPS display panel with a resolution of 1024x768, offering wide viewing angles and good color reproduction. It includes a resistive touch panel for interactive input.
Figure 4.3: The 10.4-inch LCD screen with its physical dimensions. The screen measures approximately 8.9 inches in width and 6.9 inches in height, with a diagonal size of 10.4 inches.
4.3. Resistive Touch Panel Controller
The resistive touch panel allows for user interaction directly on the screen. It connects to the main system via a dedicated USB controller board.

Figure 4.4: The resistive touch panel controller board (TS0402USB V1.27C2030). This board connects the touch overlay of the LCD screen to a USB port on your computer, enabling touch functionality.
5. Setup Instructions
Follow these steps carefully to assemble and connect your LCD kit:
- Connect LVDS Cable: Carefully connect one end of the LVDS cable to the 30-pin LVDS interface on the LCD controller board and the other end to the corresponding connector on the back of the 10.4-inch LCD screen. Ensure correct orientation and a secure connection.
- Connect Inverter Board: Connect the inverter board to the designated connector on the LCD controller board. Then, connect the backlight cable from the LCD screen to the inverter board.
- Connect Keyboard: Plug the keyboard cable into the 'Keyboard' port on the LCD controller board. This keyboard is used to navigate the On-Screen Display (OSD) menu.
- Connect Touch Panel: Connect the ribbon cable from the resistive touch panel on the LCD screen to the touch panel USB controller board. Then, connect the provided USB cable from the touch panel USB controller board to a USB port on your computer or host device.
- Connect Video Source: Connect your video source (PC, media player, etc.) to either the DVI or VGA input port on the LCD controller board using a compatible cable.
- Connect Power Adapter: Connect a 12V DC, 3A (or greater) power adapter to the 'Power Supply' input on the LCD controller board. Do not power on yet.
- Final Check: Double-check all connections to ensure they are firm and correctly oriented.
- Power On: Plug the power adapter into an electrical outlet. The LCD screen should power on and display the input signal. If no signal is detected, the board will enter standby mode.
6. Operating Instructions
The LCD controller board features an On-Screen Display (OSD) menu for adjusting display settings. Use the provided keyboard to navigate and select options.
6.1. OSD Menu Navigation
- Menu Button: Press to open the OSD menu.
- Up/Down Buttons: Navigate through menu options.
- Left/Right Buttons: Adjust values or select sub-menus.
- Enter/OK Button: Confirm selection.
6.2. Common Settings
- Brightness: Adjust the overall luminance of the display.
- Contrast: Adjust the difference between the brightest and darkest areas of the display.
- Auto Adjust: (For VGA input) Automatically optimizes the display settings for the input signal.
- Language: Select the OSD menu language (English, French, German, Spanish, Italian, etc.).
- Input Select: Manually switch between DVI and VGA inputs.
7. Maintenance
- Cleaning the Screen: Gently wipe the screen with a soft, lint-free cloth. For stubborn marks, slightly dampen the cloth with water or a non-abrasive screen cleaner. Do not spray liquid directly onto the screen.
- General Care: Keep the device free from dust. Ensure proper ventilation around the controller board to prevent overheating.
- Storage: If storing the device for an extended period, disconnect all cables and store it in a cool, dry place away from direct sunlight.
8. Troubleshooting
| Problem | Possible Cause | Solution |
|---|---|---|
| No display / Black screen |
|
|
| Image is distorted or flickering |
|
|
| Touch screen not responding |
|
|
| OSD menu not appearing |
|
|
9. Specifications
| Feature | Specification |
|---|---|
| LCD Panel Model | VS104T-003A |
| Screen Size | 10.4 inches |
| Display Type | IPS, Normally Black, Transmissive |
| Resolution | 1024(RGB) × 768 (XGA) |
| Aspect Ratio | 4:3 |
| Brightness | 500 cd/m² (Typ.) |
| Contrast Ratio | 700:1 (Typ.) |
| Viewing Angle | 85/85/85/85 (Typ.) [Left/Right/Up/Down] |
| Refresh Rate | 60 Hz |
| Backlight | WLED |
| Signal Interface | LVDS (1 ch, 6/8-bit), 30 pins |
| Touch Panel Type | Resistive |
| Controller Board Model | 68676 |
| Video Input | DVI, VGA |
| Audio Input | Yes |
| Audio Output | Speaker Connector, Earphone Out |
| Input Power Adapter | 12V DC, >3A |
| Standby Power Consumption | <1W |
| OSD Language | English, French, German, Spanish, Italian, etc. |
10. Warranty and Support
For warranty information and technical support, please refer to the documentation provided with your purchase or contact VSDISPLAY customer service directly. Keep your purchase receipt for warranty claims.