Introduction
Thank you for choosing the Rexing V3 Dual Camera Dash Cam. This manual provides detailed instructions on how to install, operate, and maintain your device. The Rexing V3 is designed to capture high-definition video from both the front and inside of your vehicle, offering enhanced security and peace of mind. It features advanced capabilities such as infrared night vision, Wi-Fi connectivity, built-in GPS, and a supercapacitor for reliable performance in various conditions.
Package Contents
Please check the box for the following items. If any items are missing or damaged, please contact Rexing customer support.
- Rexing V3 Dash Cam Unit
- Car Power Cable (Car Charger)
- 3M Adhesive Mount
- USB Computer Cable
- Cable Management Clips
- User Manual

Image: Contents of the Rexing V3 package. This image displays the Rexing V3 dash cam unit, a car power cable, a 3M adhesive mount, a USB computer cable, cable management clips, and the user manual, illustrating all items included in the standard product packaging.
Note: A MicroSD card (UHS-I Class 10 or higher, up to 256GB) is required for recording and is typically sold separately.
Product Overview
The Rexing V3 features a compact design with dual cameras for comprehensive recording. Familiarize yourself with the device's components and controls.

Image: Rexing V3 Dash Cam and App Interface. This image shows the Rexing V3 dash cam unit, highlighting its front and cabin cameras. Adjacent to it, a smartphone displays the Rexing Connect mobile application, illustrating its map integration for GPS tracking and controls for video recording and playback.
Key Features:
- Full HD Dual Channel Recording: Records 1080p video from both front and cabin cameras simultaneously.
- 170° Ultra Wide Angle Lenses: Captures a broad view of the road ahead and the vehicle's interior.
- Infrared Night Vision: Enhanced clarity for cabin recordings in low-light conditions.
- Wi-Fi Connect: Wirelessly view, save, and share recordings via the Rexing Connect app.
- Built-in GPS Logger: Records time, date, location, and speed data.
- Supercapacitor Power: Provides enhanced temperature resistance and longer lifespan compared to traditional batteries.
- Parking Monitor: Automatically records upon vibration detection or time-lapse (requires hardwire kit).
- Loop Recording: Automatically overwrites oldest files when the memory card is full.
- G-Sensor: Locks video footage upon collision detection to prevent overwriting.
- ADAS (Advanced Driver Assistance Systems): Includes Lane Departure Warning and Distance Detection of Front Vehicle.

Image: Premium Features Overview. This infographic visually summarizes the key functionalities of the Rexing V3 dash cam, including HD Dual Channel recording, internal GPS logging, Wi-Fi support, supercapacitor power, loop recording, collision detection, infrared night vision, and Advanced Driver Assistance Systems (ADAS).
Installation Guide
1. Prepare the MicroSD Card:
Before first use, format the MicroSD card (not included) in the dash cam. Use a UHS-I Class 10 or higher card, up to 256GB. Insert the card into the MicroSD card slot until it clicks.
2. Mount the Dash Cam:
- Clean the windshield area where you intend to mount the dash cam. Ensure it's free of dust and grease.
- Attach the 3M adhesive mount to the dash cam.
- Peel off the protective film from the 3M adhesive.
- Firmly press the dash cam with the mount onto the chosen spot on your windshield, ideally behind the rearview mirror for optimal view and minimal obstruction. Hold for at least 30 seconds to ensure strong adhesion.
3. Connect Power:
- Plug the car power cable into the dash cam's power port.
- Plug the other end of the car power cable into your vehicle's 12V accessory power outlet (cigarette lighter socket).
- Route the power cable neatly along the windshield edge and trim using the provided cable clips to avoid obstructing your view.
Basic Operations
Power On/Off:
- The dash cam will automatically power on and begin recording when connected to power and the vehicle's ignition is turned on.
- It will automatically power off when the vehicle's ignition is turned off (or power is disconnected).
- To manually power on/off, press and hold the Power button.
Recording:
- Once powered on, the dash cam will automatically start continuous loop recording.
- A red recording indicator will typically blink on the screen.
- To manually stop/start recording, press the OK button.
Menu Navigation:
- Press the MENU button to access settings.
- Use the UP/DOWN buttons to navigate through options.
- Press the OK button to select an option or confirm a setting.
- Press the MENU button again to exit the menu.
Advanced Features
Dual 1080p Full HD Recording:
The Rexing V3 concurrently captures video from both the front (170° wide angle) and cabin (150° wide angle) cameras at 1080p resolution. This provides comprehensive coverage of both external and internal events.

Image: Dual 1080 Full HD Recording. This image highlights the dual recording capability of the Rexing V3, showing both the front camera's wide-angle view of the road and the cabin camera's view of the interior, both captured in Full HD 1080p. Icons indicate wide-angle coverage and MicroSD card support up to 256GB.
Infrared Night Vision:
The cabin camera is equipped with 4 Infrared LED lights and a Sony Starvis Sensor, significantly enhancing night vision for clear recordings inside the vehicle, even in very low light conditions. The front camera also benefits from Wide Dynamic Range (WDR) technology for optimal performance in varying light.

Image: Infrared Night Vision. This visual explains the infrared night vision capabilities, showing how the front camera automatically balances light and dark, while the cabin camera uses 4 Infrared LED lights for enhanced night vision. Comparison images demonstrate clear visibility in both cabin and front views during nighttime.
Built-in Supercapacitor:
The Rexing V3 utilizes a supercapacitor instead of a traditional lithium-ion battery. This provides enhanced temperature resistance, allowing the dash cam to operate reliably in extreme hot or cold climates (-20°F to 176°F). It also offers a longer lifespan and is inherently safer, being explosion-proof.

Image: Built-in Super Capacitor. This image illustrates the benefits of the supercapacitor, emphasizing its high temperature resistance, longer lifespan compared to lithium batteries, and explosion-proof safety. Visuals include a circuit board with capacitors and symbolic representations of extreme temperature resilience and safety.
ADAS (Advanced Driver Assistance Systems):
The Rexing V3 includes ADAS features to assist drivers. These include:
- Lane Departure Warning: Alerts you if the vehicle drifts out of its lane.
- Distance Detection of Front Vehicle: Warns you if you are too close to the vehicle ahead.
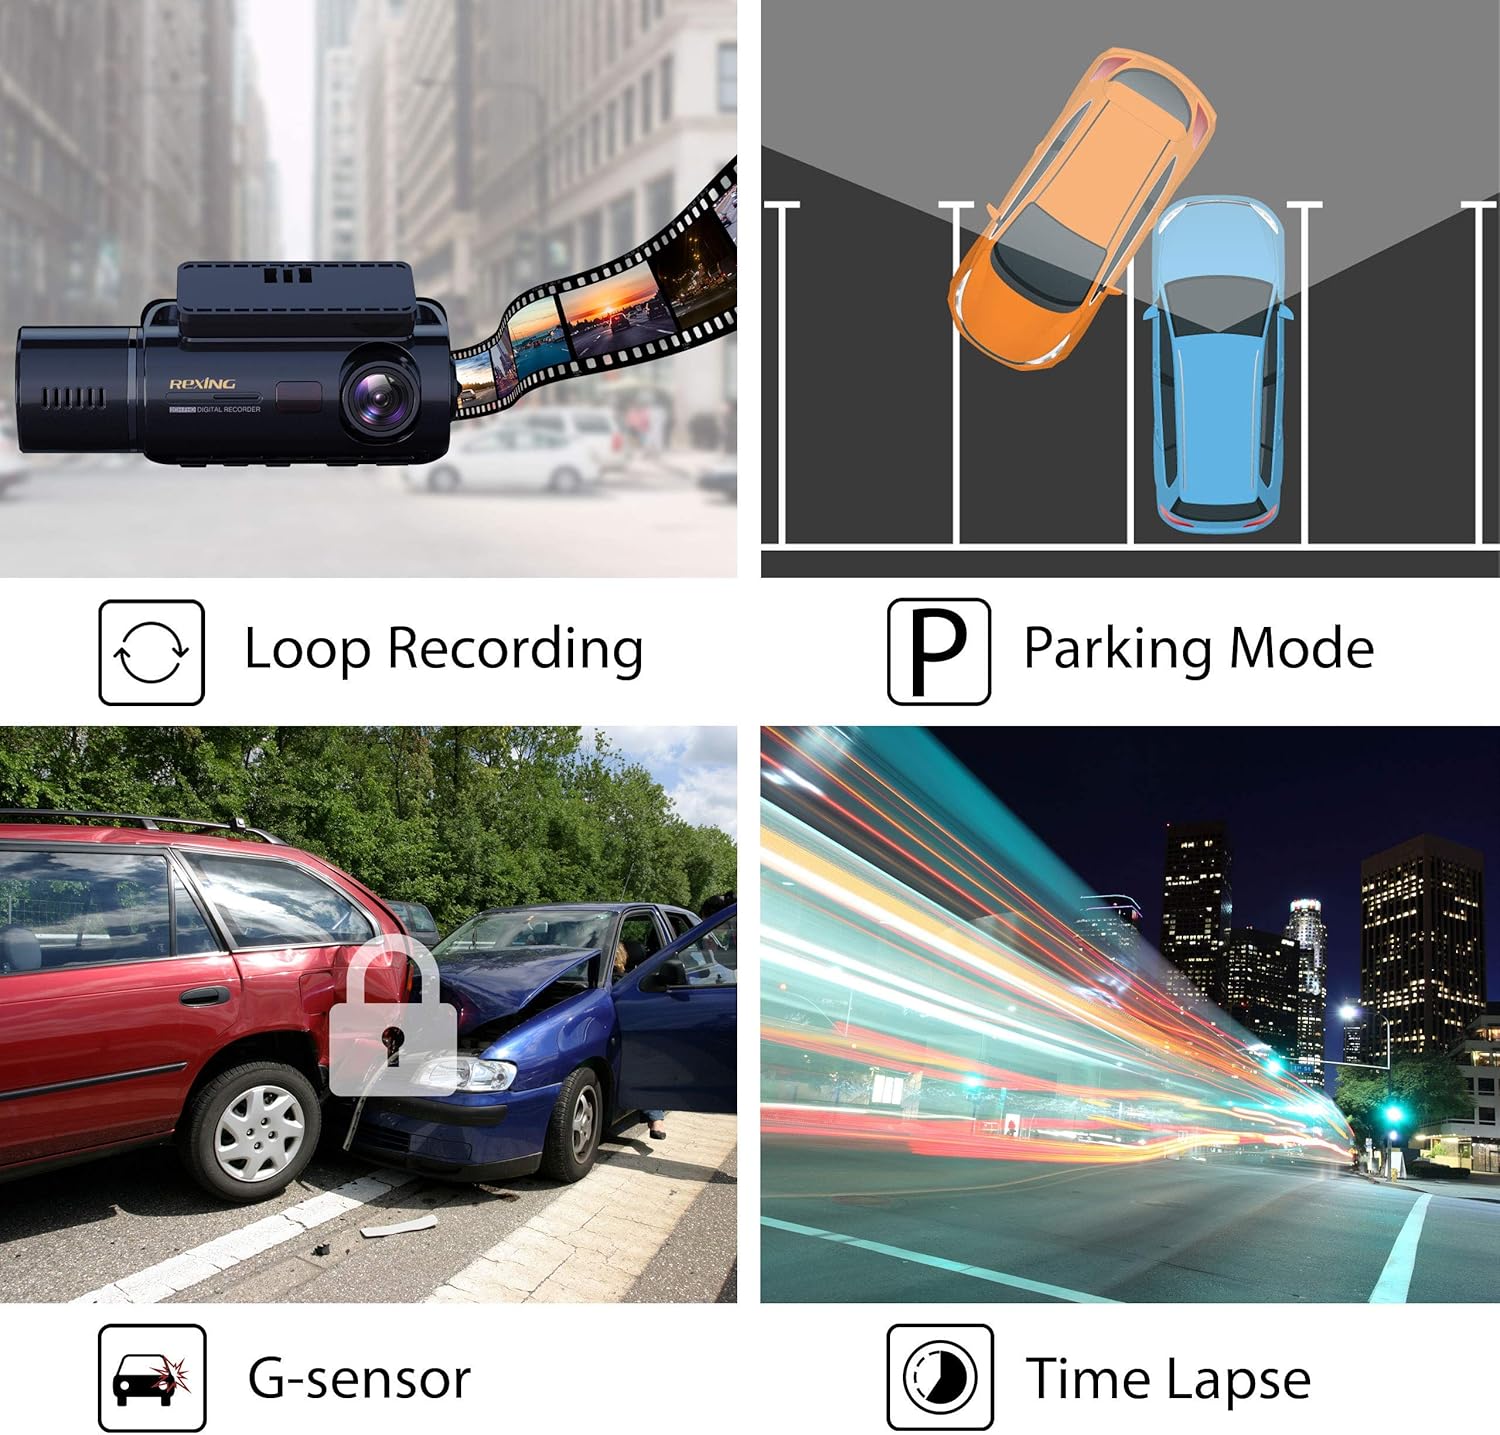
Image: ADAS (Advanced Driver Assistance Systems). This image visually explains the ADAS features, specifically Lane Departure Warning and Distance Detection of Front Vehicle, with illustrative scenarios on a highway.
Wi-Fi Connectivity & App
The Rexing V3 features built-in Wi-Fi, allowing you to connect your smartphone or tablet to the dash cam using the free Rexing Connect app (available for iOS and Android). This enables wireless viewing, saving, and sharing of your recordings.
Connecting to Wi-Fi:
- Download and install the "Rexing Connect" app from your device's app store.
- On the dash cam, navigate to the Wi-Fi settings and enable Wi-Fi. The Wi-Fi network name (SSID) and password will be displayed on the dash cam screen.
- On your smartphone/tablet, go to Wi-Fi settings and connect to the Rexing V3's Wi-Fi network.
- Open the Rexing Connect app. The app should automatically connect to the dash cam, allowing you to access its features.
App Functions:
- Live View: See what the dash cam is recording in real-time.
- Video Playback: Browse and play recorded videos directly on your device.
- Download/Share: Save video clips to your phone's gallery or share them.
- Settings: Adjust dash cam settings remotely through the app.

Image: Internal GPS Logger and Built-in Wi-Fi. This image demonstrates the integrated GPS functionality, showing speed and location tracking. It also illustrates the built-in Wi-Fi feature, with a smartphone displaying the Rexing Connect app interface for viewing and managing recordings wirelessly.
GPS Functionality
The Rexing V3 has a built-in GPS logger that records your driving route, location, and speed information directly onto your video files. This data can be viewed using the Rexing GPS Player software on your computer.
Viewing GPS Data:
- Download the Rexing GPS Player software from the official Rexing website.
- Remove the MicroSD card from the dash cam.
- Insert the MicroSD card into your computer (using a card reader if necessary).
- Open the Rexing GPS Player software and load the video files from the MicroSD card. The software will display the video along with synchronized map data, speed, and other relevant GPS information.
Parking Monitor
The Parking Monitor feature allows the dash cam to continue protecting your vehicle even when parked. It can be activated in two ways:
- Vibration Detection: The dash cam will automatically turn on and record a short video clip if it detects a vibration or impact while the vehicle is parked.
- Time-Lapse Video: The dash cam can capture frames for a continuous time-lapse video, providing 24/7 surveillance of your parked vehicle.
Note: To activate the Parking Monitor feature, the Rexing Smart Hardwire Kit (sold separately) is required to provide continuous power to the dash cam when the vehicle is off.
Maintenance
Formatting the MicroSD Card:
It is recommended to format the MicroSD card regularly (e.g., once a month) to ensure optimal performance and prevent data corruption. This can be done through the dash cam's menu settings.
Cleaning the Lens:
Use a soft, lint-free cloth to gently wipe the camera lenses. Avoid using abrasive cleaners or solvents that could damage the lens coating.
Troubleshooting
- Dash cam does not power on:
Ensure the car charger is properly connected to both the dash cam and the vehicle's 12V outlet. Check if the vehicle's 12V outlet is receiving power (e.g., by testing with another device). If using a hardwire kit, verify its installation.
- Dash cam turns on/off repeatedly:
This could indicate a power supply issue or a faulty MicroSD card. Try a different power source or a new, high-quality MicroSD card. Ensure the supercapacitor has enough charge (allow it to charge for a few minutes).
- "Please format SD card" error:
Format the MicroSD card directly in the dash cam's settings. If the issue persists, try a different MicroSD card. Ensure the card meets the recommended specifications (UHS-I Class 10 or higher, up to 256GB).
- Wi-Fi connection issues:
Ensure Wi-Fi is enabled on the dash cam. Restart both the dash cam and your mobile device. Make sure you are connecting to the correct Wi-Fi network displayed on the dash cam screen. Try reinstalling the Rexing Connect app.
- Video footage is blurry or unclear:
Clean the camera lenses with a soft cloth. Ensure the protective film has been removed from the lenses. Check the video resolution settings in the dash cam menu.
- G-Sensor is too sensitive/not sensitive enough:
Adjust the G-Sensor sensitivity setting in the dash cam menu. A higher sensitivity will lock more files, while a lower sensitivity will reduce false positives.
Specifications
| Model Name | V3 |
| Product Dimensions | 4.5 x 1.75 x 1.5 inches |
| Item Weight | 4.4 ounces |
| Video Capture Resolution | 1080p (Front & Cabin) |
| Lens Angle | Front: 170°, Cabin: 150° |
| Display | 2.7" LCD Screen |
| Storage Support | MicroSD Card (UHS-I Class 10 or higher) up to 256GB |
| Power Source | Supercapacitor |
| Connectivity | Wi-Fi, Built-in GPS |
| Special Features | Infrared Night Vision, WDR, Parking Monitor, Loop Recording, G-Sensor, ADAS |
Warranty & Support
Rexing products come with a standard warranty. For specific warranty terms and conditions, please refer to the warranty card included with your product or visit the official Rexing website. For technical support, troubleshooting assistance, or to inquire about replacement parts, please contact Rexing customer service through their official channels.
Official Website: www.rexingusa.com


