1. Introduction
This manual provides essential information for the safe and efficient operation of your RAGGIE RGS 1500W 12V Solar Power Inverter. This device is designed to convert 12V DC electricity from batteries or solar panels into 220V AC electricity, allowing you to power standard household appliances from a DC power source. Please read this manual thoroughly before installation and use.
2. Safety Information
WARNING: Failure to follow these safety instructions may result in electric shock, fire, serious injury, or death.
- Ensure the inverter is installed in a well-ventilated, dry, and cool environment, away from direct sunlight, heat sources, and flammable materials.
- Do not expose the inverter to rain, moisture, or liquids.
- Connect the inverter only to a 12V DC power source. Connecting to a different voltage may damage the unit.
- Always connect the battery terminals with correct polarity: positive (+) to positive, and negative (-) to negative. Reverse polarity will damage the unit.
- Ensure all connections are tight and secure to prevent overheating and arcing.
- Do not open the inverter casing. There are no user-serviceable parts inside. Refer all servicing to qualified personnel.
- Keep children away from the inverter and its connections.
- Always disconnect the DC power source before performing any maintenance or troubleshooting.
- Ensure the inverter is properly grounded.
3. Product Overview
The RAGGIE RGS 1500W inverter features robust construction and essential ports for reliable power conversion.
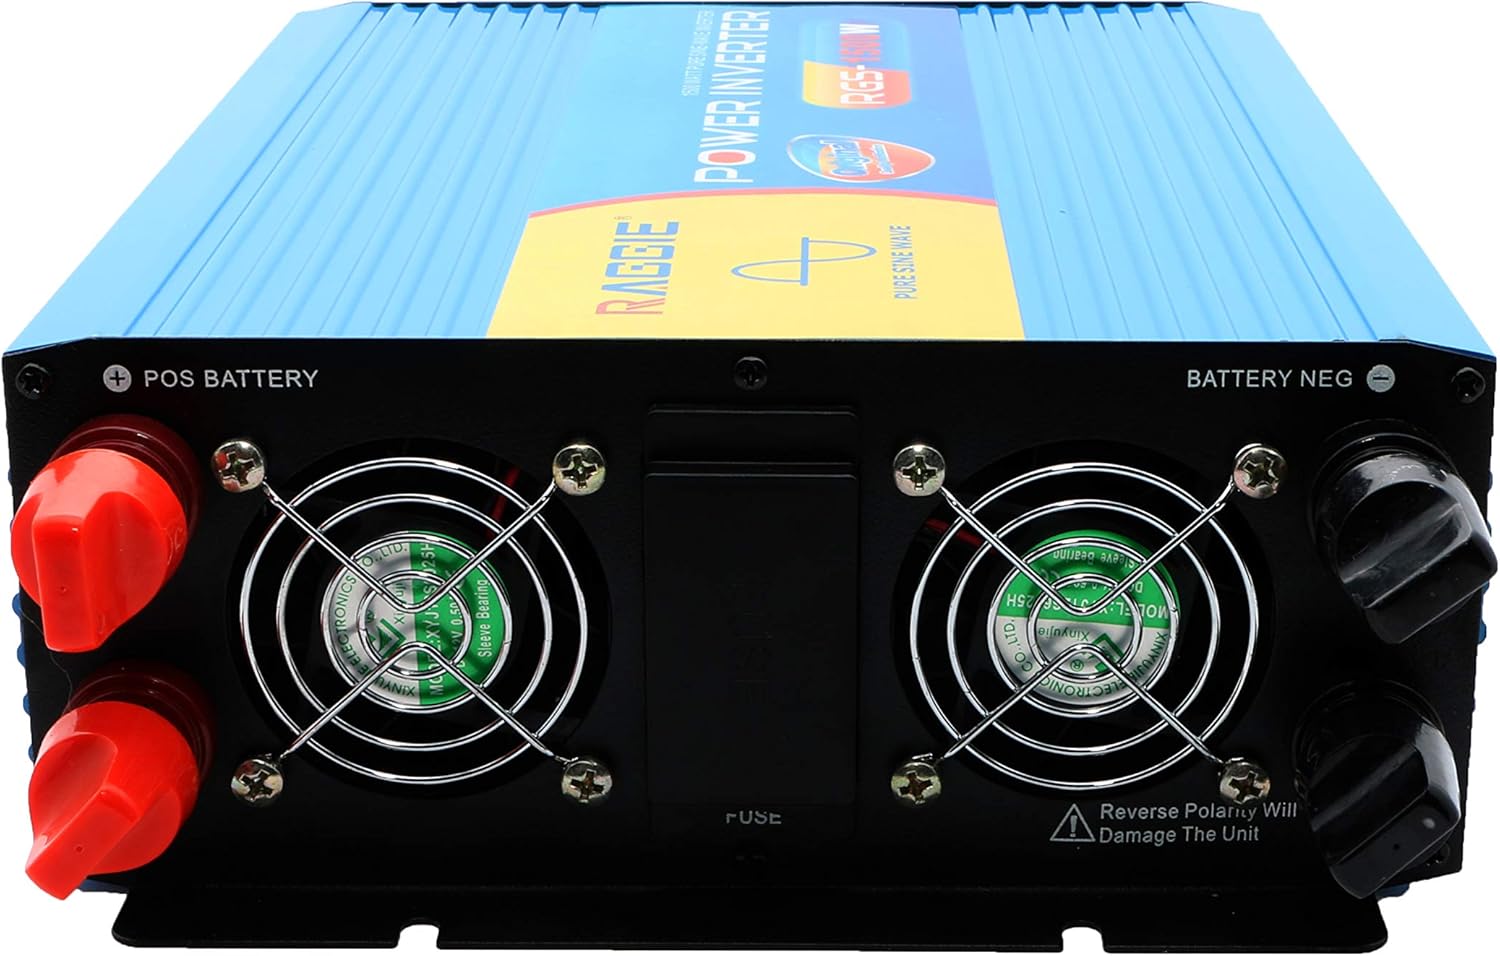
3.1 Rear Panel Components
The rear panel includes the DC input terminals for connecting to your 12V battery or solar array, along with cooling fans and a fuse compartment.
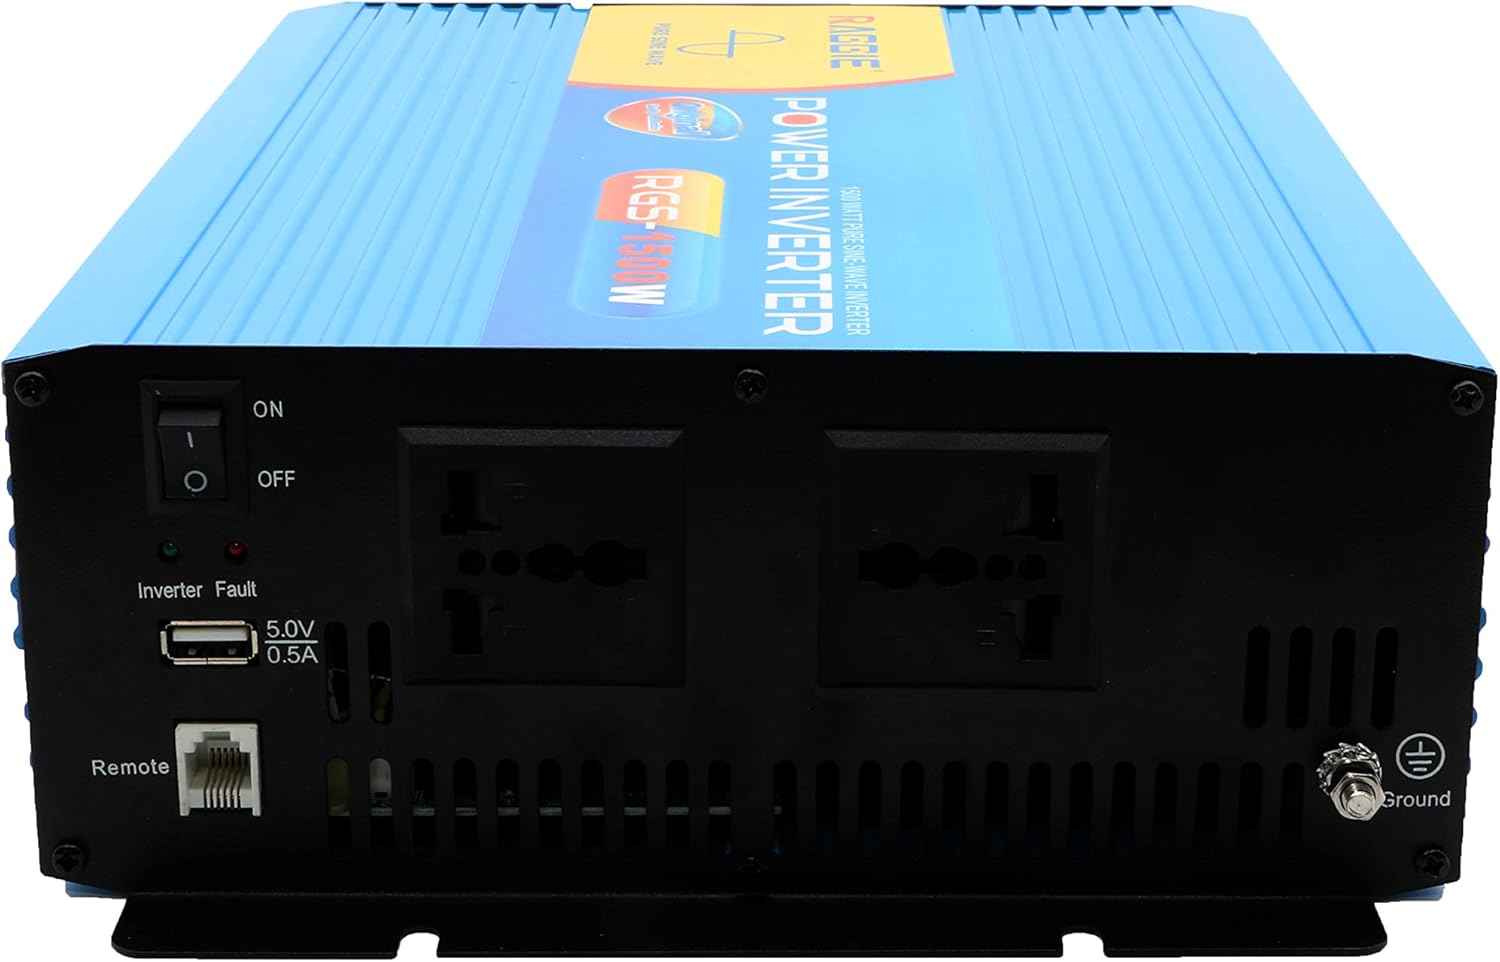
3.2 Front Panel Components
The front panel provides the AC output sockets for connecting your appliances, the main power switch, a USB charging port, and a remote control port.
4. Setup and Installation
Follow these steps for proper installation of your inverter.
4.1 Unpacking and Inspection
- Carefully remove the inverter from its packaging.
- Inspect the unit for any signs of damage during transit. If damage is found, do not proceed with installation and contact your supplier.
- Ensure all accessories are present.
4.2 Placement
- Choose a location that is dry, cool, and well-ventilated.
- Avoid areas with direct sunlight, high temperatures, or excessive dust.
- Mount the inverter securely on a stable surface.
- Ensure there is adequate clearance around the cooling fans for proper airflow.
4.3 DC Input Connection (Battery/Solar)
IMPORTANT: Ensure the inverter's power switch is in the OFF position before making any connections.
- Use appropriate gauge cables for your 12V DC input. Refer to the specifications for recommended cable sizes.
- Connect the RED (+) cable to the positive terminal of your 12V battery/solar array.
- Connect the other end of the RED (+) cable to the positive terminal (POS BATTERY) on the inverter's rear panel.
- Connect the BLACK (-) cable to the negative terminal of your 12V battery/solar array.
- Connect the other end of the BLACK (-) cable to the negative terminal (BATTERY NEG) on the inverter's rear panel.
- Ensure all connections are tight and secure.
4.4 Grounding
For safety, the inverter must be properly grounded.
- Connect a grounding wire from the ground terminal on the inverter's front panel to a suitable earth ground point (e.g., vehicle chassis, ground rod).
4.5 AC Output Connection (Appliances)
- Plug your AC appliances directly into the AC output sockets on the inverter's front panel.
- Ensure the total wattage of all connected appliances does not exceed the inverter's continuous output power (1500W).
5. Operating Instructions
5.1 Turning On the Inverter
- Ensure all DC and AC connections are correctly made and secure.
- Switch the main power switch on the inverter's front panel to the ON position.
- The inverter will typically emit a short beep and an indicator light will illuminate, indicating it is operational.
5.2 Turning Off the Inverter
- Disconnect all AC appliances from the inverter.
- Switch the main power switch on the inverter's front panel to the OFF position.
5.3 USB Charging Port
- The inverter includes a 5.0V 0.5A USB port for charging small electronic devices.
- Plug your USB device into this port for charging.
6. Maintenance
Regular maintenance ensures optimal performance and longevity of your inverter.
- Cleaning: Periodically clean the exterior of the inverter with a dry, soft cloth. Ensure cooling vents are free from dust and debris. Do not use liquid cleaners.
- Connection Check: Regularly inspect all DC and AC connections to ensure they remain tight and free from corrosion. Loose connections can cause overheating and power loss.
- Fuse Replacement: The inverter is equipped with internal fuses. If the inverter stops working and troubleshooting does not resolve the issue, the fuse may need replacement. This should only be performed by qualified personnel.
7. Troubleshooting
This section addresses common issues you might encounter with your inverter.
| Problem | Possible Cause | Solution |
|---|---|---|
| No power output / Inverter not turning on | Loose DC connections Low battery voltage Blown fuse Inverter switch OFF | Check and tighten DC cables Recharge or replace battery Check and replace fuse (by qualified personnel) Turn inverter switch ON |
| Overload warning / Inverter shuts down | Connected load exceeds 1500W Surge power too high | Reduce the total wattage of connected appliances Ensure appliance starting current is within inverter's peak capacity |
| Overheating warning / Inverter shuts down | Poor ventilation Excessive ambient temperature Blocked cooling fans | Ensure adequate airflow around the inverter Move inverter to a cooler location Clean cooling fans and vents |
| Low battery voltage warning | Battery charge is low | Recharge the battery |
8. Specifications
| Feature | Specification |
|---|---|
| Brand | RAGGIE |
| Model Number | RGS 1500W |
| Continuous Output Power | 1500 Watts |
| Input Voltage | 12 Volts DC |
| Output Voltage | AC (Standard for region, typically 220V) |
| Power Source | External (Battery/Solar) |
| Recommended Uses | Provide AC power from a DC source, operate AC devices using DC power. |
| Peak Output Power | 18000 Watts (Momentary Surge) |
| Certifications | UL, ETL, CE |
| Date First Available | July 9, 2019 |
9. Warranty and Support
For warranty information or technical support, please refer to the documentation provided with your purchase or contact the manufacturer directly. Keep your purchase receipt as proof of purchase.


