1. Introduction
This manual provides detailed instructions for the installation, operation, and maintenance of your GGStudy 360° Swivel Spout Two Handles 3-Hole 8-16 inch Widespread Bathroom Sink Faucet, Model 16397-ORB. Please read these instructions thoroughly before beginning installation and retain them for future reference. Proper installation and care will ensure optimal performance and longevity of your faucet.
2. Safety Information
- Always turn off the main water supply before installing or performing any maintenance on the faucet.
- Wear appropriate personal protective equipment, such as safety glasses and gloves, during installation.
- If you are unsure about any part of the installation process, it is recommended to consult a qualified plumber.
- Do not overtighten connections, as this may cause damage to the faucet or plumbing.
- Ensure all local plumbing codes are met during installation.
3. Package Contents
Verify that all components are present before beginning installation. If any parts are missing or damaged, please contact GGStudy customer support.
- 1 x Faucet Body
- 1 x Pop-up Drain with Overflow
- 1 x Instructions Manual (this document)
- 2 x 3/8-inch Supply Lines (Hot & Cold)
- 1 Pair Hot and Cold Handles
- Mounting Hardwares (washers, nuts, etc.)

Image 3.1: Overview of all components included in the GGStudy faucet package, including the faucet body, handles, pop-up drain, supply lines, and mounting hardware.
4. Specifications
| Feature | Specification |
|---|---|
| Brand | GGStudy |
| Model Name | 16397-ORB |
| Mounting Type | Deck Mount, Widespread (3-Hole) |
| Material | Brass (Faucet Body), Zinc (Handles) |
| Finish Type | Matte Black |
| Number of Handles | 2 |
| Spout Design | Swivel |
| Maximum Flow Rate | 1.2 Gallons Per Minute (GPM) |
| Spout Height | 5.51 Inches |
| Spout Reach | 4.52 Inches |
| Recommended Hole Spacing | 8-16 inches (center to center) |
| Pre-drilled Hole Size Requirement | 1.25 inches (min) - 1.85 inches (max) |
| Item Weight | 4.74 pounds |

Image 4.1: Detailed diagram showing the dimensions of the faucet components, including spout height, spout reach, and the required pre-drilled hole sizes for installation.
5. Setup (Installation)
5.1 Pre-Installation Checklist
- Ensure your sink has three pre-drilled holes with a spacing between 8 and 16 inches.
- Verify that the hole diameter is between 1.25 inches (min) and 1.85 inches (max). Refer to Image 4.1.
- Gather necessary tools: adjustable wrench, plumber's putty or silicone sealant, screwdriver, flashlight, and a basin wrench (if needed).
- Clean the mounting surface of the sink.
5.2 Installation Steps
- Prepare the Faucet Body: Apply plumber's putty or silicone sealant around the base of the faucet spout and handles.
- Install Faucet Spout: Insert the faucet spout through the center hole of the sink. From underneath the sink, secure it with the rubber washer, metal washer, and mounting nut. Hand-tighten first, then use a basin wrench to gently tighten.
- Install Handles: Insert the hot and cold handles through the left and right holes of the sink. From underneath, secure each handle with its respective rubber washer, metal washer, and mounting nut. Ensure the handles are oriented correctly (hot on left, cold on right) and can rotate freely.
- Connect Supply Lines: Attach the hot and cold supply lines to the corresponding inlets on the faucet handles and the main faucet body. Ensure a tight seal.
- Connect Water Supply: Connect the other ends of the supply lines to your hot and cold water shut-off valves. Use an adjustable wrench to tighten connections, but do not overtighten.
- Install Pop-Up Drain: Follow the separate instructions provided with the pop-up drain for proper installation into the sink drain hole. Ensure a watertight seal using plumber's putty or silicone sealant.
- Test for Leaks: Slowly turn on the main water supply. Check all connections for leaks. If leaks are detected, gently tighten the connections.
- Flush the Faucet: Remove the aerator from the spout. Turn on both hot and cold water for a few minutes to flush out any debris from the lines. Turn off the water, reattach the aerator, and test the water flow.
6. Operating Instructions
Your GGStudy widespread faucet features two handles for precise control over water temperature and flow, and a 360° swivel spout for convenience.
6.1 Water Flow and Temperature Control
- The left handle controls the hot water. Rotate it counter-clockwise to increase hot water flow.
- The right handle controls the cold water. Rotate it counter-clockwise to increase cold water flow.
- To achieve desired water temperature, adjust both hot and cold handles simultaneously.
- To turn off the water, rotate both handles clockwise until fully closed.
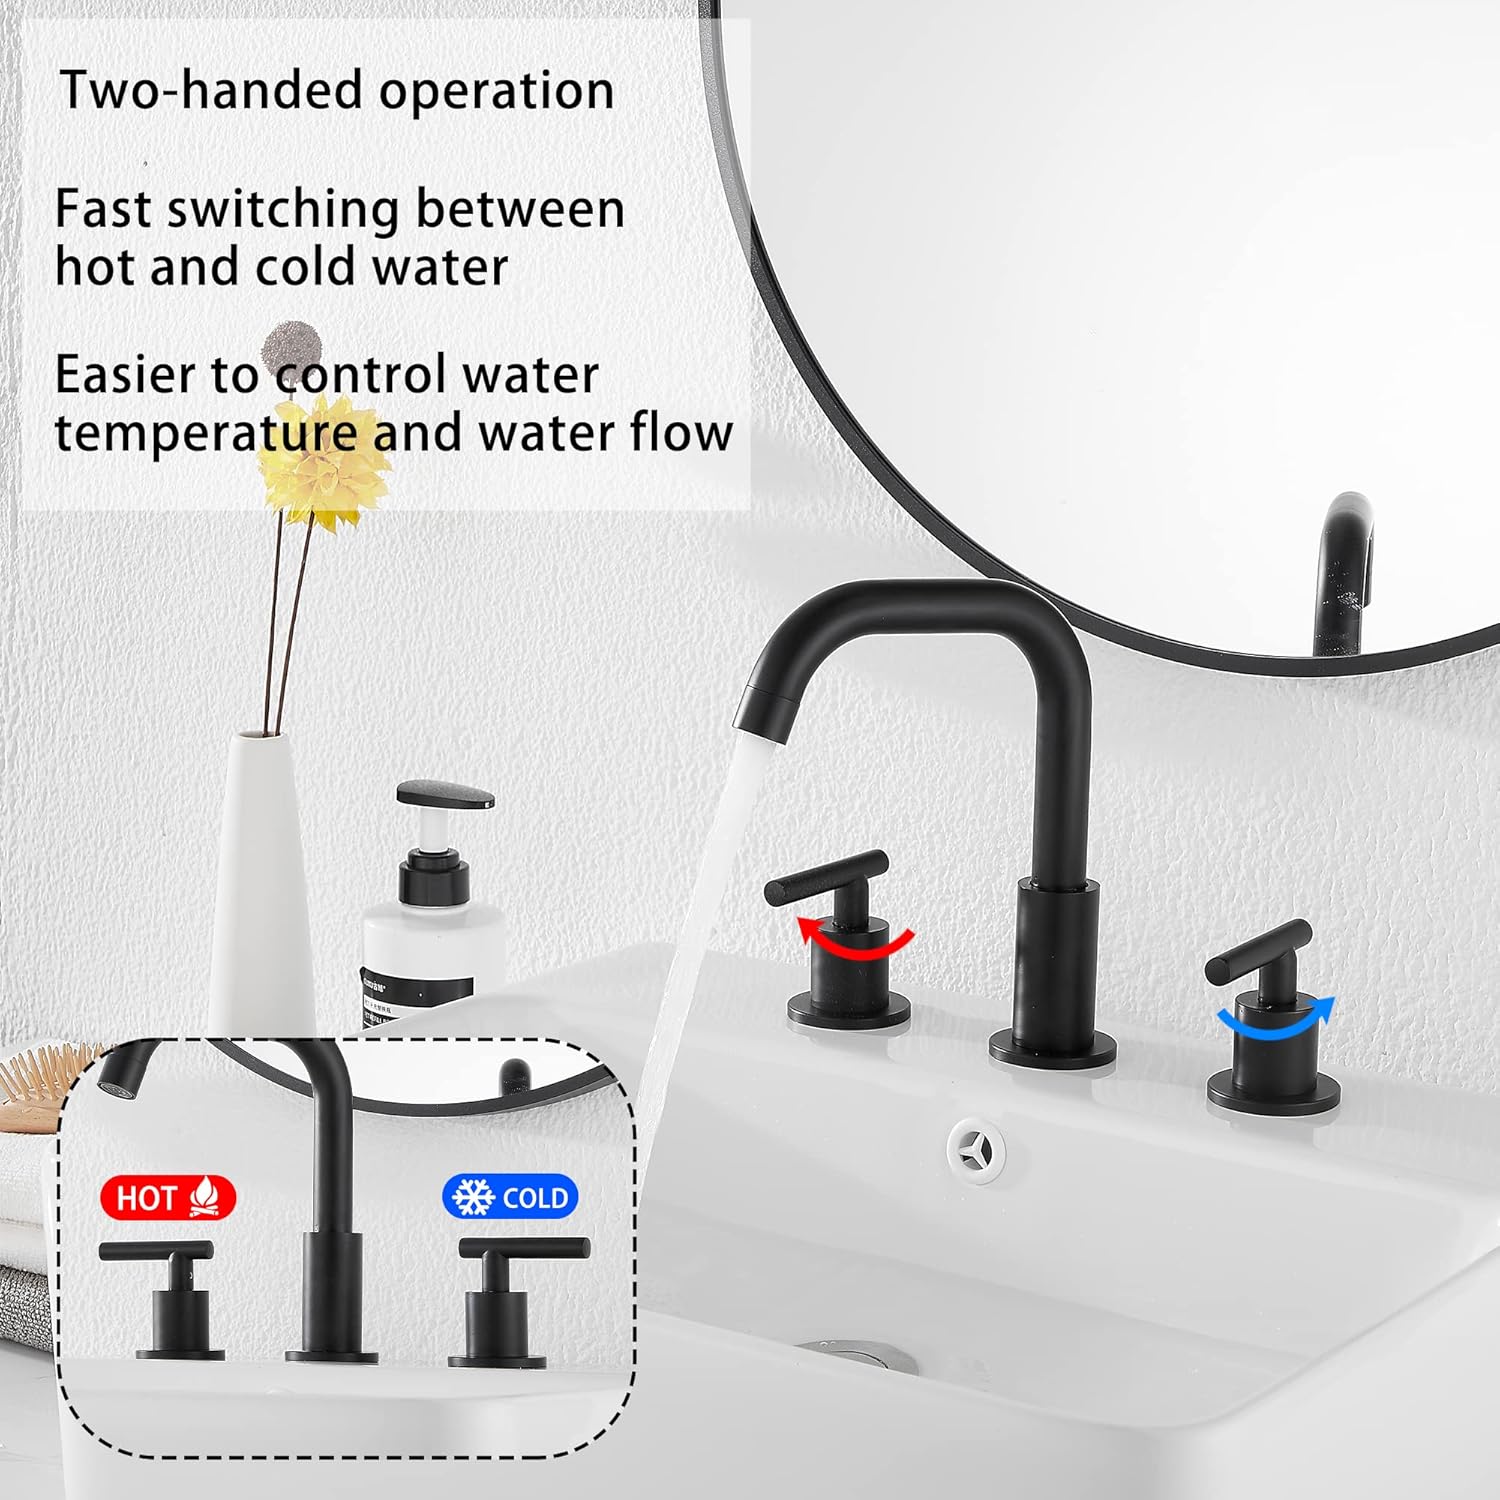
Image 6.1: Illustration demonstrating the two-handed operation of the faucet, with clear indicators for hot (red) and cold (blue) water control.

Image 6.2: Diagram illustrating both horizontal and vertical handle direction options for opening and closing hot and cold water flow.
6.2 Swivel Spout Function
- The faucet spout can rotate 360 degrees, allowing for flexible use and easy access to different areas of the sink.
7. Maintenance
7.1 Cleaning the Faucet
- To maintain the matte black finish, clean the faucet regularly with a soft, damp cloth.
- Avoid using abrasive cleaners, harsh chemicals, or scouring pads, as these can damage the finish.
- For stubborn spots, use a mild soap solution and rinse thoroughly with water, then dry with a soft cloth.
7.2 Aerator Maintenance
- If water flow becomes restricted or uneven, the aerator may be clogged with debris or mineral deposits.
- Unscrew the aerator from the tip of the spout.
- Rinse the aerator components under running water to remove any particles. For mineral deposits, soak the aerator in a solution of equal parts white vinegar and water for a few hours.
- Reassemble the aerator and screw it back onto the spout.
8. Troubleshooting
| Problem | Possible Cause | Solution |
|---|---|---|
| Low water flow | Clogged aerator; partially closed shut-off valves; debris in supply lines. | Clean the aerator (see Section 7.2); ensure shut-off valves are fully open; flush supply lines. |
| Leaks from connections | Loose connections; damaged washers. | Gently tighten connections; replace worn washers if necessary. |
| Water temperature issues | Incorrect handle adjustment; issues with water heater. | Adjust hot and cold handles as needed; check water heater settings. |
| Handles are stiff or difficult to turn | Mineral buildup in cartridges. | Contact customer support for guidance on cartridge maintenance or replacement. |
9. Warranty and Support
GGStudy is committed to providing quality products. For specific warranty details, please refer to the documentation included with your purchase or visit the official GGStudy website. Warranty coverage typically includes defects in materials and workmanship under normal use.
For technical assistance, missing parts, or any other inquiries, please contact GGStudy customer support directly. When contacting support, please have your model number (16397-ORB) and proof of purchase readily available.
Optional protection plans may be available from third-party providers at the time of purchase. Please review the terms and conditions of any such plans separately.
You can visit the GGStudy store for more information: GGStudy Store on Amazon


