
AOPUTTRIVER AP-866A
AOPUTTRIVER Digital Anemometer AP-866A User Manual
Model: AP-866A
Introduction
The AOPUTTRIVER AP-866A Digital Anemometer is a versatile handheld device designed for accurate measurement of wind speed, wind temperature, humidity, and dew point. It also features air flow (CFM) measurement capabilities, a backlight LCD display for easy reading, and USB connectivity for data transfer to a PC. This manual provides detailed instructions for the proper use, setup, and maintenance of your anemometer.
Package Contents
Please check the package carefully to ensure all items are present:
- 1 x Digital Anemometer (AP-866A)
- 1 x User Manual
- 1 x Protective Bag
- 1 x USB Cable
- 1 x Software Disc
- 1 x Lanyard
- 2 x 1.5V (AAA) Batteries

Image: Contents of the AP-866A package.
Product Features
- High Precision Measurement: Wind speed, temperature, humidity, and dew point.
- Air Flow (CFM/CMM/CMS) Measurement: Range up to 999900 m³/min.
- Multiple Wind Speed Units: mph, ft/min, km/h, m/s, knots.
- Temperature Units: Celsius (℃) / Fahrenheit (℉) selection.
- Data Hold Function: Freezes the current reading on the display.
- MAX/MIN/AVG Modes: Displays maximum, minimum, or average readings.
- Backlight LCD Display: Ensures readability in low-light conditions.
- USB Connectivity: Transfer and analyze data on a PC (Excel or Txt format).
- Auto Power Off: Saves battery life after 10 minutes of inactivity.
- Low Battery Indication: Alerts when batteries need replacement.
- Wind Chill Indication.
- Barometer Indication.

Image: AP-866A dimensions and feature icons.
Specifications
| Parameter | Value |
|---|---|
| Wind Speed Range | 0.3 - 30 m/s, 0.67 - 67.1 mph |
| Wind Temperature Range | -10℃ - 45℃ (14℉ - 113℉) |
| Relative Humidity | 5 - 95% RH |
| Dew Point | 0℃ - 50℃ (32℉ - 122℉) |
| Wind Flow Range | 0 - 999900 m³/min |
| Accuracy of Wind Speed | +/- 5% of readings |
| Accuracy of Temperature | +/- 2℃ (35.6℉) |
| Resolution | 0.2 mph, 32.36℉, 0.1% RH |
| Power Supply | 2 x 1.5V AAA Batteries |
| Product Dimensions (L x W x H) | 16.51 x 8.51 x 3.81 cm (6.5 x 3.35 x 1.5 inches) |
| Item Weight | 306.17 g (10.8 Ounces) |
| Material | Polycarbonate (PC) |
Setup
1. Battery Installation
- Locate the battery cover on the back of the anemometer.
- Open the battery cover by sliding it or unscrewing if applicable (refer to diagram).
- Insert two 1.5V AAA batteries, ensuring correct polarity (+/-).
- Close the battery cover securely.
2. Device Overview
Familiarize yourself with the components and buttons of the anemometer:

Image: Labeled diagram of the AP-866A anemometer components.
- Fan: Rotates to measure wind speed.
- LCD: Liquid Crystal Display for showing readings.
- Power switch: Turns the device on/off.
- "HOLD/MODE" Button: Used to hold data or switch measurement modes.
- "FUNC" Button: Used for function selection.
- "*/USB" Button: Activates backlight and USB connection.
- "UNIT" Button: Changes measurement units.
- "MAX/MIN" Button: Displays maximum, minimum, or average values.
- Fan retaining bolt hole: For securing the fan.
- Transducer air vent: For environmental sensing.
- Battery housing cover retaining bolt hole: For securing the battery cover.
- Battery cover: Access to battery compartment.
- Connection bracket: For fixing measurement bracket.
Operating Instructions
1. Power On/Off
- Press the Power switch button to turn the anemometer on.
- To turn off, press and hold the Power switch button. The device also features an auto power-off function after 10 minutes of inactivity to conserve battery.
2. Changing Measurement Units
- To change wind speed units (m/s, km/h, ft/min, knots, mph), press the UNIT button repeatedly until the desired unit is displayed.
- To switch between Celsius (℃) and Fahrenheit (℉) for temperature, press the FUNC button.
3. Data Hold, MAX/MIN/AVG
- Data Hold: Press the HOLD/MODE button briefly to freeze the current reading on the display. Press again to release.
- MAX/MIN/AVG: Press the MAX/MIN button repeatedly to cycle through Maximum, Minimum, and Average wind speed readings.
4. Backlight
- Press the */USB button briefly to turn the LCD backlight on or off.
5. Air Flow (CFM) Measurement
- Press the FUNC key to make "AREA" display on the screen.
- Use the MAX/MIN and UNIT keys to adjust the area value and unit (m², ft²).
- After adjusting the area unit, press the MAX/MIN key. An audible buzz will confirm that the area input is complete and settings are saved.
- The device will now display air flow readings based on the set area.
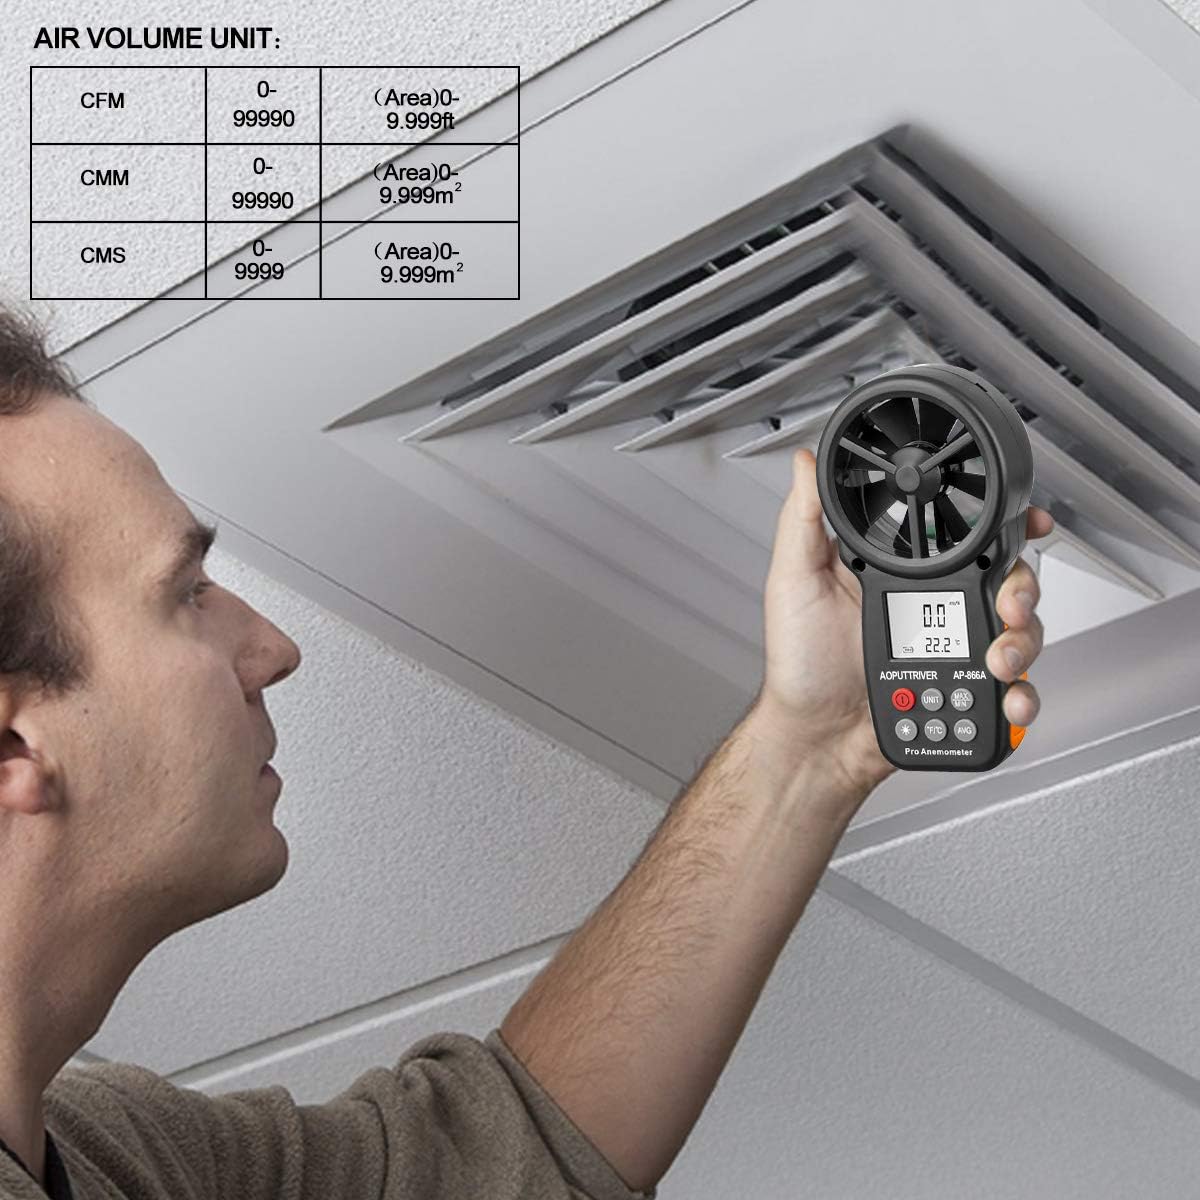
Image: Measuring air flow and air volume unit table.
6. Typical Applications
The AP-866A anemometer is suitable for a variety of applications, including:
- HVAC system testing and maintenance.
- Environmental monitoring.
- Sailing and outdoor sports.
- Drone operation and testing.
- Wind power assessment.
- Ventilation duct measurements.

Image: Examples of anemometer applications.
USB Connectivity and Real-Time Data Uploading
The AP-866A anemometer can connect to a PC to transfer and analyze real-time data. Follow these steps:
- Use the provided CD to install the PC software and USB drivers on your computer.
- Power on the meter and connect it to your computer using the supplied USB cable.
- Launch the installed PC software.
- Long press the "*/USB" key on the anemometer for 3 seconds to enable the USB function of the meter.
- The PC software will display real-time data and diagrams.
- You can save or print the data, saving it in Excel or Txt format for further analysis.

Image: USB real-time data uploading process and software interface.
Maintenance
- Cleaning: Wipe the device with a soft, dry cloth. Do not use abrasive cleaners or solvents.
- Storage: When not in use for extended periods, remove the batteries to prevent leakage. Store the device in a cool, dry place, away from direct sunlight and extreme temperatures.
- Fan Care: Ensure the fan blades are free from dust and debris for accurate readings. Do not attempt to lubricate the fan bearings.
- Battery Replacement: Replace batteries promptly when the low battery indicator appears on the display.
Troubleshooting
| Problem | Possible Cause | Solution |
|---|---|---|
| Device does not power on. | Low or dead batteries; incorrect battery polarity. | Replace batteries with new ones, ensuring correct +/- orientation. |
| Inaccurate readings. | Fan blades obstructed; sensor dirty; device not held correctly. | Check for obstructions on fan blades; gently clean sensors; ensure proper positioning during measurement. |
| LCD display is dim or blank. | Low battery; backlight off. | Replace batteries; press the */USB button to activate backlight. |
| USB connection not working. | Drivers not installed; USB function not enabled; faulty cable. | Install drivers from the provided disc; long press */USB for 3 seconds; try a different USB port or cable. |
Warranty and Support
AOPUTTRIVER products come with a 2-Year Warranty and lifetime technical support.
If you have any questions about the product, require technical assistance, or need to claim warranty, please contact us:
- Email: AOPVIPSERVICE@163.com
We aim to reply within 24 hours.
Related documentsAP-866A


Ask a question about this manual
Ask about setup, troubleshooting, compatibility, parts, safety, or missing instructions. Manuals+ will review the question and use this page’s manual context to help answer it.