
1. Introduction
The FX-Audio DAC-X6 is a compact and versatile Mini HiFi Digital Audio Decoder (DAC) and Headphone Amplifier. It is designed to significantly improve the audio quality from various digital sources by converting digital audio signals into high-fidelity analog sound. With multiple input options and both RCA and headphone outputs, the DAC-X6 offers flexibility for connecting to active speakers, power amplifiers, or directly driving headphones.
2. Safety Information
Please read and understand all safety instructions before using this product.
- Do not expose the device to water, moisture, or extreme temperatures.
- Use only the provided power adapter to prevent damage.
- Avoid placing the device near heat sources or in direct sunlight.
- Do not attempt to disassemble or modify the unit. Refer all servicing to qualified personnel.
- Ensure proper ventilation around the device during operation.
3. Package Contents
Verify that all items are present in the package:
- FX-Audio DAC-X6 Unit x 1
- 6.35mm to 3.5mm Headphone Adapter x 1
- 12V 1.5A Power Adapter x 1
- USB Cable x 1
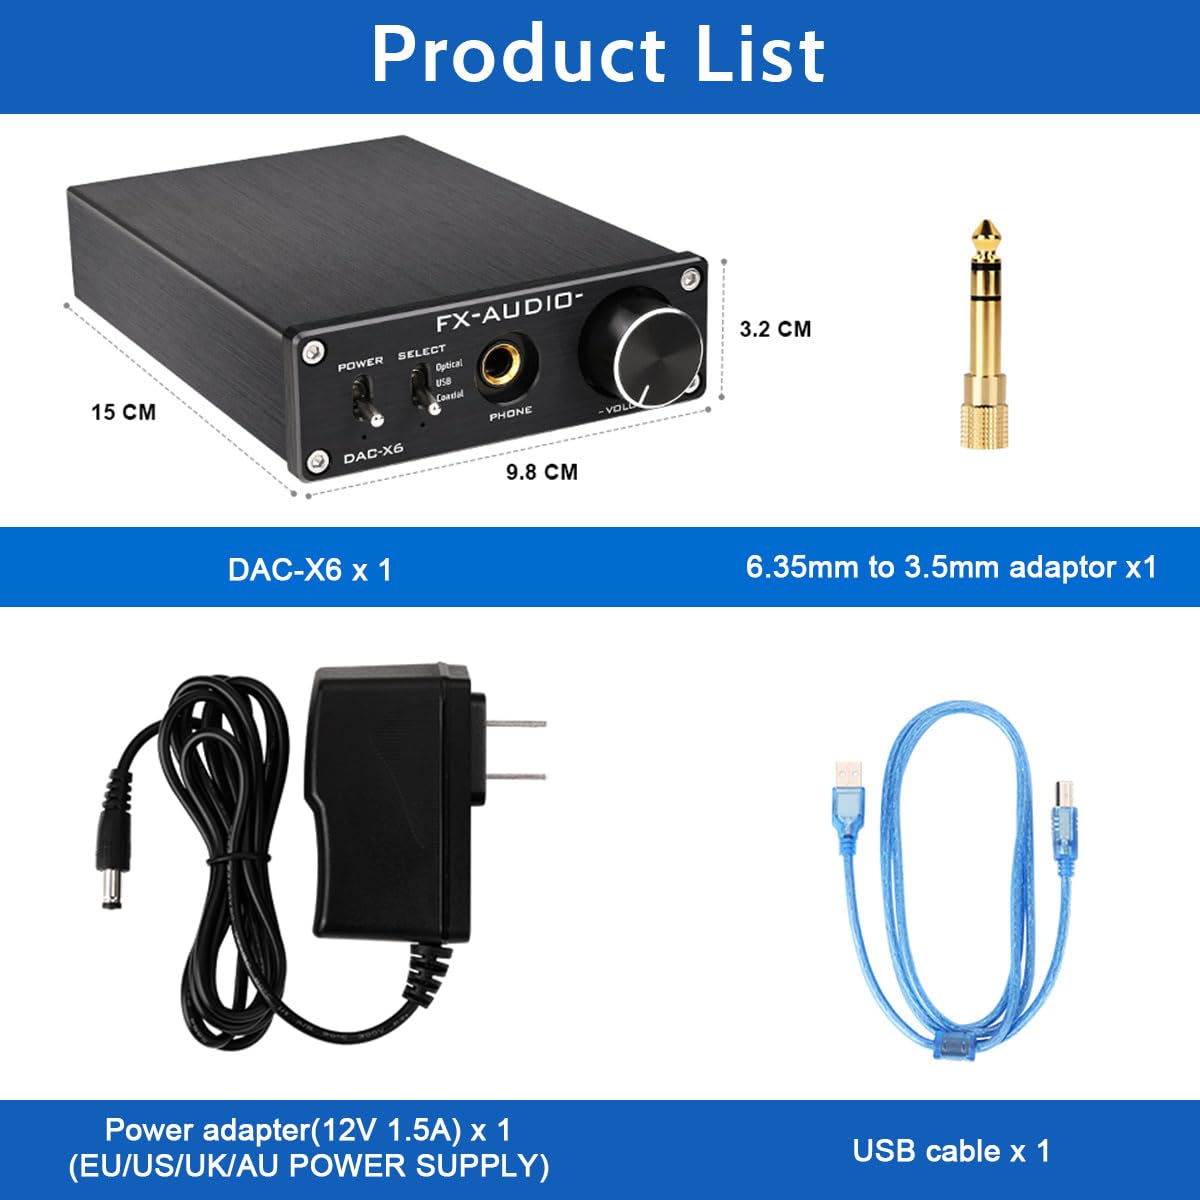
Figure 3.1: Package Contents of the FX-Audio DAC-X6.
4. Product Overview
4.1 Front Panel

Figure 4.1: Front Panel Controls and Connectors.
- POWER Switch: Toggles the device power On/Off.
- SELECT Switch: Used to choose between Optical, USB, and Coaxial input sources.
- PHONE (6.35mm Headphone Jack): Connect your headphones here.
- VOLUME Knob: Adjusts the output volume for connected headphones. Note: This knob does not control the volume of the RCA line output.
4.2 Rear Panel

Figure 4.2: Rear Panel Inputs and Outputs.
- PC-USB IN: Connects to a computer via USB cable for digital audio input.
- OPTICAL IN: Connects to devices with optical digital audio output (e.g., TV, game console).
- COAXIAL IN: Connects to devices with coaxial digital audio output (e.g., CD/DVD player).
- R OUT / L OUT (RCA): Analog stereo outputs for connecting to active speakers or a power amplifier.
- POWER (DC 12V): Connects the provided 12V DC power adapter.
5. Setup and Connection
Follow these steps to set up your FX-Audio DAC-X6:
- Connect Power: Plug the provided 12V DC power adapter into the "POWER" input on the rear panel of the DAC-X6, then plug the adapter into a wall outlet.
- Connect Input Source:
- For PC-USB input: Connect a USB cable from your computer to the "PC-USB IN" port on the DAC-X6.
- For Optical input: Connect an optical cable from your source device to the "OPTICAL IN" port.
- For Coaxial input: Connect a coaxial cable from your source device to the "COAXIAL IN" port.
- Connect Output Device:
- For Headphones: Plug your 6.35mm headphones directly into the "PHONE" jack on the front panel. If your headphones have a 3.5mm plug, use the included 6.35mm to 3.5mm adapter.
- For Active Speakers or Amplifier: Connect RCA cables from the "R OUT" and "L OUT" ports on the rear panel of the DAC-X6 to the corresponding inputs on your active speakers or power amplifier.
- Power On: Flip the "POWER" switch on the front panel to the ON position. The power indicator LED will illuminate.
- Select Input: Use the "SELECT" switch on the front panel to choose your desired input source (Optical, USB, or Coaxial).
5.1 Connection Diagram

Figure 5.1: Typical Connection Scenarios for the DAC-X6.
5.2 Setup Demonstration Video
Video 5.1: This video demonstrates the unboxing and basic setup of the FX-Audio DAC-X6, including connecting power, USB input, and RCA outputs. It shows the physical unit and its various ports.
6. Operating Instructions
- Power On/Off: Use the "POWER" toggle switch on the front panel to turn the unit on or off.
- Input Selection: Use the "SELECT" toggle switch to cycle through the available digital inputs: Optical, USB, and Coaxial. The corresponding indicator LED will light up to show the active input.
- Headphone Volume Control: Rotate the "VOLUME" knob on the front panel to adjust the listening level for headphones connected to the 6.35mm jack.
- RCA Line Output: The RCA outputs (R OUT, L OUT) provide a fixed-level analog signal. The volume knob on the DAC-X6 does not affect the RCA output volume. If using active speakers or an amplifier connected via RCA, adjust their volume directly. Both headphone and RCA outputs function simultaneously. If you do not wish to use active speakers, ensure they are turned off or disconnected.
6.1 Usage Scenarios
- Music Listening: Connect your digital music source (PC, CD player) to the DAC-X6 and enjoy enhanced audio fidelity through headphones or external speakers.
- Gaming: The DAC-X6 can improve audio clarity and directional sound for gaming when connected to your PC or console (via optical/coaxial if supported).
Video 6.1: This video provides an overview of the FX-Audio DAC-X6 Mini DAC Headphone Amp Combo, highlighting its features and operational aspects.
7. Maintenance
To ensure the longevity and optimal performance of your DAC-X6:
- Keep the device clean by wiping it with a soft, dry cloth. Avoid using liquid cleaners or solvents.
- Store the unit in a cool, dry place away from direct sunlight and excessive dust.
- Ensure all cables are securely connected but do not overtighten.
8. Troubleshooting
If you encounter issues with your DAC-X6, please refer to the following common problems and solutions:
| Problem | Possible Cause | Solution |
|---|---|---|
| No sound from headphones. |
|
|
| No sound from RCA outputs. |
|
|
| Distorted or poor sound quality. |
|
|
9. Specifications
| Feature | Detail |
|---|---|
| Brand | KGUSS (FX-Audio) |
| Model | DAC-X6 |
| Input Interfaces | PC-USB, Optical, Coaxial |
| Output Interfaces | RCA (L/R), 6.35mm Headphone Jack |
| Maximum Supply Voltage | 12 Volts |
| Minimum Supply Voltage | 12 Volts (DC) |
| Number of Channels | 2 |
| Product Dimensions | 5.7"L x 3.9"W (approx. 14.5cm x 9.9cm) |
| Item Weight | 1.45 pounds (approx. 0.66 kg) |
| Chipset | TPA6120A2+LM4562NA+SA9123+CS4398+CS8416 |

Figure 9.1: Internal Chipset Layout (for reference, actual components may vary by production batch).
10. Warranty and Support
This product is manufactured by KGUSS. For warranty information, technical support, or service inquiries, please refer to the documentation included with your purchase or contact the retailer/manufacturer directly. Keep your proof of purchase for warranty claims.

