1. Compatibility and Selection
This replacement screen is specifically designed for the Gateway Q5WTC laptop model. To ensure correct compatibility, it is crucial to verify that your original screen matches the following specifications:
- Resolution: HD 1366x768. This screen is not compatible with resolutions such as 1600x900px, 1920x1080px, or 3840x2160px.
- Video Connector: 40-pin. This screen is not compatible with 30-pin connectors.
- Screen Type: LCD LED Display, Non-Touchscreen. This screen does not support touch functionality.
- Screen Size: 15.6 inches.
Before purchasing, always confirm these details against your original screen's specifications. You can often find this information on a label on the back of your original screen or by checking your laptop's model specifications.

Image 1.1: Guide to selecting the correct screen. It illustrates how to find model numbers on the back of a screen or laptop and emphasizes matching the video connector (30-pin vs 40-pin), resolution (HD vs FHD vs UHD), touchscreen vs non-touch, and refresh rate (60Hz vs 144Hz vs 240Hz).

Image 1.2: Visual comparison of a 40-pin video connector (compatible) and a 30-pin video connector (incompatible). Ensure your original screen has a 40-pin connector.

Image 1.3: Resolution compatibility guide. This screen is only compatible with 1366x768 resolution displays.

Image 1.4: Screen type clarification. This product is an LCD screen only and does not support touchscreen functionality.
2. Setup and Installation
Replacing a laptop screen requires careful handling and attention to detail. It is recommended to consult a professional if you are not comfortable performing this procedure yourself. Always ensure the laptop is powered off and the battery is disconnected before beginning any installation.
2.1 Included Tools
The replacement screen package includes a set of basic tools to assist with the installation process:
- Precision Screwdriver (PH0)
- Pry Tools (plastic spudgers)
- Tweezers
- Precision Knife/Scalpel

Image 2.1: The included tool kit for screen replacement.
2.2 Identifying the Video Connector
The video connector on the back of the screen is a critical component. Ensure it is a 40-pin connector, as this replacement screen is designed for this specific type.
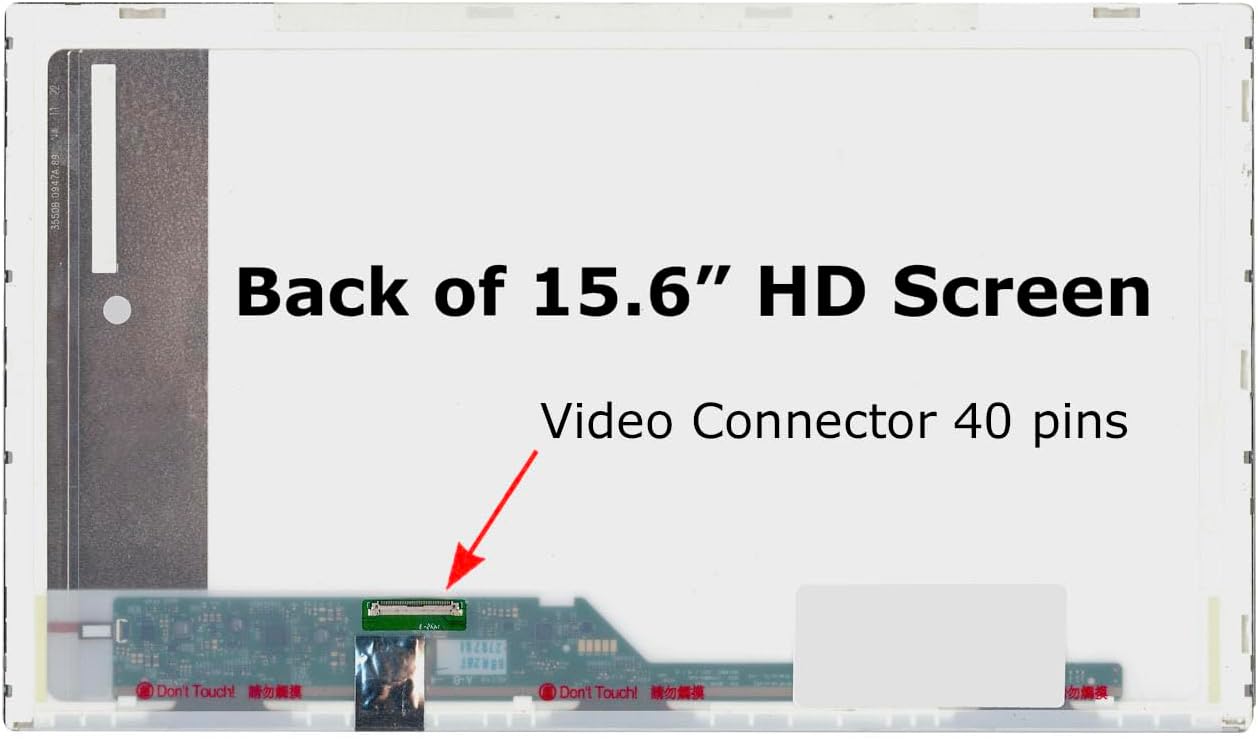
Image 2.2: Location of the 40-pin video connector on the back of the 15.6" HD screen.
2.3 General Installation Steps (Summary)
- Power Off: Shut down your laptop completely and disconnect the power adapter.
- Remove Battery: If possible, remove the laptop battery.
- Disassemble Bezel: Carefully remove the plastic bezel surrounding the screen using the pry tools.
- Unscrew Screen: Unscrew the old screen from its mounting brackets.
- Disconnect Cable: Gently disconnect the 40-pin video cable from the back of the old screen.
- Connect New Screen: Connect the video cable to the new screen, ensuring it is securely seated.
- Mount New Screen: Mount the new screen into the brackets and secure it with screws.
- Reassemble Bezel: Reattach the screen bezel.
- Reconnect Battery & Power: Reconnect the battery and power adapter, then power on the laptop to test.
For detailed step-by-step instructions, it is highly recommended to search for specific video tutorials or guides for your exact laptop model (Gateway Q5WTC screen replacement) online.
3. Operating the New Screen
Once installed, the new screen operates identically to your original screen. No special drivers or software are typically required for a standard LCD LED replacement screen. The laptop's operating system will automatically detect and utilize the display.
- Brightness Control: Adjust screen brightness using your laptop's function keys (e.g., Fn + F5/F6) or through your operating system's display settings.
- Resolution: The screen will operate at its native HD 1366x768 resolution. Ensure your operating system is set to this resolution for optimal display quality.
4. Maintenance
To ensure the longevity and optimal performance of your new screen, follow these maintenance guidelines:
- Cleaning: Use a soft, lint-free microfiber cloth specifically designed for electronics. For stubborn smudges, lightly dampen the cloth with distilled water or a screen-safe cleaning solution. Never spray liquid directly onto the screen.
- Avoid Pressure: Do not press on the screen with sharp objects or excessive force, as this can damage the LCD panel.
- Protection: When transporting your laptop, ensure it is in a protective sleeve or bag to prevent impacts or pressure on the screen.
- Temperature: Avoid exposing the laptop to extreme temperatures, which can affect screen performance and lifespan.
5. Troubleshooting Steps
If you encounter issues after installing your new screen, consider the following troubleshooting steps:
- External Monitor Test: Connect an external monitor to your laptop. If the external monitor displays an image, it confirms that the laptop's internal components (motherboard, graphics card) are operational, indicating the issue is likely with the screen or its connection.
- Pin Count Verification: Double-check that the number of pins on the original LCD's connector and the new screen's connector are identical (both 40-pin). Incompatible pin counts will prevent the screen from functioning.
- Blank Image: If the screen remains blank, carefully reconnect the video cable from both the screen side and the motherboard side. Ensure the connector is fully seated and secured, possibly with tape if it was originally present. Verify that the connector itself is not damaged.
- Issue Persistence: If the problem (e.g., no display, distorted image) is identical to the issue you had with the old LCD, the problem is likely not with the new screen but with another part of the laptop, such as the video card or motherboard.
- Dim Image: If the image is dim or there is no backlight, try connecting the old LCD (if it still lights up, even if broken). If both the old and new LCDs do not light up, check the backlight fuse on the motherboard. This fuse is usually located near the video connector.

Image 5.1: Summary of common troubleshooting steps for screen replacement issues.
6. Product Specifications
| Feature | Specification |
|---|---|
| Screen Size | 15.6 inches |
| Resolution | HD 1366x768 |
| Connector Type | 40-pin |
| Screen Finish | Glossy |
| Backlight Type | LED |
| Touchscreen | No |
| Compatibility | Gateway Q5WTC (and other models with matching specifications) |
7. Warranty and Support
7.1 Warranty Information
This SCREENARAMA replacement screen comes with a 2-year warranty. This warranty covers manufacturing defects and ensures the screen is free from defects in materials and workmanship under normal use during the warranty period.
The warranty does not cover damage caused by improper installation, accidental damage, misuse, abuse, or unauthorized modifications.
7.2 Customer Support
For technical assistance, warranty claims, or any questions regarding your SCREENARAMA product, please contact SCREENARAMA customer support. Refer to your purchase documentation or the SCREENARAMA official website for contact details.
When contacting support, please have your product model (Gateway Q5WTC replacement screen, HD 1366x768) and purchase date available.


