1. Product Overview
The S7 250A 110/220V Stick/Lift TIG Welding Machine is a versatile and portable inverter welder designed for a wide range of welding tasks. It features synergic control for simplified operation, an intuitive digital LED display, and advanced protection systems including anti-stick, overheat, overcurrent, and undervoltage safeguards. This machine is suitable for various electrodes and metals, making it ideal for DIY, farm, maintenance, and light industrial projects.

Key features include:
- Powerful 250A Output: Capable of handling various electrodes and thick steel welding tasks.
- Synergic Welding Mode: Simplifies parameter adjustment for ease of use.
- Digital LED Display: Provides clear readouts for precise control.
- Anti-Stick Function: Prevents electrode sticking, improving efficiency and machine protection.
- Portable and Lightweight: Compact design with a built-in handle for easy transport.
- Advanced Multi-Protection System: Includes overheat, overcurrent, and undervoltage protections.
2. Safety Information
Always prioritize safety when operating welding equipment. Failure to follow safety guidelines can result in serious injury or death.
2.1 General Safety Precautions
- Read the Manual: Thoroughly read and understand this entire manual before installation or operation.
- Personal Protective Equipment (PPE): Always wear appropriate PPE, including welding helmet with proper shade, flame-resistant clothing, welding gloves, and safety shoes.
- Ventilation: Ensure adequate ventilation to remove welding fumes. Work in a well-ventilated area or use fume extraction equipment.
- Fire Prevention: Keep a fire extinguisher nearby. Remove all flammable materials from the welding area. Welding sparks can travel.
- Electrical Safety:
- Do not operate the welder in wet conditions.
- Ensure proper grounding of the machine and workpiece.
- Inspect cables and connections for damage before each use.
- Do not touch live electrical parts.
- Arc Rays: Arc rays can burn eyes and skin. Protect yourself and bystanders.
- Electromagnetic Fields (EMF): Welding current creates EMF. Consult a physician if you have a pacemaker or other medical implant.
2.2 Machine Specific Protections
The S7 welder incorporates several built-in protection features:
- Overheat Protection: Automatic shutdown if the machine temperature exceeds safe limits.
- Overcurrent Protection: Shuts down if current draw is too high.
- Undervoltage Protection: Protects the machine from unstable power supply.
- Anti-Stick Function: Reduces electrode sticking to the workpiece.
- IP21 Protection Standard: Provides protection against solid objects larger than 12.5mm and vertically falling water drops.

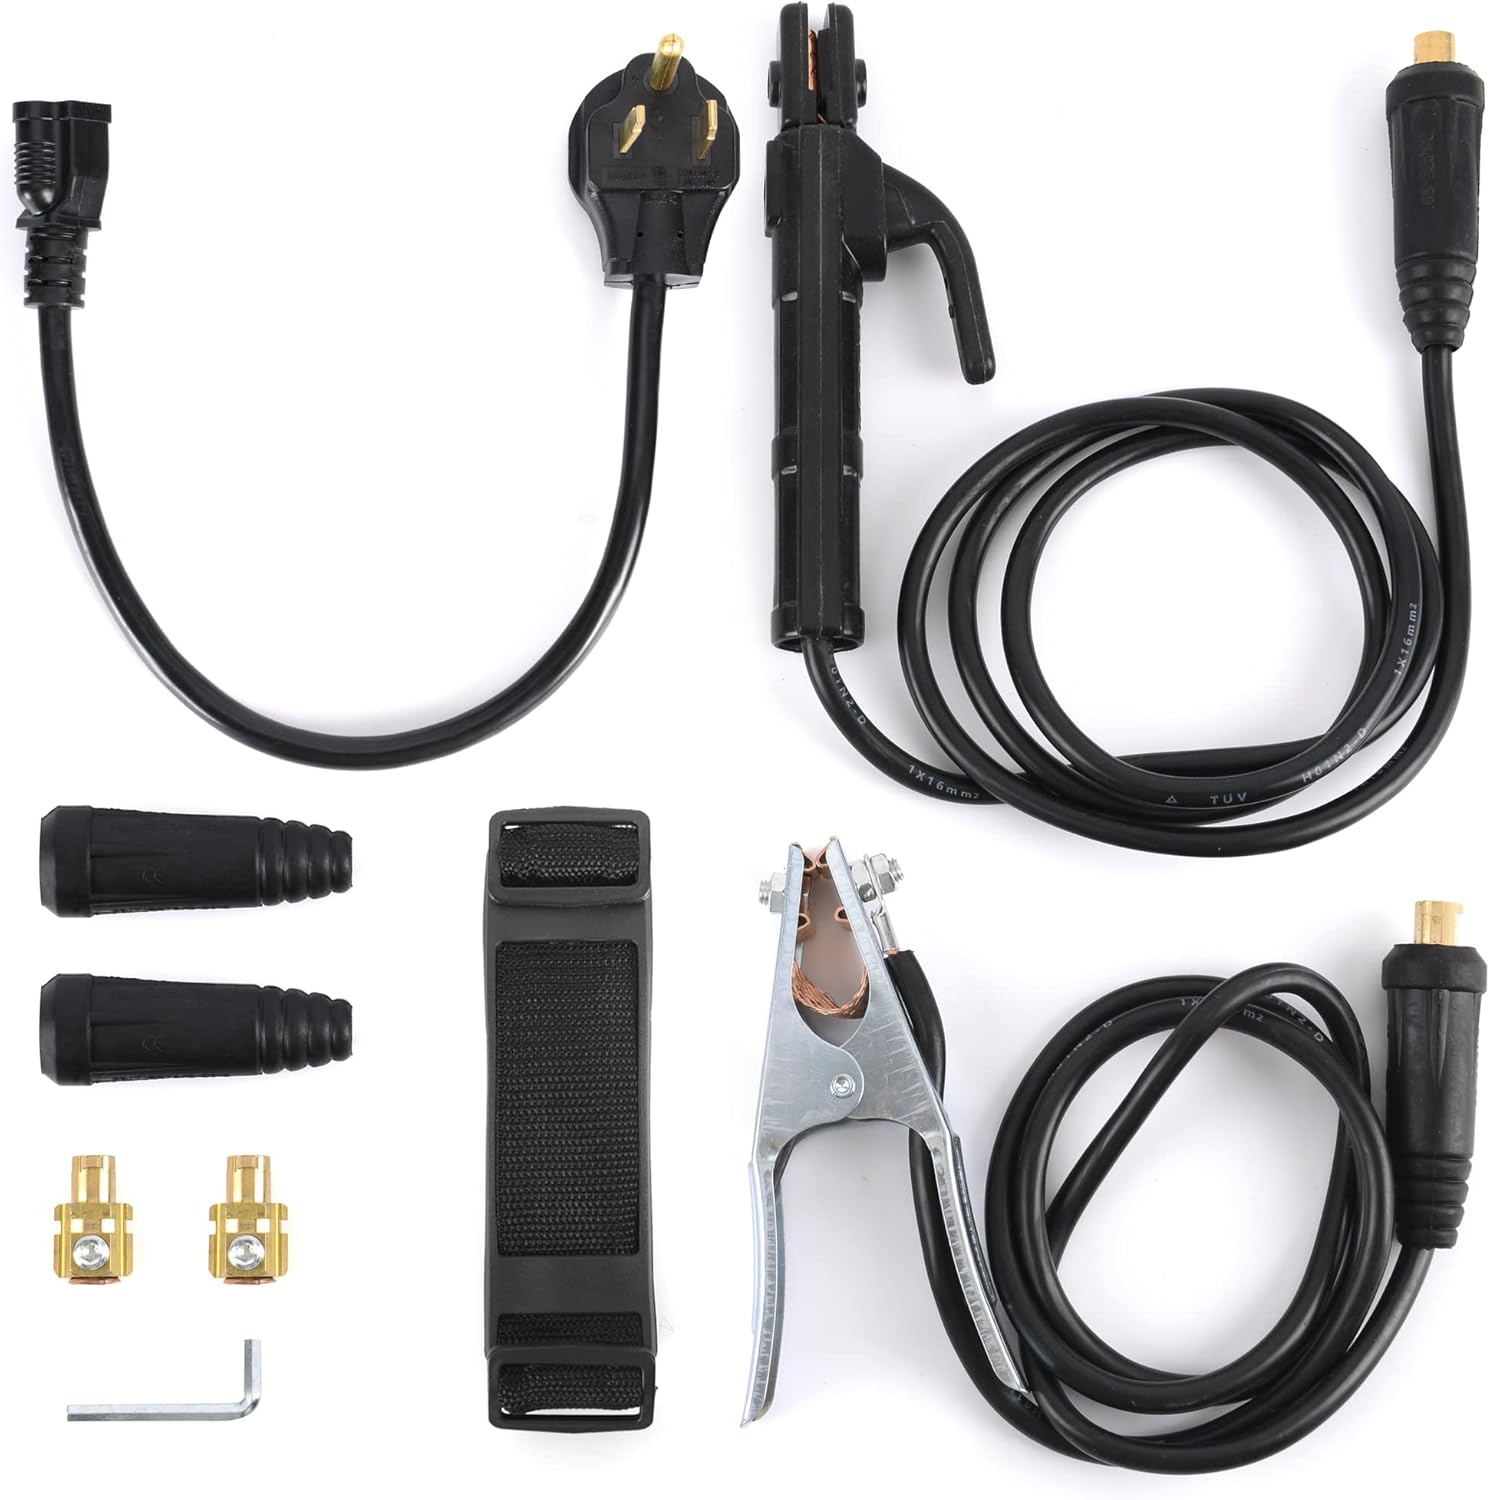
3. Package Contents
Upon opening the package, verify that all items listed below are present and undamaged:
- S7 250A Welding Machine Unit
- Electrode Holder with Cable
- Ground Clamp with Cable
- Power Adapter Cable (if applicable for 110V/220V conversion)
- Shoulder Strap
- Hex Wrench (for assembly/maintenance)
- Cable Connectors/Adapters (if applicable)
4. Setup Instructions
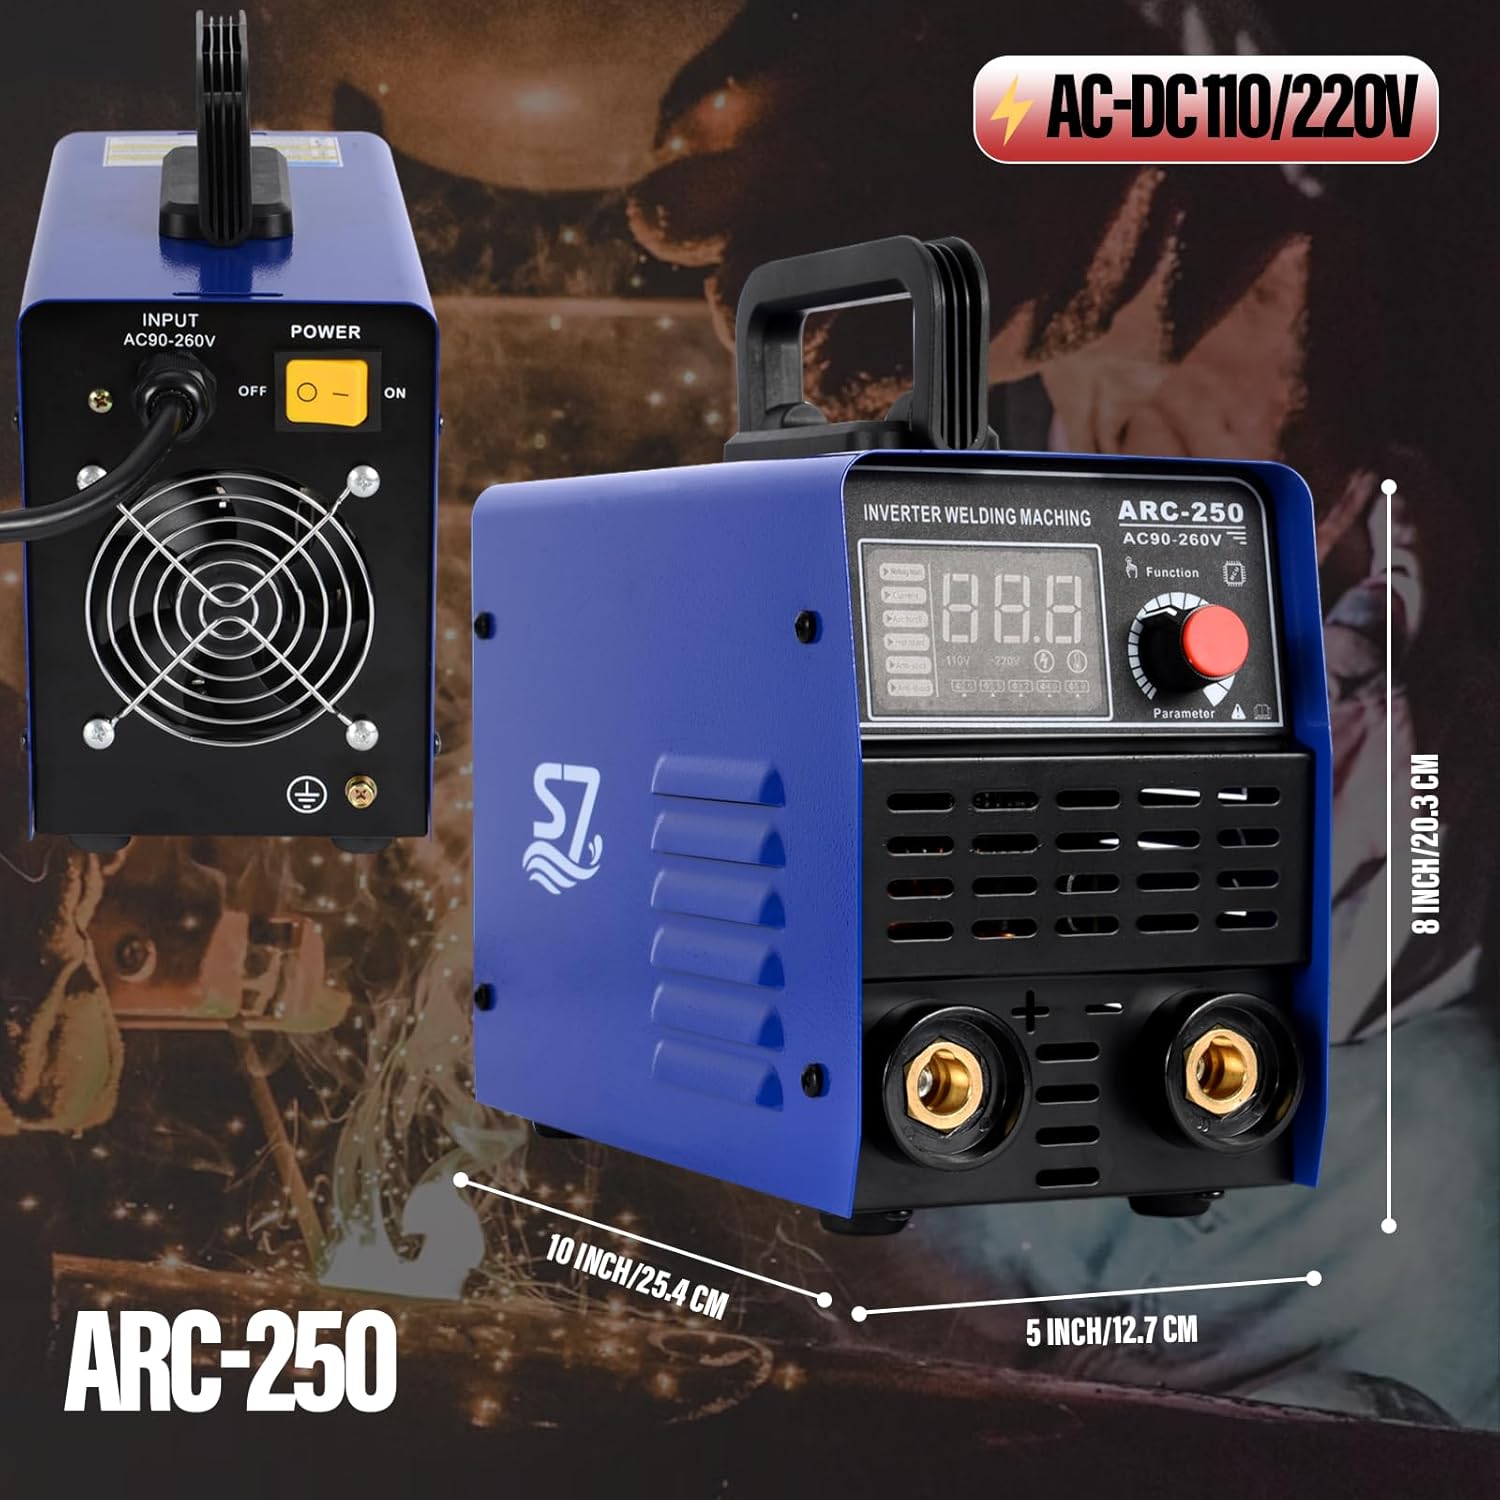
4.1 Power Connection
The S7 250A welder supports both 110V and 220V input voltages. The machine automatically detects the input voltage. Ensure your power source matches the machine's requirements and that the outlet is properly grounded.
- Connect the power cable to the welder's power input port.
- Plug the power cable into a suitable grounded electrical outlet.
- Ensure the power switch on the back of the unit is in the "OFF" position before plugging in.
4.2 Connecting Welding Cables
Connect the electrode holder and ground clamp cables to the appropriate terminals on the front panel of the welding machine.
- Electrode Holder Cable: Connect the electrode holder cable to the positive (+) terminal. Insert the connector and twist clockwise to secure.
- Ground Clamp Cable: Connect the ground clamp cable to the negative (-) terminal. Insert the connector and twist clockwise to secure.
- Ensure all connections are tight and secure to prevent arcing and ensure proper current flow.

5. Operating Instructions
5.1 Control Panel Overview
The front panel of the S7 welder features a digital LED display and a multi-function knob for easy operation.
- Digital LED Display: Shows current welding parameters such as amperage, voltage, and selected function.
- Function Button: Press to cycle through different welding modes (ARC/Stick, Lift TIG) or settings.
- Parameter Knob: Rotate to adjust welding current (amperage) or other selected parameters.
- Indicator Lights: May include indicators for power, overheat, and other status alerts.
5.2 Welding Modes
This machine supports two primary welding processes:
- ARC (Stick) Welding: Suitable for a wide range of electrodes (E6010, E6011, E6013, E7018, etc.) and various metals including cast iron, mild steel, stainless steel, and sheet metal.
- Lift TIG Welding: Provides a cleaner, more precise weld. Requires a TIG torch (not included) and shielding gas. To initiate, touch the tungsten electrode to the workpiece and then lift slightly to establish the arc.

5.3 Synergic Control and Parameter Adjustment
The synergic welding mode simplifies setup by automatically adjusting parameters based on your selected current. This feature is particularly helpful for beginners.
- Turn on the machine using the power switch on the rear panel.
- Press the "Function" button to select your desired welding mode (ARC or Lift TIG).
- Rotate the "Parameter" knob to adjust the welding current (amperage) according to the electrode size and material thickness. The digital display will show the current setting.
- For ARC welding, the machine automatically adjusts other parameters like Hot Start, Arc Force, and Anti-Stick based on the selected current.
- Begin welding, ensuring proper technique and safety precautions.
6. Maintenance
Regular maintenance ensures the longevity and optimal performance of your welding machine.
6.1 Cleaning
- Exterior: Wipe down the exterior of the machine with a clean, dry cloth. Do not use solvents or abrasive cleaners.
- Ventilation Openings: Periodically use compressed air to blow dust and debris out of the ventilation openings to ensure proper airflow and prevent overheating. Do this in a well-ventilated area.
- Cable Connections: Keep cable connectors clean and free of rust or corrosion.
6.2 Storage
- Store the welding machine in a dry, clean, and dust-free environment.
- Protect the machine from extreme temperatures and humidity.
- Coil cables neatly to prevent kinks or damage.
7. Troubleshooting
This section addresses common issues you might encounter. For problems not listed here, contact customer support.
| Problem | Possible Cause | Solution |
|---|---|---|
| Machine does not power on. | No power supply; power switch off; faulty cable. | Check power outlet, ensure switch is ON, inspect power cable. |
| No arc or weak arc. | Poor ground connection; incorrect current setting; damp electrode; faulty cable. | Ensure good ground contact, adjust current, use dry electrodes, check cables. |
| Overheat indicator is on. | Machine is overheated due to prolonged use or blocked ventilation. | Allow machine to cool down, ensure clear ventilation, reduce duty cycle. |
| Electrode sticks frequently. | Low current setting; improper electrode angle; Anti-Stick not functioning. | Increase current, adjust welding technique, ensure Anti-Stick is active. |
8. Specifications
| Feature | Detail |
|---|---|
| Model Number | S7 |
| Input Voltage | 110V/220V AC (Auto-sensing) |
| Max Output Current | 250A |
| Welding Processes | ARC (Stick), Lift TIG |
| Technology | IGBT Inverter |
| Protection Features | Hot Start, Arc Force, Anti-Stick, Overheat, Overcurrent, Undervoltage |
| IP Rating | IP21 |
| Item Weight | 9.38 pounds |
| Package Dimensions | 12.5 x 10 x 9.5 inches |
| Manufacturer | winwin |
9. Warranty and Support
For warranty information, technical support, or service inquiries, please refer to the official S7 website or contact the seller directly. Keep your purchase receipt as proof of purchase.
A digital version of this user manual is available for download: User Manual (PDF)