Introduction
This manual provides comprehensive instructions for the installation, operation, and maintenance of your GE 7-Day Digital Box Timer, Model 46537. This heavy-duty timer is designed for reliable scheduling of various electrical loads, including fans, pumps, pool heaters, AC units, and heating and ventilation systems. Its robust construction and advanced features ensure efficient and secure operation for both indoor and outdoor applications.
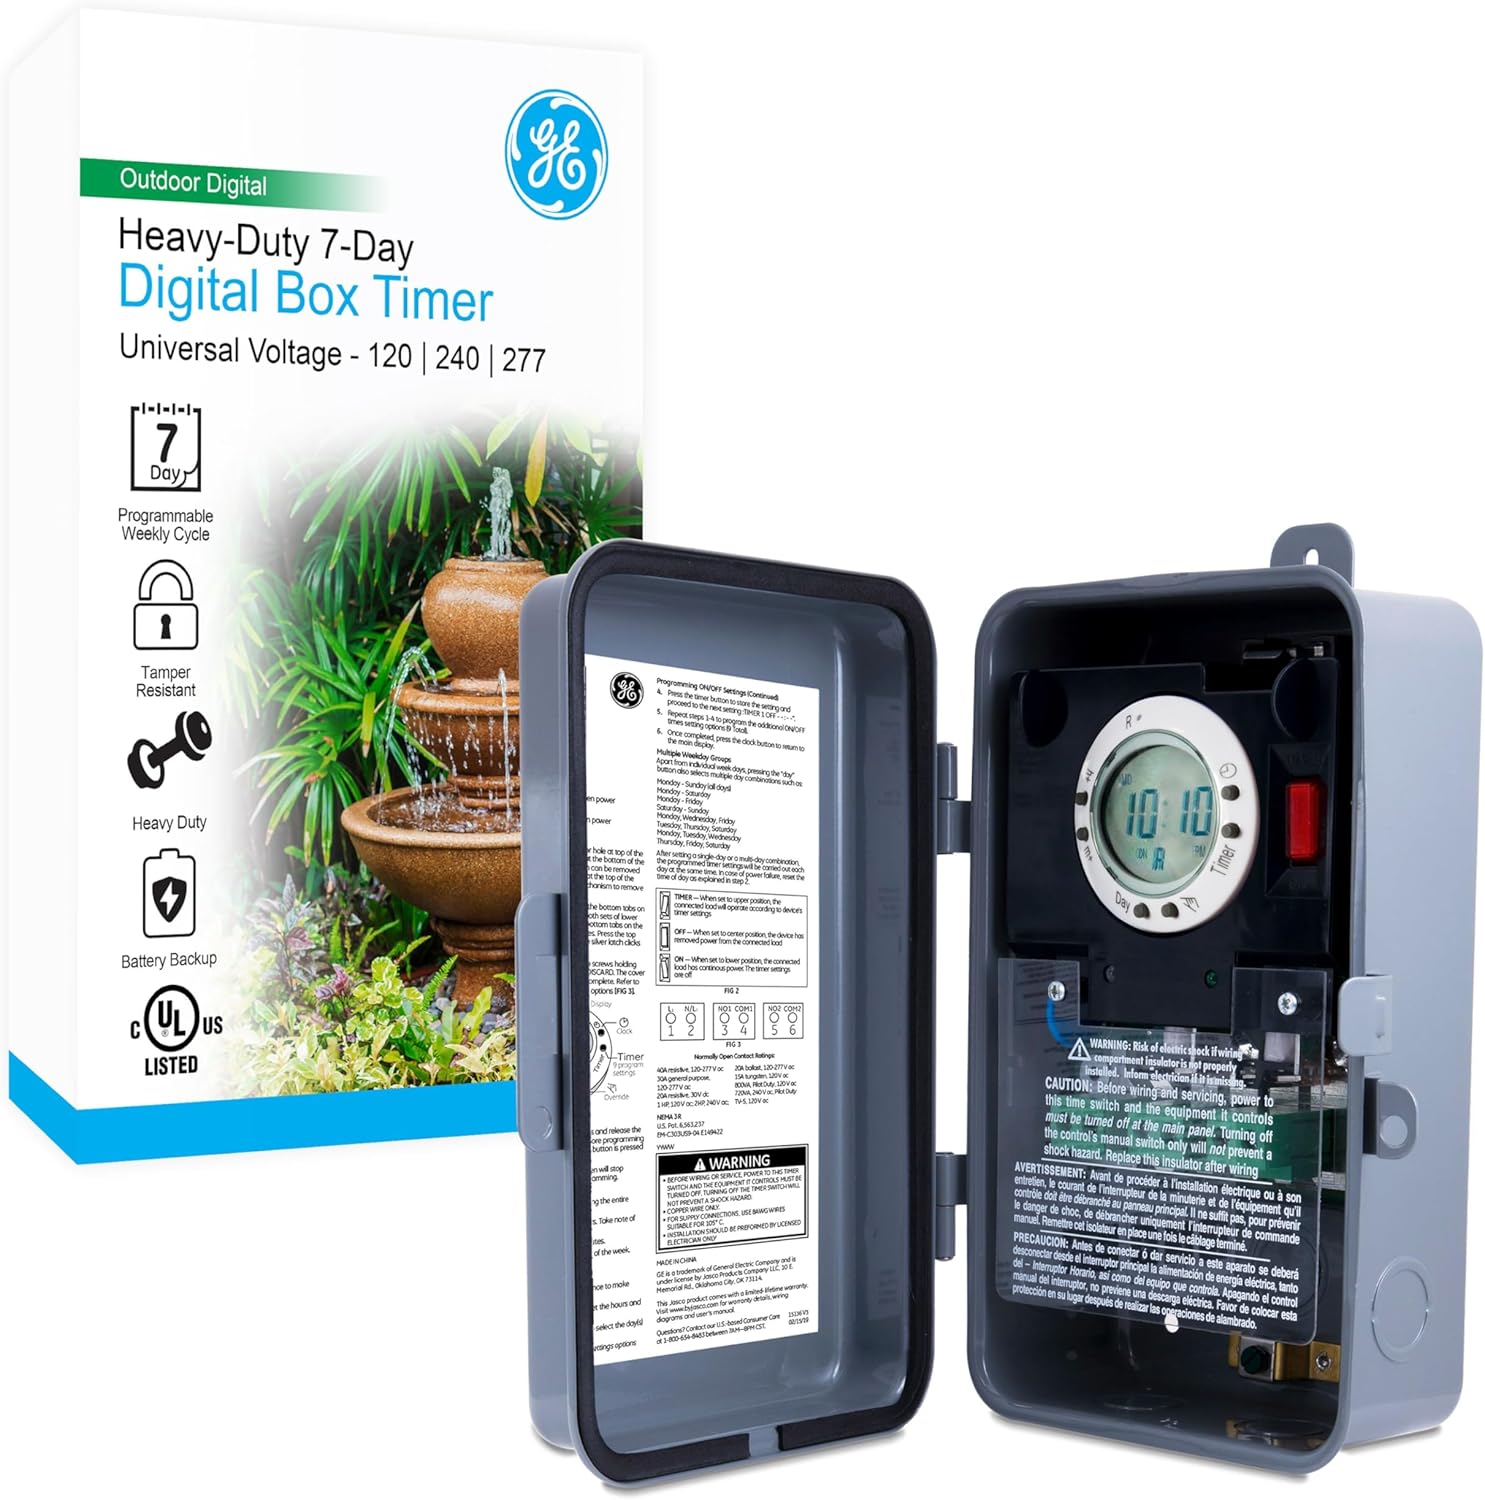
Figure 1: GE 7-Day Digital Box Timer and its packaging, highlighting key features like 7-day programming, tamper resistance, heavy-duty construction, and battery backup.
Safety Information
WARNING: Risk of electric shock. Installation requires knowledge of electrical systems. If not qualified, do not attempt installation. Contact a qualified electrician.
- Always disconnect power at the circuit breaker or fuse box before installing or servicing the timer.
- Ensure all wiring connections are secure and comply with local and national electrical codes.
- Do not exceed the maximum load capacity of the timer (2HP, 40A).
- The NEMA 3R-rated enclosure provides protection against rain, sleet, and external ice formation. However, avoid direct water spray or submersion.
- Keep the enclosure door closed and locked to prevent tampering and protect internal components.
Product Features
- 7-Day Programmable Cycle: Allows for customized scheduling throughout the week.
- Heavy-Duty Construction: Durable metal enclosure designed for longevity.
- Universal Voltage: Automatically configures for 120 VAC, 240 VAC, or 277 VAC loads.
- High Load Capacity: Supports up to 2HP and 40A.
- NEMA 3R-Rated Enclosure: Weatherproof and suitable for outdoor use, protecting against rain, sleet, and external ice formation.
- Tamper-Resistant Design: Lockable door provides security for settings and wiring.
- Battery Backup: Retains programming and time settings during power outages.
- Multiple ON/OFF Settings: Up to nine programmable ON/OFF settings per day.
- Versatile Compatibility: Supports single-pole single-throw and double-pole single-throw switches.
- Convenient Block Terminals: Ensures fast and secure wiring connections.

Figure 2: Visual representation of the timer's key features, including its 7-day programmable cycle, heavy-duty metal construction, tamper-resistant design, battery backup, and universal voltage capability.
Installation
1. Prepare the Enclosure (Remove Knockouts)
The timer enclosure comes with pre-scored 1/2" and 3/4" knockouts for wiring entry.
- Using a screwdriver, firmly press against the center of the desired knockout to break the initial seal.
- Use pliers to grasp the outer ring of the knockout and twist it off. Ensure a clean opening for conduit or cable connectors.
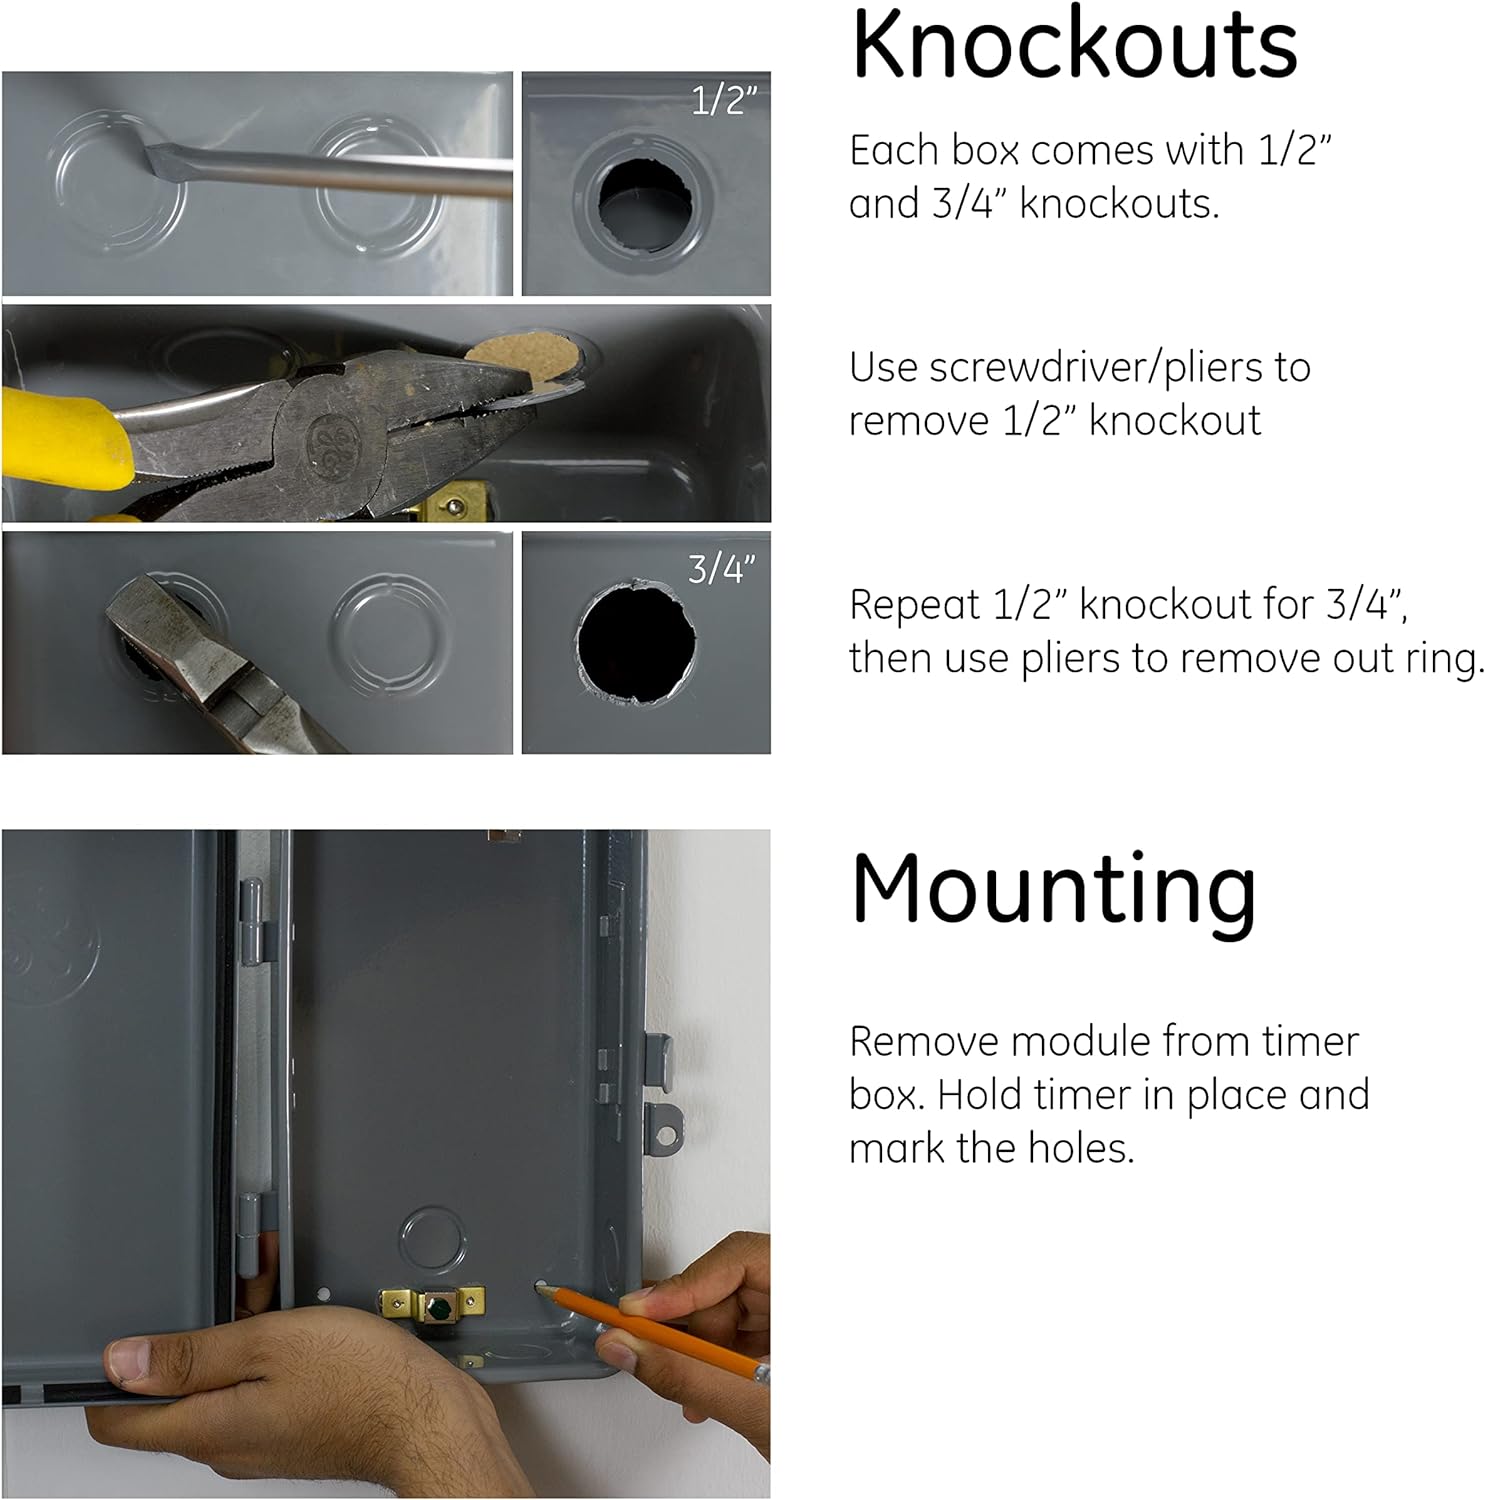
Figure 3: Detailed steps illustrating how to remove the 1/2" and 3/4" knockouts from the timer's metal enclosure using a screwdriver and pliers.
2. Mount the Timer
Select a suitable mounting location that is secure, accessible, and protected from direct impact.
- Remove the internal timer module from the metal box by gently pulling it forward.
- Hold the empty timer box against the desired mounting surface.
- Mark the locations for the mounting screws through the pre-drilled holes on the back of the enclosure.
- Drill pilot holes if necessary and secure the enclosure firmly to the surface using appropriate screws (not included).
- Once the box is mounted, reinsert the timer module into the enclosure, ensuring it clicks securely into place.

Figure 4: Illustration of marking mounting holes and securing the timer enclosure to a surface after removing the internal module.
3. Wiring Connections
The GE 7-Day Digital Box Timer features convenient block terminals for secure wiring. Ensure all connections are tight and correct for your application. The timer automatically senses 120 VAC, 240 VAC, or 277 VAC. Refer to the wiring diagram inside the timer's door for specific connection configurations (Single-Pole Single-Throw or Double-Pole Single-Throw).
- Connect the incoming power supply wires to the designated input terminals.
- Connect the load wires (to the appliance/device) to the designated output terminals.
- Ensure proper grounding according to electrical codes.
Operation
1. Activate the Timer and Set Current Time/Day
Upon initial power-up or after a prolonged power outage, the timer may require time and day setting.
- Press the "TIME" button to enter time setting mode.
- Use the "HOUR" and "MIN" buttons to adjust the current hour and minute.
- Use the "DAY" button to set the current day of the week.
- Press "TIME" again to exit setting mode and save changes.

Figure 5: The timer's digital display and control buttons, used for setting the current time and day, and for programming.
2. Programming ON/OFF Cycles
The timer allows for up to nine programmable ON/OFF settings per day.
- Press the "PROG" button to enter programming mode. The display will show "1 ON".
- Use "HOUR", "MIN", and "DAY" buttons to set the desired ON time and day(s) for program 1.
- Press "PROG" again. The display will show "1 OFF".
- Set the desired OFF time and day(s) for program 1.
- Repeat steps 2-4 for additional programs (up to 9).
- To exit programming mode, press the "TIME" button.
3. Summer Time Feature
This feature allows for easy adjustment for Daylight Saving Time. Consult your timer's specific instructions for activation and deactivation of this feature, typically involving a dedicated button or combination of buttons.
4. Manual Override Switch
The timer includes a manual override switch to temporarily interrupt the programmed cycle. This is useful for turning the connected device ON or OFF outside of its scheduled times.
- Push the override switch to change the current state (ON to OFF, or OFF to ON).
- The timer will revert to its programmed schedule at the next scheduled ON or OFF event.
Maintenance
The GE 7-Day Digital Box Timer is designed for minimal maintenance.
- Battery Backup: The internal battery ensures time and program retention during power outages. This battery is typically long-lasting and does not require regular replacement under normal operating conditions. If the display is blank or settings are lost frequently after power interruptions, the battery may need servicing by a qualified technician.
- Cleaning: Periodically wipe the exterior of the enclosure with a damp cloth to remove dust and debris. Do not use abrasive cleaners or solvents.
- Inspection: Annually inspect the wiring connections for tightness and signs of wear or corrosion. Ensure the enclosure door seal is intact.
Troubleshooting
| Problem | Possible Cause | Solution |
|---|---|---|
| Timer display is blank. | No power to the timer; internal battery depleted. | Check circuit breaker. If power is present, allow time for internal battery to charge or consider professional servicing if issue persists. |
| Programs are not running. | Incorrect programming; manual override engaged; incorrect time/day setting. | Verify program settings. Check if manual override is active. Ensure current time and day are set correctly. |
| Connected device does not turn ON/OFF. | Loose wiring connections; faulty device; timer malfunction. | WARNING: Disconnect power before checking wiring. Inspect all wiring connections. Test the connected device independently. If issues persist, contact support. |
| Timer loses settings after power outage. | Internal battery is no longer holding charge. | The internal battery may need replacement. Contact a qualified technician. |
Specifications
- Model Number: 46537
- Brand: GE
- Color: Digital
- Material: Metal
- Product Dimensions: 3.8"D x 6.75"W x 9.5"H
- Item Weight: 3.32 pounds (1.51 Kilograms)
- Number of Settings: 9 (ON/OFF programs)
- Voltage: Universal (120 VAC, 240 VAC, 277 VAC)
- Load Capacity: 2HP, 40A
- Enclosure Rating: NEMA 3R
- UPC: 030878465373, 308784653734
- Manufacturer: Jasco Products Company, LLC
- Batteries: 1 Product Specific battery required (included, for backup)
Warranty Information
This GE 7-Day Digital Box Timer comes with a 1-year limited warranty. For detailed warranty terms and conditions, please refer to the documentation included with your product or contact Jasco Products Company, LLC customer support.
Customer Support
For technical assistance, troubleshooting, or warranty claims, please contact Jasco Products Company, LLC, the manufacturer of this GE-branded product.
Please note: Specific contact information (phone number, website) is typically provided in the product packaging or on the manufacturer's official website.