
1. Introduction
Thank you for choosing the HomeLava Kitchen Sink Touch Faucet. This manual provides essential information for the safe installation, operation, and maintenance of your new faucet. Please read these instructions thoroughly before installation and keep them for future reference.

Image 1.1: The HomeLava Kitchen Faucet highlighting its key features including anti-bacterial properties, fingerprint resistance, durable construction, and lead-free brass components.
2. Safety Information
- Always turn off the main water supply before beginning any installation or maintenance.
- Wear appropriate personal protective equipment, such as safety glasses and gloves, during installation.
- Ensure all connections are secure to prevent leaks.
- If you are unsure about any part of the installation process, consult a qualified plumber.
- Do not use harsh chemicals or abrasive cleaners on the faucet finish.
3. Package Contents
Verify that all components are present before beginning installation:
- Faucet Body with Pull-Down Sprayer
- Mounting Hardware
- Hot and Cold Water Supply Lines
- Counterweight for Pull-Down Hose
- User Manual
4. Specifications
| Feature | Detail |
|---|---|
| Brand | HomeLava |
| Model | B07TVB9977 |
| Mounting Type | Deck Mount |
| Finish Type | Brushed Nickel |
| Material | Stainless Steel |
| Color | Silver |
| Number of Handles | 1 |
| Hole Count | 1 |
| Special Feature | Pull Down Sprayer, Water Saving, Touch Control |
| Installation Type | Countertop |
| Maximum Flow Rate | 1.5 Gallons Per Minute (5.7 L/min) |
| Faucet Total Height | 17.72 inches (45 cm) |
| Spout Length | 9.1 inches (23 cm) |
| Spout Height | 9.45 inches (24 cm) |
| Installation Measurement | 1.38-1.99 inches (3.5-5 cm) |
| Valve Type | Ceramic Valve |
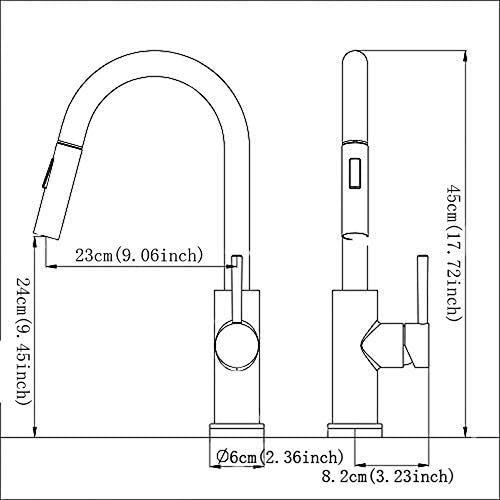
Image 4.1: Detailed dimensional drawing of the faucet, indicating total height (45cm/17.72in), spout length (23cm/9.06in), spout height (24cm/9.45in), and base diameter (6cm/2.36in).
5. Setup and Installation
This faucet is designed for single-hole deck mount installation. Professional installation is recommended.
Required Tools (Not Included):
- Adjustable Wrench
- Phillips Head Screwdriver
- Plumber's Putty or Silicone Sealant
- Flashlight
Installation Steps:
- Prepare the Sink: Ensure the mounting hole on your sink or countertop is clean and within the specified diameter (1.38-1.99 inches).
- Install the Faucet: Insert the faucet body into the mounting hole. From underneath the sink, secure the faucet using the provided mounting hardware (washer and mounting nut). Tighten firmly but do not overtighten.
- Connect Water Supply Lines: Attach the hot and cold water supply lines to the corresponding inlets on the faucet body. Connect the other ends to your hot and cold water stops. Ensure a watertight seal.
- Install Pull-Down Hose and Counterweight: Feed the pull-down sprayer hose through the faucet spout. Connect the hose to the quick-connect fitting under the sink. Attach the counterweight to the pull-down hose at the appropriate height to ensure smooth retraction.

Image 5.1: View of the pull-down hose connection, illustrating how the sprayer hose connects to the main faucet body for flexible use.
- Test for Leaks: Slowly turn on the main water supply. Check all connections for leaks. If leaks occur, tighten the connections as needed.
6. Operating Instructions
Single Handle Operation:
The single lever handle controls both water flow and temperature. Lift the handle to increase water flow. Move the handle left for hot water and right for cold water.
Touch Control Technology:
To activate or deactivate water flow, simply touch the faucet spout or body. This feature allows for convenient, near touchless operation, helping to keep the faucet clean.

Image 6.1: Demonstrating the touch control feature, where a simple touch on the faucet body initiates or stops water flow.
Pull-Down Sprayer:
The sprayer head can be pulled down from the spout for extended reach and flexibility. It features two spray functions:
- Stream: For filling pots and general washing.
- Spray: For rinsing and cleaning.
Press the button on the sprayer head to switch between stream and spray modes. After use, the sprayer retracts smoothly back into the spout.

Image 6.2: A hand demonstrating the pull-down sprayer functionality, extending the hose into the sink for versatile use.

Image 6.3: A close-up view of the sprayer head in operation, showing the water flowing in a steady stream.
7. Maintenance
Cleaning the Faucet:
The brushed nickel finish is designed to be smudge and fingerprint-free. To maintain its appearance, clean the faucet regularly with a soft, damp cloth. For stubborn spots, use a mild soap solution and rinse thoroughly with water, then dry with a soft cloth.
- Do NOT use abrasive cleaners, scouring pads, ammonia, bleach, or acid-based cleaners, as these can damage the finish.
- Do NOT use cleaners containing alcohol, as they can also damage the finish.
Aerator Maintenance:
If water flow decreases, the aerator may be clogged. Unscrew the aerator from the sprayer head, clean any debris or mineral deposits, and then reattach it.
8. Troubleshooting
| Problem | Possible Cause | Solution |
|---|---|---|
| Low water flow | Clogged aerator; partially closed water supply valve | Clean aerator; ensure water supply valves are fully open |
| Leaks from connections | Loose connections; damaged O-rings | Tighten connections; replace O-rings if damaged |
| Touch control not working | Power supply issue; sensor malfunction | Check battery/power connection (if applicable); contact support |
| Sprayer does not retract fully | Counterweight improperly positioned; hose obstruction | Adjust counterweight position; clear any obstructions around the hose |
9. Warranty and Support
This HomeLava faucet is manufactured with high-quality materials and meets CUPC certifications for reliability and corrosion resistance. We offer a 90-day money-back guarantee.
If you have any questions or require assistance with your kitchen sink faucet, please do not hesitate to contact us via Amazon. We are committed to resolving your inquiries within 24 hours.