
Rii RM200
Contents
Rii RM200 2.4G Wireless Rechargeable Optical Mouse User Manual
Model: RM200
Introduction
Thank you for choosing the Rii RM200 2.4G Wireless Rechargeable Optical Mouse. This manual provides detailed instructions on how to set up, operate, and maintain your new mouse, ensuring optimal performance and longevity. Please read this manual thoroughly before use.

Image: The Rii RM200 wireless mouse, showcasing its ergonomic design and vibrant, multi-colored LED lighting patterns.
Package Contents
- 1 x Rii RM200 Wireless Rechargeable Optical Mouse
- 1 x Nano USB Receiver
- 1 x USB Charging Cable
- 1 x User Manual (this document)

Image: The Rii RM200 mouse, its brown retail packaging, the USB charging cable, and the small USB receiver, laid out together.
Product Overview

Image: A top-down diagram of the Rii RM200 mouse, labeling its key components: Roller (scroll wheel), Left key, Right key, DPI button, Forward button, and Back button.
- Left Key: Standard left-click function.
- Right Key: Standard right-click function.
- Roller (Scroll Wheel): For scrolling up and down, and can also be pressed for middle-click.
- DPI Button: Adjusts the mouse sensitivity (DPI levels).
- Forward Button: Navigates forward in web browsers or file explorers.
- Back Button: Navigates backward in web browsers or file explorers.
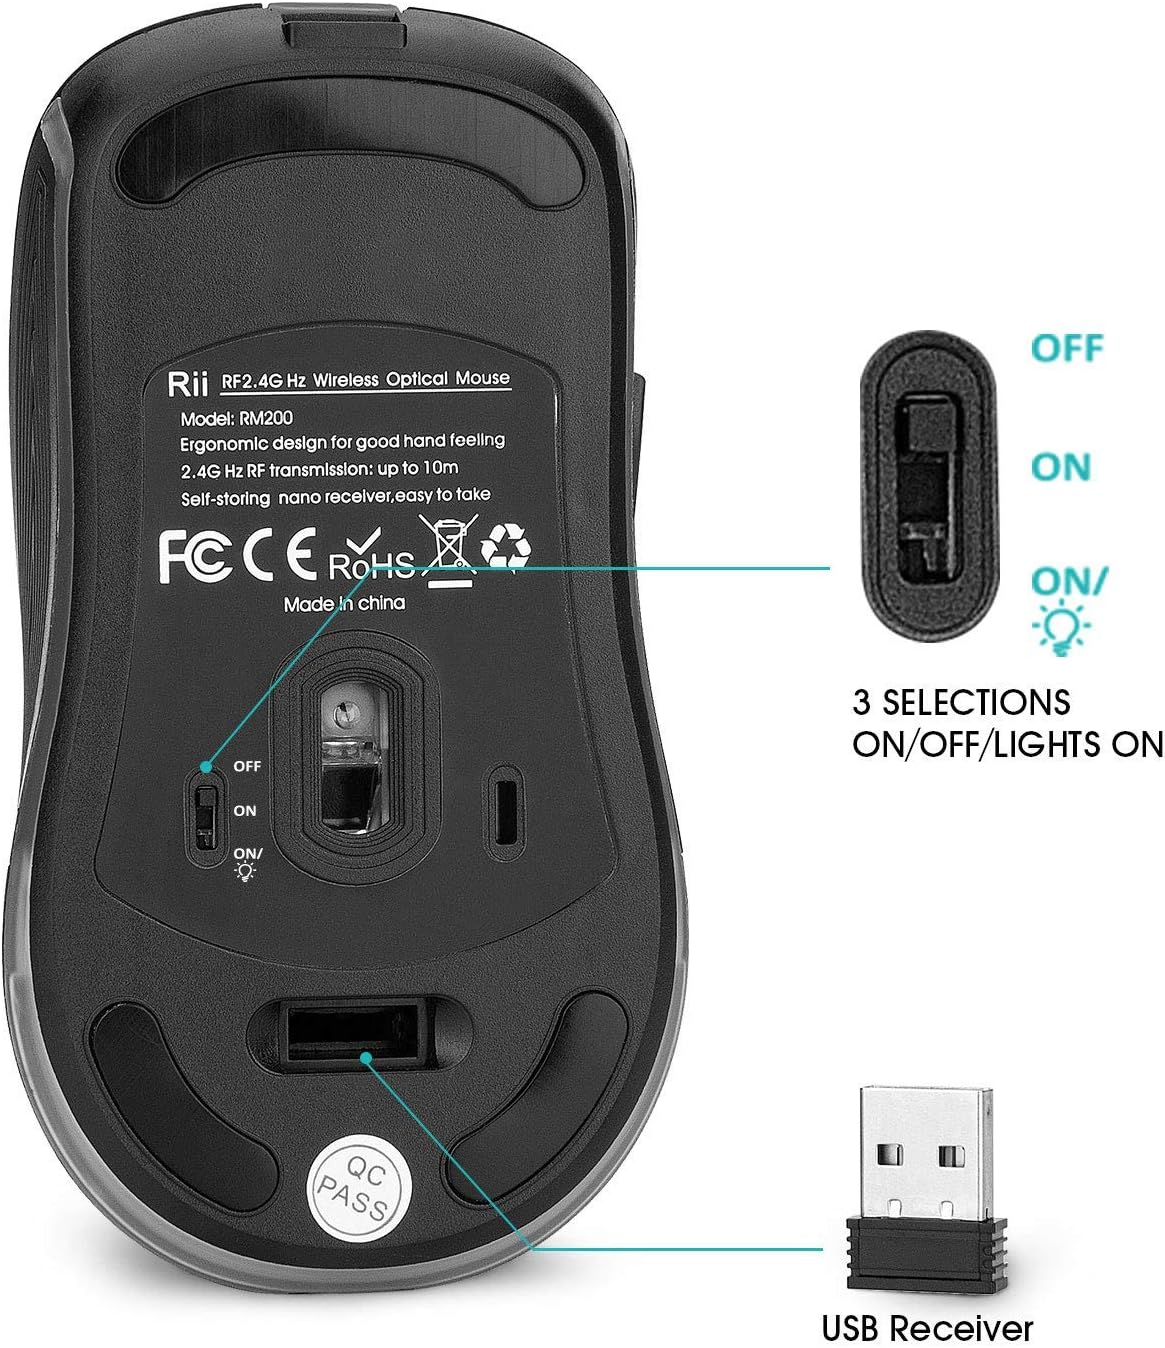
Image: The underside of the Rii RM200 mouse, showing the optical sensor, the power switch with ON/OFF/Lights ON positions, and the storage compartment for the USB receiver.
Setup
- Charge the Mouse: Before first use, connect the mouse to a USB power source (e.g., computer USB port, USB wall adapter) using the provided USB charging cable. The LED lights will indicate charging status.
- Locate the USB Receiver: The Nano USB receiver is stored in a compartment on the bottom of the mouse for convenience. Gently pull it out.
- Connect the Receiver: Insert the Nano USB receiver into an available USB port on your computer, laptop, or compatible device.
- Power On the Mouse: Locate the power switch on the bottom of the mouse. Slide it to the "ON" position to activate the mouse. For colorful LED lights, slide it to the "ON/Lights ON" position.
- Automatic Connection: The mouse should automatically connect to your device. No additional drivers are required.
Operating Instructions
DPI Adjustment
The Rii RM200 mouse features 3 adjustable DPI levels (800/1200/1600) to suit your preference and task requirements. To change the DPI:
- Press the DPI Button (located behind the scroll wheel) to cycle through the available DPI settings.
- Each press will switch to the next DPI level. The mouse cursor speed will change accordingly.
LED Light Control
The mouse features 7 circular and colorful RGB LED lights. You can control them using the switch on the bottom:
- Slide the power switch to the "ON/Lights ON" position to activate the LED lights.
- Slide the power switch to the "ON" position to use the mouse without the LED lights, conserving battery.
- Slide the power switch to the "OFF" position to turn off the mouse completely.
Recharging the Mouse
When the mouse battery is low, the LED lights may dim or the mouse may become unresponsive. To recharge:
- Connect the provided USB charging cable to the charging port on the front of the mouse and to a USB power source.
- The mouse cannot be used while charging to prevent battery damage.
- A full charge typically takes a few hours.
Maintenance
- Cleaning: Use a soft, dry cloth to clean the surface of the mouse. For stubborn dirt, a slightly damp cloth can be used, but ensure no moisture enters the mouse.
- Optical Sensor: Keep the optical sensor on the bottom of the mouse clean and free from dust or debris to ensure accurate tracking.
- Storage: When not in use for extended periods, turn off the mouse to conserve battery life. Store the USB receiver in its dedicated slot on the bottom of the mouse to prevent loss.
- Battery Care: Avoid fully discharging the battery frequently. Recharge the mouse when the battery is low. Do not use the mouse while it is charging.
Troubleshooting
| Problem | Solution |
|---|---|
| Mouse not responding. |
|
| Cursor movement is erratic or jumpy. |
|
| LED lights are not working. |
|
| Mouse disconnects frequently. |
|
Specifications
| Model: | RM200 |
| Connectivity: | 2.4G Wireless (Nano USB Receiver) |
| DPI Levels: | 800 / 1200 / 1600 |
| Buttons: | 5 (Left, Right, Scroll Wheel, Forward, Back, DPI) |
| Lighting: | 7 Circular RGB LED Lights |
| Battery Type: | Rechargeable Lithium-ion |
| Operating Range: | Up to 10 meters |
| Compatibility: | Windows 2000/2003/Win7/8/10/Vista/ME, Mac OS, Linux, PC, Laptop, Raspberry Pi, Android box, Smart TV, Amazon Fire TV Box |
Warranty and Support
Rii products are designed for reliability and performance. For warranty information and technical support, please refer to the official Rii website or contact your retailer. Keep your purchase receipt as proof of purchase.
For further assistance, please visit www.riitek.com (Note: This is a placeholder URL, please refer to actual product documentation for official support channels).
Ask a question about this manual
Ask about setup, troubleshooting, compatibility, parts, safety, or missing instructions. Manuals+ will review the question and use this page’s manual context to help answer it.