1. Introduction
This manual provides essential information for the safe and effective use of your VONROC MS500AC Radial Mitre Saw. Please read these instructions carefully before operating the machine and retain them for future reference. Proper use and maintenance will ensure optimal performance and extend the life of your tool.

Image 1.1: The VONROC MS500AC Radial Mitre Saw, showcasing its main components including the saw blade, motor housing, and base.
2. General Safety Instructions
WARNING: Read all safety warnings, instructions, illustrations, and specifications provided with this power tool. Failure to follow all instructions listed below may result in electric shock, fire, and/or serious injury.
2.1. Work Area Safety
- Keep work area clean and well lit. Cluttered or dark areas invite accidents.
- Do not operate power tools in explosive atmospheres, such as in the presence of flammable liquids, gases, or dust. Power tools create sparks which may ignite the dust or fumes.
- Keep children and bystanders away while operating a power tool. Distractions can cause you to lose control.
2.2. Electrical Safety
- Power tool plugs must match the outlet. Never modify the plug in any way.
- Avoid body contact with earthed or grounded surfaces, such as pipes, radiators, ranges, and refrigerators. There is an increased risk of electric shock if your body is earthed or grounded.
- Do not expose power tools to rain or wet conditions. Water entering a power tool will increase the risk of electric shock.
2.3. Personal Safety
- Always wear eye protection. Use safety glasses, goggles, or a face shield.
- Wear hearing protection. Prolonged exposure to noise can cause hearing damage.
- Dress properly. Do not wear loose clothing or jewelry. Keep your hair and clothing away from moving parts.
- Stay alert, watch what you are doing, and use common sense when operating a power tool.
2.4. Mitre Saw Specific Safety
- Always use the correct blade for the material being cut.
- Ensure the workpiece is securely clamped before cutting.
- Never reach into the blade area when the saw is running or connected to power.
- Allow the blade to reach full speed before beginning a cut.
- Use the laser guide and LED light for improved accuracy and visibility, but always verify the cut line manually.

Image 2.1: Example of safety labels and warnings found on the saw, including laser radiation warnings.
3. Package Contents
Carefully unpack the contents and check for any damage or missing parts. If any parts are missing or damaged, please contact VONROC customer support.
- VONROC MS500AC Radial Mitre Saw
- Saw Blade (Ø216 mm, 40-toothed)
- Dust Bag
- Allen Wrench
- Work Piece Clamp
- Bench Extensions (2 units)
- User Manual (this document)
4. Product Overview
The VONROC MS500AC is a powerful 2000W radial mitre saw designed for precise cutting of wood. It features a 216mm saw blade, integrated laser guidance, and an LED work light for enhanced accuracy and visibility.
4.1. Key Features
- Laser Device: Provides a clear line for controlled and straight sawing.
- Integrated LED Light: Illuminates the workpiece for optimal visibility, even in low-light conditions.
- Adjustable Mounting Features: Allows for versatile and precise adjustments for various cuts.
- Large Saw Capacity: Capable of cutting wood pieces up to 65 x 340 mm.
- Powerful Motor: 2000W motor with 4700 RPM for efficient cutting.

Image 4.1: Detail of the laser guide and LED work light, highlighting their position above the saw blade.
5. Setup and Assembly
Before first use, ensure the saw is securely mounted on a stable workbench. Follow these steps for initial setup:
5.1. Mounting the Saw
- Place the mitre saw on a firm, level surface.
- Secure the saw to the workbench using appropriate bolts or clamps through the mounting holes in the base.
5.2. Attaching Bench Extensions
The included bench extensions provide additional support for longer workpieces.
- Slide the bench extensions into the designated slots on either side of the saw base.
- Tighten the locking screws to secure them in place.
5.3. Installing the Dust Bag
Attach the dust bag to the dust extraction port to collect sawdust during operation.
- Locate the dust extraction port on the saw.
- Securely attach the dust bag to the port. Ensure it is firmly in place to prevent detachment during use.
5.4. Adjusting the Work Piece Clamp
The workpiece clamp helps secure material for safe and accurate cutting.
- Insert the workpiece clamp into the designated hole on the saw table.
- Adjust its position to firmly hold the workpiece against the fence.
6. Operating Instructions
Always wear appropriate personal protective equipment (PPE) including eye protection, hearing protection, and a dust mask when operating the saw.
6.1. Basic Cutting Procedure
- Prepare Workpiece: Mark your desired cut line on the material.
- Position Workpiece: Place the workpiece firmly against the fence and secure it with the workpiece clamp. Ensure the material is fully supported.
- Adjust Angles (if necessary):
- Mitre Angle: Adjust the turntable to the desired mitre angle (up to 45 degrees left or right). Lock the turntable in place.
- Bevel Angle: Tilt the saw head to the desired bevel angle (up to 45 degrees). Lock the saw head in place.
- Activate Laser and LED: Turn on the laser guide and LED work light for precise alignment and improved visibility.
- Start Saw: Press the power switch to start the motor. Allow the blade to reach full speed before beginning the cut.
- Perform Cut:
- For straight cuts, slowly lower the saw blade through the workpiece.
- For radial (sliding) cuts, pull the saw head towards you, lower the blade into the material, and then push the saw head smoothly through the workpiece.
- Release Saw: Once the cut is complete, release the power switch and allow the blade to stop completely before raising the saw head.
- Remove Workpiece: Carefully remove the cut material.

Image 6.1: Demonstrating a cut with the saw, showing proper hand placement and dust extraction hose.

Image 6.2: Illustration of the saw head tilting for bevel cuts, adjustable up to 45 degrees.
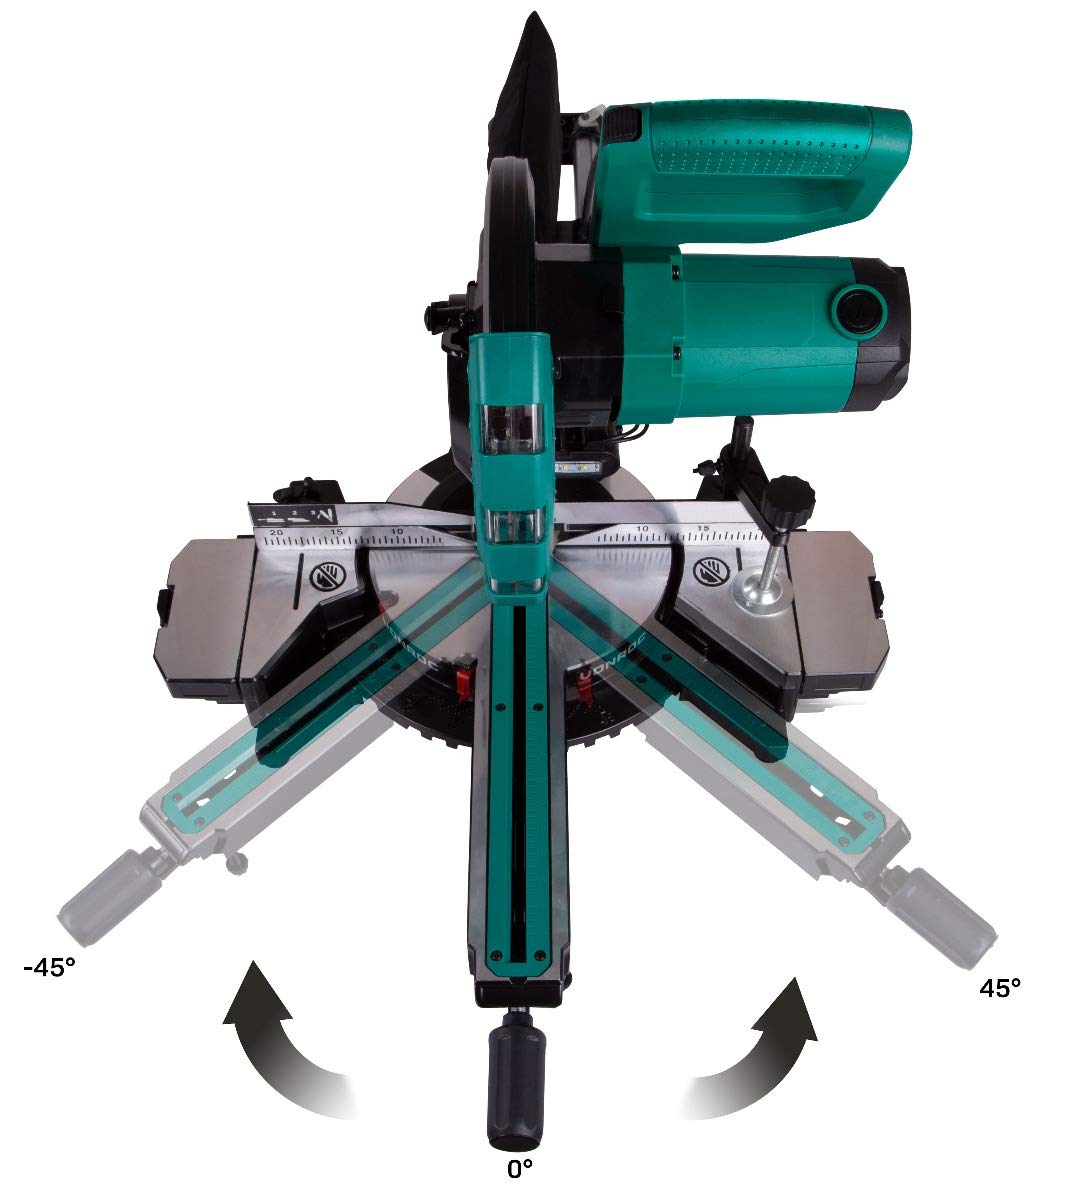
Image 6.3: Illustration of the saw base rotating for mitre cuts, adjustable from -45 to +45 degrees.
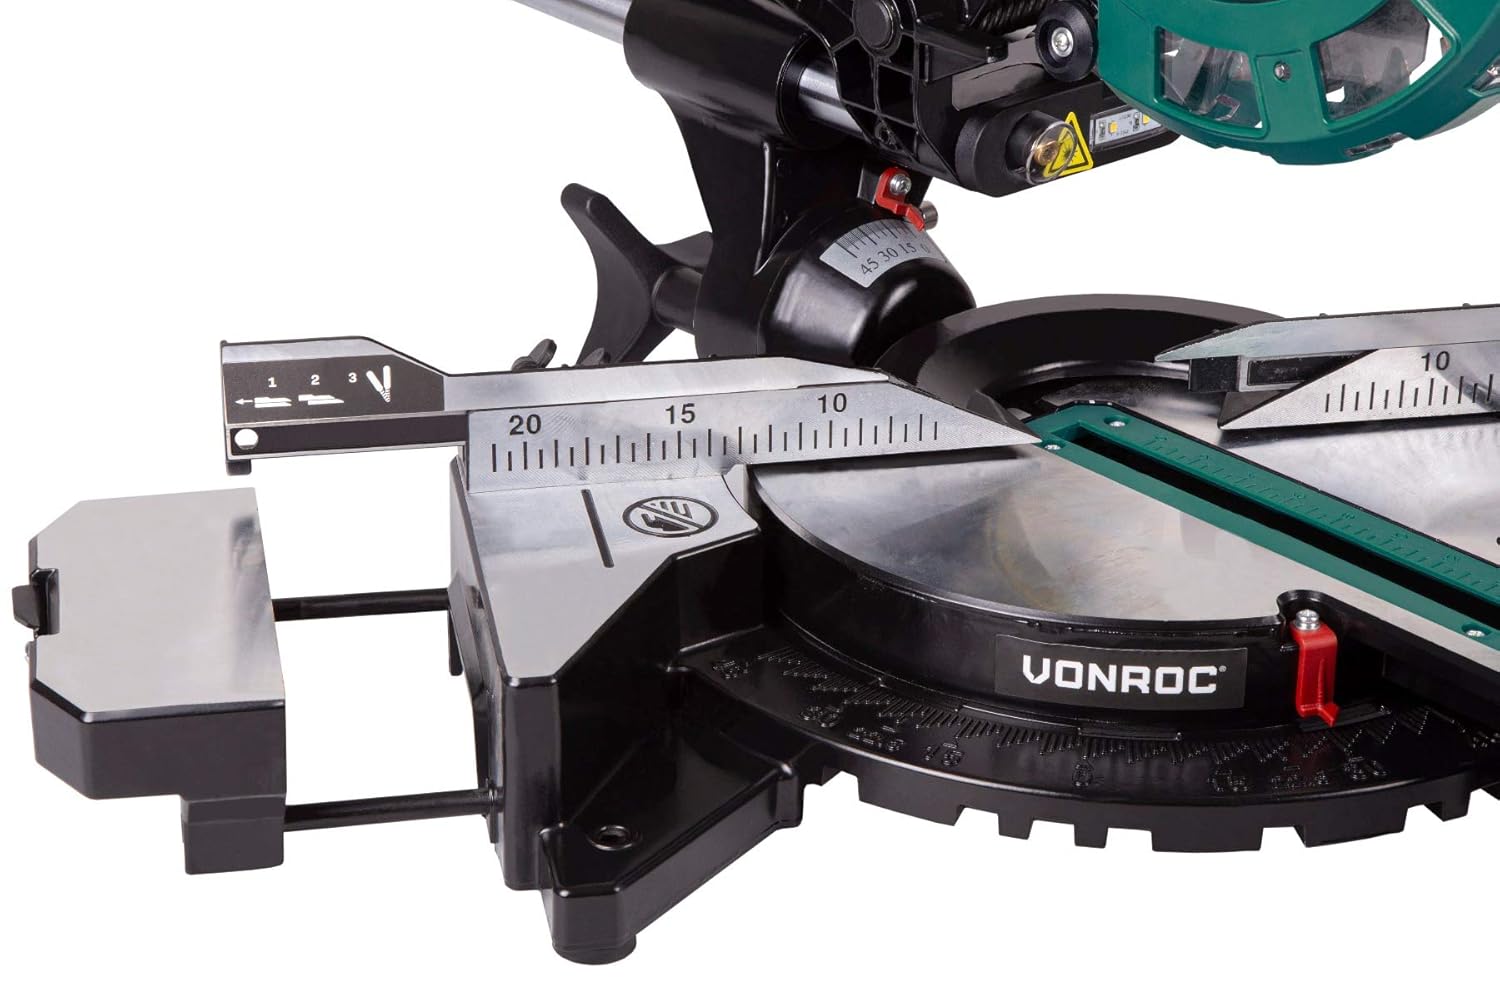
Image 6.4: Detail of the measurement scale and adjustable fence for accurate workpiece positioning.
6.2. Using the Laser Guide and LED Light
The laser guide projects a red line onto the workpiece, indicating the exact cutting path. The LED light illuminates the cutting area. These features can be activated independently or together via dedicated switches.
- Always verify the laser line against your marked cut line before starting the saw.
- The LED light is particularly useful in dimly lit workshops or when working on intricate cuts.
7. Maintenance
Regular maintenance ensures the longevity and safe operation of your VONROC MS500AC Mitre Saw. Always disconnect the saw from the power supply before performing any maintenance or cleaning.
7.1. Cleaning
- After each use, clean the saw thoroughly to remove sawdust and debris. Use a brush or compressed air.
- Empty the dust bag regularly.
- Wipe down external surfaces with a damp cloth. Do not use harsh chemicals or solvents.
- Keep the ventilation openings clear to prevent overheating.
7.2. Blade Replacement
A dull or damaged saw blade can lead to poor cuts and increased risk of kickback. Replace the blade when necessary.
- Disconnect the saw from the power supply.
- Refer to the saw's specific instructions for accessing and removing the blade guard.
- Use the provided Allen wrench to loosen the blade retaining bolt.
- Carefully remove the old blade, noting its rotation direction.
- Install the new blade, ensuring the teeth are oriented correctly for cutting.
- Tighten the blade retaining bolt securely and reassemble the blade guard.
7.3. Laser and LED Maintenance
- Keep the laser aperture and LED lens clean from dust and debris to maintain optimal visibility.
- If the laser becomes misaligned, refer to the specific adjustment procedures in the full manual (if available) or contact customer support.
8. Troubleshooting
This section addresses common issues you might encounter with your mitre saw. For problems not listed here, please contact VONROC customer support.
| Problem | Possible Cause | Solution |
|---|---|---|
| Saw does not start | No power supply; Faulty switch; Overload protection activated. | Check power connection; Test outlet; Allow motor to cool down. |
| Poor cut quality (rough, splintering) | Dull or incorrect blade; Incorrect cutting speed; Workpiece not secured. | Replace blade; Use appropriate blade for material; Secure workpiece firmly; Adjust cutting speed. |
| Laser line is dim or inaccurate | Dirty laser lens; Misalignment; Low battery (if applicable). | Clean laser lens; Consult service for alignment; Check/replace laser battery (if applicable). |
| Excessive vibration or noise | Loose blade; Damaged blade; Loose components; Motor issue. | Check blade tightness; Replace damaged blade; Inspect and tighten components; Contact service. |
9. Technical Specifications
| Feature | Specification |
|---|---|
| Brand | VONROC |
| Model Number | MS500AC |
| Power Source | Corded Electric |
| Wattage | 2000 Watts |
| Voltage | 240 Volts |
| Speed | 4700 RPM |
| Blade Diameter | 216 mm |
| Number of Teeth | 80 (Note: Product title mentions 40-toothed, specifications mention 80. Using 80 as it's in the detailed spec list.) |
| Max Cutting Capacity (H x W) | 65 x 340 mm |
| Cutting Angle (Mitre) | 45 Degrees (Left/Right) |
| Cutting Angle (Bevel) | 45 Degrees (Left) |
| Item Weight | 11.8 kg |
| Product Dimensions (LxWxH) | 79 x 47 x 14 cm |
| Included Components | Allen Wrench, Bench Extensions, Dust Bag, Saw Blade, Work Piece Clamp |
10. Warranty and Customer Support
VONROC products are manufactured to high-quality standards. In the unlikely event of a defect or malfunction, please refer to your purchase documentation for warranty details or contact VONROC customer support directly.
For assistance, spare parts, or technical inquiries, please visit the official VONROC website or contact their customer service department. Always have your model number (MS500AC) and purchase date available when contacting support.


