
SCREENARAMA X54C
SCREENARAMA Laptop Screen Replacement User Manual
Model: ASUS X54C Compatible Display
Introduction
This manual provides essential information for the installation and care of your new SCREENARAMA laptop screen replacement for the ASUS X54C model. This high-definition (HD) 1366x768 glossy LCD LED display is designed to restore your laptop's visual functionality. Please read these instructions carefully before proceeding with installation.
Product Overview and Compatibility
Your SCREENARAMA replacement screen is a 15.6-inch glossy LCD LED display with a resolution of 1366x768. It features a 40-pin video connector, which is crucial for compatibility. Please ensure your original screen has the same resolution and connector type before installation.

Image: The SCREENARAMA replacement screen shown with the included installation tools: tweezers, a precision knife, a spudger, and a screwdriver.

Image: Rear view of the 15.6-inch HD screen, highlighting the location of the 40-pin video connector.

Image: A visual comparison illustrating the difference between a 40-pin video connector (compatible) and a 30-pin video connector (incompatible), emphasizing the need to match your original screen's connector type.
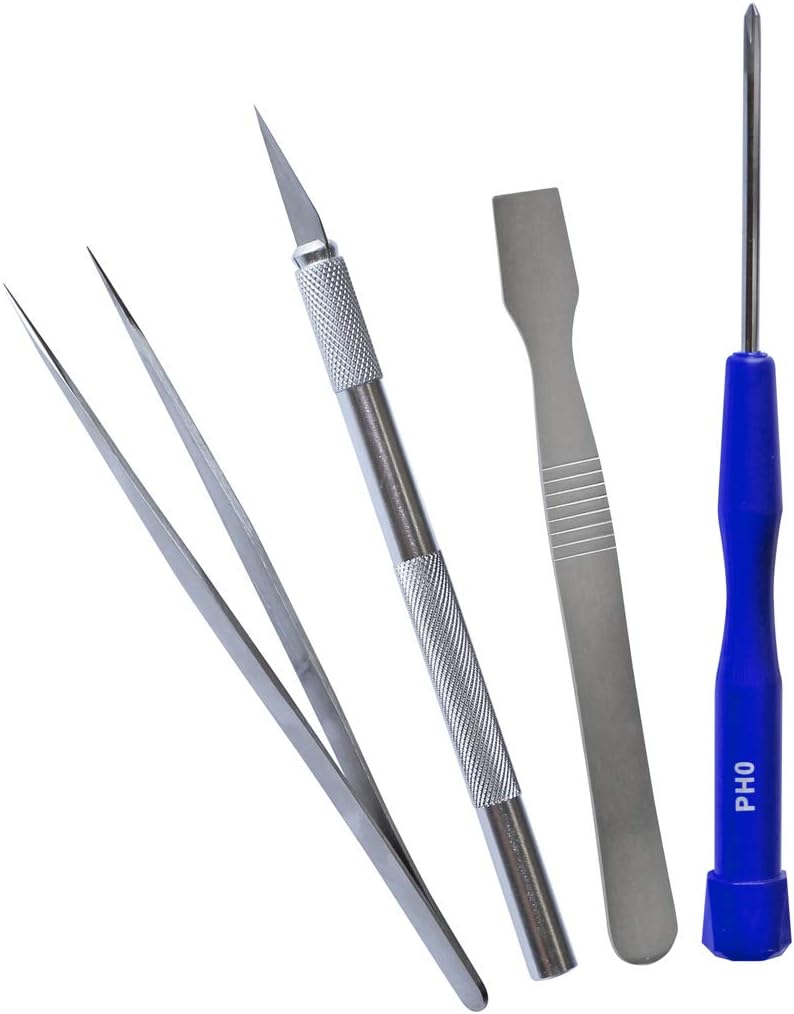
Image: A diagram indicating that this screen replacement is compatible only with 1366x768 resolution displays, and not with higher resolutions like 1600x900px, 1920x1080px, or 3840x2160px.

Image: A visual clarification that this product is an LCD screen replacement only and does not include touchscreen functionality. A touchscreen is shown crossed out below the compatible LCD screen.
Setup and Installation
Replacing a laptop screen requires careful handling and basic technical knowledge. It is recommended to consult a professional if you are unsure about any steps. The following general steps outline the process:
- Preparation: Power off your laptop completely and disconnect it from the power adapter. Remove the laptop battery.
- Disassembly: Carefully remove the screen bezel (plastic frame around the screen). This may involve removing rubber screw covers and screws.
- Old Screen Removal: Unscrew the old screen from its mounting brackets. Gently lay it face down on the keyboard. Disconnect the video cable from the back of the old screen by carefully lifting the retaining clip and pulling the cable straight out.
- New Screen Installation: Connect the video cable to the new SCREENARAMA screen, ensuring the 40-pin connector is fully seated and the retaining clip is secured. Mount the new screen into the brackets and secure it with screws.
- Reassembly: Reattach the screen bezel. Reinstall the laptop battery and connect the power adapter.
- Testing: Power on the laptop to test the new screen.
The included tools (tweezers, precision knife, spudger, screwdriver) are provided to assist with the disassembly and reassembly process.

Image: A close-up of the four essential tools provided with your screen replacement: tweezers for delicate handling, a precision knife for prying, a spudger for separating components, and a screwdriver for fasteners.
Operating the Display
Once correctly installed, your SCREENARAMA replacement display will function identically to the original screen. It provides a clear, glossy HD 1366x768 resolution display for your laptop. No special drivers or software are required for its operation beyond what your laptop's operating system already uses for display output.
Maintenance
To ensure the longevity and clarity of your new screen, follow these maintenance tips:
- Clean the screen with a soft, lint-free cloth specifically designed for electronics.
- Use a screen cleaner solution (non-ammonia based) sparingly, applied to the cloth, not directly to the screen.
- Avoid pressing hard on the screen or using abrasive materials.
- Keep the laptop in a clean, dust-free environment.
Troubleshooting
If you encounter issues after installation, consider the following troubleshooting steps:

Image: A visual guide to common troubleshooting steps for screen replacement issues.
- No Display: Connect an external monitor to your laptop to confirm if the laptop itself is still operational.
- Incorrect Pin Count: Double-check that the number of pins on your original LCD's connector and the new screen's connector are both 40 pins.
- Blank Image: Reconnect the video cable from both the screen and motherboard sides. Ensure the connector is secure, possibly using tape to reinforce it. Verify the connector itself is not damaged.
- Persistent Issue: If the problem persists and is identical to the issue with the old LCD, the problem might lie with another component of the laptop (e.g., motherboard, video card) rather than the screen.
- Dim Image: Try connecting the old LCD back. If both LCDs do not light up, check the backlight fuse, which is typically located near the video connector on the motherboard.
Specifications
| Feature | Detail |
|---|---|
| Screen Size | 15.6 inches |
| Resolution | HD 1366x768 |
| Connector Type | 40 pin |
| Surface Type | Glossy |
| Display Technology | LCD LED |
| Compatibility | ASUS X54C (and other models with matching specifications) |
Warranty and Support
Your SCREENARAMA replacement screen comes with a 2-year warranty, guaranteeing compatibility and performance. If you experience any issues or require technical assistance, please contact SCREENARAMA customer support through the retailer's platform or the official SCREENARAMA website for prompt service.
For further assistance, please visit the SCREENARAMA Store on Amazon.
Ask a question about this manual
Ask about setup, troubleshooting, compatibility, parts, safety, or missing instructions. Manuals+ will review the question and use this page’s manual context to help answer it.