Introduction
This manual provides detailed instructions for the setup, operation, and maintenance of your M&C Music Color MX-5500 8-digit price tag gun. Please read these instructions carefully before use to ensure proper function and longevity of the device.

Image: The MX-5500 price tag gun, shown with a roll of labels and spare ink rollers. This image illustrates the complete kit.
Package Contents
Verify that all items are present in your package:
- 1 x MX-5500 8-Digit Price Tag Gun
- 10 Rolls x Label Paper / Price Stickers
- 3 x Spare Ink Rollers
Setup
1. Loading Label Paper
- Open the top cover of the price tag gun by gently pulling it upwards.
- Insert a roll of label paper into the designated compartment, ensuring the labels feed from the bottom and the adhesive side faces down.
- Thread the first few labels through the slot until they emerge from the front of the gun.
- Close the top cover securely.
2. Installing the Ink Roller
The price tag gun comes with an ink roller pre-installed. If replacement is needed, follow these steps:
- Locate the ink roller compartment, usually near the front of the gun, under the label feed mechanism.
- Gently pull out the old ink roller assembly.
- Remove the old ink roller from its frame and insert a new one.
- Reinsert the ink roller assembly back into the compartment until it clicks into place.

Image: A hand demonstrating the installation of a new ink roller onto its wheel rack, with the price tag gun's ink compartment visible. This shows the correct method for replacing the ink roller.
Operating Instructions
1. Adjusting Characters (Price/Symbols)
To set the desired price or characters:
- Locate the adjustment knobs on the side of the price tag gun.
- Rotate the knobs to select the desired numbers, currency symbols (e.g., $, €, ¥), or other characters for each of the 8 digits.
- Ensure all characters are aligned correctly in the display window before printing.
2. Applying Labels
Once the characters are set and the labels are loaded:
- Position the gun over the item where you want to apply the label.
- Squeeze the trigger handle firmly and completely. This action prints the characters onto the label and dispenses it.
- Release the trigger. The printed label will be ready for application.

Image: An exploded view highlighting key features of the price tag gun, including the clear text display, adjustable character wheels, and comfortable handle. This image helps visualize the components involved in setting the price.
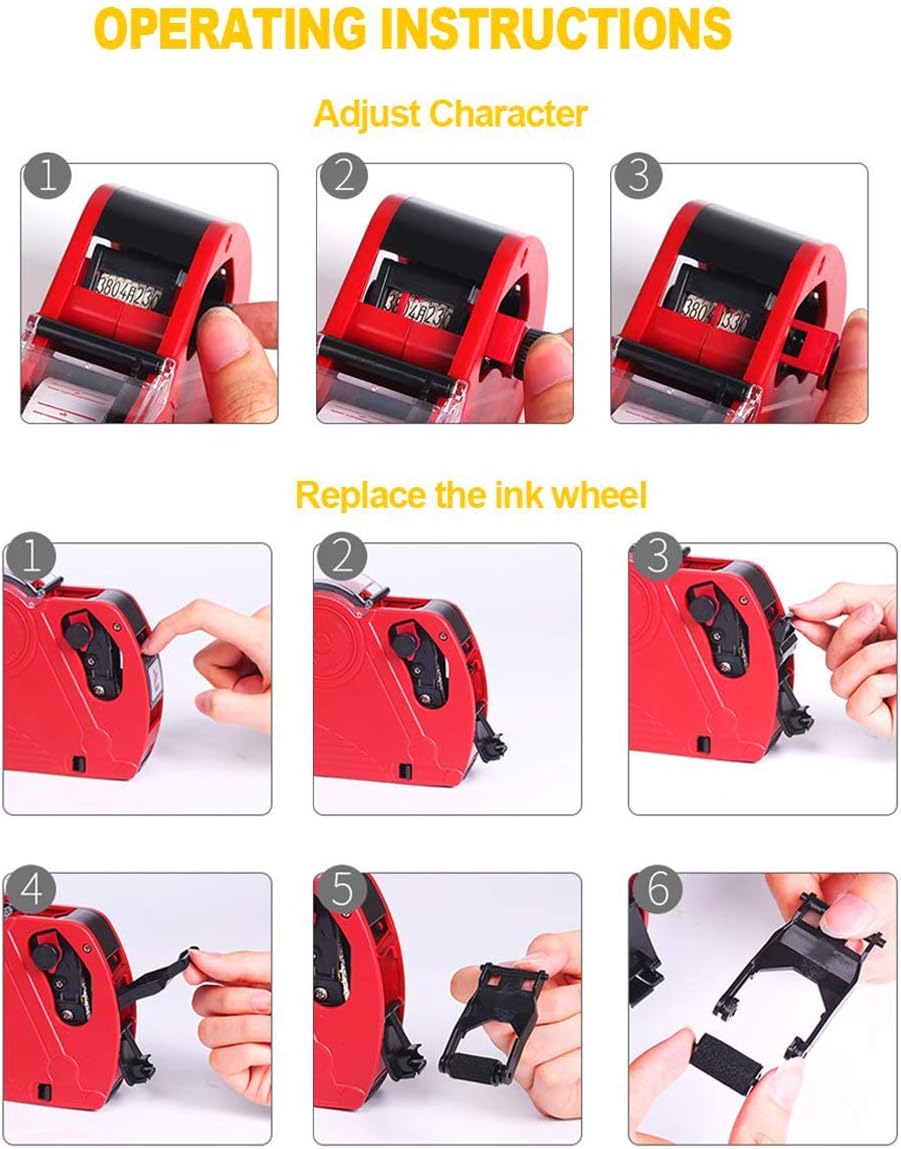
Image: A visual guide demonstrating how to adjust characters using the side dials (top row) and the process of replacing the ink wheel (bottom row). This provides clear steps for both operations.
Maintenance
1. Replacing the Ink Roller
Refer to the "Installing the Ink Roller" section under Setup for detailed steps. Replace the ink roller when prints become faint or inconsistent.
2. Cleaning
- Periodically clean the exterior of the gun with a soft, dry cloth.
- If ink residue accumulates on the character bands, gently wipe them with a cotton swab lightly dampened with rubbing alcohol. Ensure the gun is dry before use.
- Keep the label feed path clear of any debris or adhesive residue to prevent jamming.
Troubleshooting
| Problem | Possible Cause | Solution |
|---|---|---|
| Faint or inconsistent print | Ink roller is dry or improperly installed. | Replace the ink roller. Ensure it is seated correctly. |
| Labels are jamming | Improper label loading, labels are stuck, or debris in feed path. | Open the top cover, clear any jammed labels or debris. Reload labels correctly. Ensure labels are the correct size (21x12 mm). |
| Characters are unclear or smudged | Ink roller is oversaturated, character bands are dirty, or trigger not fully pressed. | Clean character bands. Ensure ink roller is not excessively wet (if refilling manually). Press the trigger firmly and completely. |
| Numbers/symbols not changing | Adjustment knobs are stiff or stuck. | Gently rotate the adjustment knobs. If stiff, try to free them by rotating back and forth. Avoid excessive force. |
Specifications
- Model: MX-5500
- Digits: 8 (Single Row)
- Label Size: 21 x 12 mm
- Material: Plastic
- Item Weight: Approximately 13.6 ounces (385 grams)
- Package Dimensions: Approximately 9.72 x 7.76 x 2.2 inches
- Supported Currencies: Dollar ($), RMB (¥), HKD (HK$), TWD (NT$), Euro (€), etc.
Warranty and Support
For warranty information or technical support, please contact the manufacturer, M&C Music Color, through their official channels or the retailer from whom you purchased the product. Keep your purchase receipt as proof of purchase.


