1. Introduction
Thank you for purchasing the NUNET Nuprojector Bright Home Theater Projector. This portable projector is designed to deliver a high-definition viewing experience, supporting 1080p content with a native 720p resolution. It features multiple connectivity options and an integrated speaker, making it suitable for various home entertainment and presentation needs. Please read this manual thoroughly before use to ensure proper operation and to maximize the lifespan of your device.
2. Safety Information
- Power Supply: Use only the specified power adapter. Ensure the voltage matches the projector's requirements.
- Ventilation: Do not block the ventilation openings. Ensure adequate space around the projector for proper airflow to prevent overheating.
- Heat: The projector lamp generates heat. Avoid touching the lens or vents immediately after operation.
- Moisture: Do not expose the projector to rain, moisture, or immerse it in water. Keep liquids away from the device.
- Cleaning: Unplug the projector before cleaning. Use a soft, dry cloth. Do not use liquid or aerosol cleaners.
- Servicing: Do not attempt to service this product yourself. Refer all servicing to qualified service personnel.
- Eye Protection: Do not look directly into the projector lens when the lamp is on, as the bright light can cause eye damage.
3. Package Contents
Please check the package contents upon unboxing to ensure all items are present:
- NUNET Nuprojector
- Remote Control
- Power Cable
- HDMI Cable
- AV Cable
- User Manual
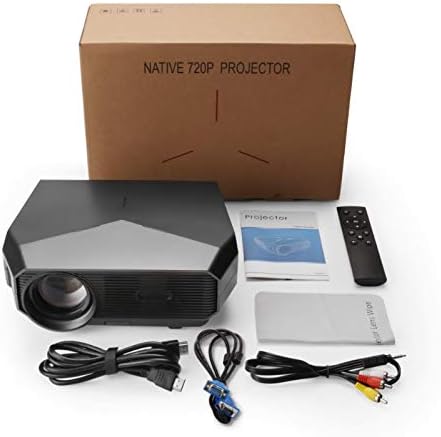
Image: Contents of the Nuprojector package, showing the projector, remote control, power cable, HDMI cable, AV cable, and user manual.
4. Product Overview
4.1 Projector Components
Familiarize yourself with the various ports and controls on your Nuprojector.

Image: Rear panel of the Nuprojector, illustrating the location of the Power On/Off button, AV Port, Audio Jack, HDMI Input, two USB ports, VGA port, Power Out, and the Keystone Correction slider. A side view inset shows the focus ring and tilt angle adjustment.
- Power On/Off: Button to turn the projector on or off.
- AV Port: For connecting devices using an AV cable (composite video and stereo audio).
- Audio Jack: 3.5mm output for external speakers or headphones.
- HDMI Input: For connecting devices like laptops, Blu-ray players, gaming consoles, or streaming sticks.
- USB Ports: For connecting USB drives to play media files.
- VGA Port: For connecting older computers or laptops.
- Power Out: Connection for the power cable.
- Keystone Correction: Slider to adjust the image shape if the projector is not perfectly perpendicular to the screen.
- Focus Ring: Located around the lens, used to sharpen the projected image.
4.2 Remote Control
The included remote control allows for convenient operation of the projector from a distance.

Image: The Nuprojector and its remote control, positioned in a living room environment with a large projected image on a screen.
- Power Button: Turns the projector on/off.
- Source Button: Selects input source (HDMI, VGA, AV, USB).
- Navigation Buttons (Up/Down/Left/Right): For menu navigation.
- OK Button: Confirms selections.
- Menu Button: Accesses the projector's settings menu.
- Volume Buttons: Adjusts audio volume.
- Mute Button: Mutes/unmutes audio.
5. Setup
5.1 Placement
Choose a flat, stable surface for the projector. The distance from the screen will determine the projection size. Ensure the projector is positioned to allow for proper ventilation.

Image: A visual representation of different screen sizes (45", 60", 100", 200") and the approximate throw distances (1.4m, 2.11m, 3.47m, 5.7m) required for the Nuprojector.
5.2 Power Connection
- Connect the power cable to the 'Power Out' port on the projector.
- Plug the other end of the power cable into a wall outlet.
5.3 Connecting Input Devices
The Nuprojector supports various input sources:
- HDMI: Connect an HDMI cable from your device (laptop, game console, streaming stick) to the HDMI input port on the projector.
- VGA: Connect a VGA cable from your computer to the VGA port on the projector.
- AV: Use the provided AV cable to connect devices with composite video and stereo audio outputs to the AV port.
- USB: Insert a USB flash drive into one of the USB ports to play media files directly.

Image: A diagram illustrating the versatility of the Nuprojector, showing its compatibility with various devices such as laptops, desktop computers, Blu-ray/DVD players, iPads/iPhones, media centers, PS4/Xbox 360, Amazon TV Stick, and USB drives.
5.4 Image Adjustment
- Focus: Rotate the focus ring around the lens until the projected image appears sharp and clear.
- Keystone Correction: If the image appears trapezoidal (wider at the top or bottom), use the keystone correction slider on the rear of the projector to adjust the image shape until it is rectangular.
- Tilt Angle: The projector may have adjustable feet or a tilt mechanism to slightly raise the front for better projection angle.

Image: Detailed view of the Nuprojector's side, highlighting the focus ring on the lens and the tilt angle adjustment mechanism, which allows for up to 10 degrees of tilt.
6. Operating Instructions
6.1 Powering On/Off
- To Power On: Press the Power button on the projector or the remote control. The indicator light will change, and the projector will start up.
- To Power Off: Press the Power button again. Confirm shutdown if prompted. Allow the projector to cool down before unplugging it.
6.2 Selecting Input Source
After connecting your device, you need to select the correct input source:
- Press the 'Source' button on the remote control.
- Use the navigation buttons to highlight the desired input (e.g., HDMI, VGA, AV, USB).
- Press 'OK' to confirm your selection.
6.3 Menu Navigation
To access and adjust projector settings:
- Press the 'Menu' button on the remote control.
- Use the navigation buttons to browse through menu options (e.g., Picture, Sound, Time, Option).
- Press 'OK' to enter a sub-menu or confirm a setting.
- Use the 'Return' or 'Exit' button to go back or exit the menu.
7. Maintenance
7.1 Cleaning the Lens
Dust or smudges on the lens can affect image quality.
- Use a professional lens cleaning cloth or lens paper.
- Gently wipe the lens in a circular motion.
- Do not use abrasive cleaners or excessive force.
7.2 Cleaning Air Vents
Blocked vents can lead to overheating.
- Regularly check the air vents for dust accumulation.
- Use a soft brush or a can of compressed air to gently clean the vents.
7.3 Storage
When not in use for extended periods:
- Ensure the projector is powered off and cooled down.
- Store it in a cool, dry, dust-free environment.
- Consider using the original packaging or a protective bag to prevent dust buildup.
8. Troubleshooting
| Problem | Possible Cause | Solution |
|---|---|---|
| No image projected | Power cable loose; Incorrect input source; Device not connected properly. | Check power connection; Select correct input source; Ensure HDMI/VGA/AV cables are securely connected. |
| Image is blurry | Focus not adjusted; Projector too close/far from screen. | Adjust the focus ring; Reposition the projector for optimal distance. |
| Image is trapezoidal | Projector not perpendicular to screen. | Adjust the keystone correction slider. |
| No sound | Volume too low/muted; External speakers not connected; Audio format not supported. | Increase volume, unmute; Connect external speakers to audio jack; Check device audio settings. |
| Remote control not working | Batteries dead/incorrectly inserted; Obstruction between remote and projector. | Replace batteries; Ensure clear line of sight to the projector's IR receiver. |
9. Specifications
- Brand: NUNET
- Model: Nuprojector
- Item Weight: 1.4 pounds
- Product Dimensions: 10.24 x 7.56 x 3.58 inches
- Display Resolution: 1920 x 1080 (Supports 1080p, Native 720p)
- Connectivity Technology: HDMI, VGA, AV, USB
- Special Feature: Portable
- Recommended Uses: Home Cinema
- Speaker Type: Monitor (Integrated)
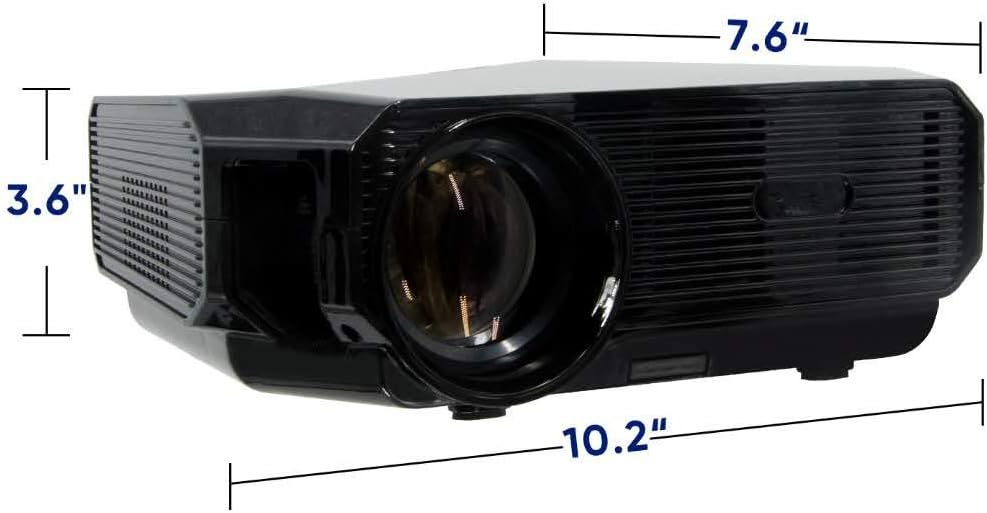
Image: The Nuprojector with its dimensions labeled: 10.2 inches in length, 7.6 inches in width, and 3.6 inches in height.
10. Warranty and Support
10.1 Warranty Information
The NUNET Nuprojector comes with a standard manufacturer's warranty. Please refer to the warranty card included in your package for specific terms, conditions, and duration. This warranty typically covers defects in materials and workmanship under normal use.
10.2 Customer Support
If you encounter any issues not covered in the troubleshooting section or require further assistance, please contact NUNET customer support. Contact details can usually be found on the warranty card or the official NUNET website.
Please have your product model number (Nuprojector) and purchase information ready when contacting support.