AUTOWN RP-PI-04
AUTOWN RP-PI-04 1000A Peak Jump Starter User Manual
Model: RP-PI-04
1. Introduction
Thank you for choosing the AUTOWN RP-PI-04 1000A Peak Jump Starter. This device is designed to provide a reliable solution for jump-starting vehicles with dead batteries, as well as serving as a portable power bank for electronic devices and an emergency LED light. Please read this manual thoroughly before use to ensure safe and optimal operation.

The AUTOWN 1000A Peak Jump Starter unit with its intelligent jumper cables and clamps.
2. Product Overview
2.1. What's in the Box
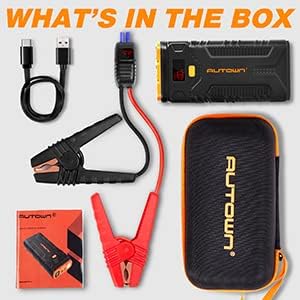
The package includes the AUTOWN jump starter unit, intelligent jumper clamps, a USB-C charging cable, and a protective carrying case.
- AUTOWN RP-PI-04 Jump Starter Unit
- Intelligent Jumper Clamps
- USB-C Charging Cable
- Protective Carrying Case
- User Manual
2.2. Key Features
- Powerful Jump Starting: Capable of starting gas engines up to 8.0L and diesel engines up to 6.5L.
- Multi-functional Power Bank: Equipped with Quick Charge 3.0 and Type-C ports for charging various electronic devices.
- Advanced Safety Protection: Intelligent clamps provide protection against reverse polarity, short circuits, over-current, over-charge, and over-discharge.
- Built-in LED Light: Features a bright LED flashlight with multiple modes (steady, strobe, SOS) for emergencies.
- Wide Temperature Range: Operates reliably in extreme conditions from -20°C (-4°F) to 60°C (140°F).

Illustration of the jump starter's capacity, capable of starting gas engines up to 8.0L and diesel engines up to 6.5L, providing over 30 starts on a full charge.

The jump starter features Quick Charge 3.0 and Type-C ports for charging various electronic devices like smartphones, tablets, and cameras.
3. Safety Information
WARNING: Read all safety warnings and instructions. Failure to follow the warnings and instructions may result in electric shock, fire, and/or serious injury.
- Do not use the jump starter if the clamps or cables are damaged.
- Ensure the jump starter is at least 20% charged before attempting to jump-start a vehicle.
- Connect the red clamp to the positive (+) terminal and the black clamp to the negative (-) terminal. Reverse polarity can cause damage.
- Do not touch the red and black clamps together.
- Keep the device away from children.
- Do not expose the device to rain or wet conditions.
- Do not disassemble the unit. Refer all servicing to qualified personnel.
- Avoid operating the device in explosive atmospheres, such as in the presence of flammable liquids, gases, or dust.
- Disconnect the jump starter from the vehicle battery within 30 seconds after the engine starts.

The intelligent jumper clamps provide multiple safety protections including low voltage, high voltage, reverse charge, reverse polarity, high temperature, short circuit, incorrect connection, and overload protection.
4. Setup and Charging
4.1. Charging the Jump Starter
- Connect the USB-C charging cable to the input port of the jump starter.
- Connect the other end of the USB-C cable to a 5V/2A or higher USB wall adapter (not included).
- The digital display will show the charging progress. The unit is fully charged when the display shows 100%.
- It is recommended to fully charge the jump starter every 3-6 months to maintain battery health, even if not in use.
5. Operating Instructions
5.1. Jump Starting a Vehicle
Ensure the jump starter has at least 20% charge before attempting to jump-start a vehicle.

A visual guide demonstrating the four steps to jump-start a vehicle: connecting clamps, inserting the plug, starting the car, and disconnecting.
- Connect Clamps: Connect the red (+) clamp to the positive terminal of the vehicle's battery and the black (-) clamp to the negative terminal.
- Insert Plug: Insert the blue plug of the intelligent jumper cables into the jump starter's 12V output port. Ensure a secure connection. The display on the intelligent clamps will show the battery voltage.
- Start Vehicle: Start your vehicle's engine. If it doesn't start immediately, wait 10-15 seconds and try again. Do not attempt more than 3 consecutive starts.
- Disconnect: Once the engine starts, immediately remove the blue plug from the jump starter, then disconnect the black (-) clamp, followed by the red (+) clamp from the vehicle battery.
5.2. Using as a Power Bank
The jump starter can charge various electronic devices via its USB output ports.
- Connect your device's USB charging cable to one of the jump starter's USB output ports (USB-A or USB-C).
- The jump starter will automatically begin charging your device.
- The digital display will show the remaining battery percentage.
5.3. Using the LED Light
The built-in LED light can be used for illumination or as an emergency signal.
- Press and hold the power button for 3 seconds to turn on the LED light (steady mode).
- Press the power button again to cycle through modes: Strobe > SOS > Off.
6. Maintenance and Storage
- Store the jump starter in its protective carrying case when not in use.
- Keep the device in a cool, dry place, away from direct sunlight and moisture.
- Recharge the unit every 3-6 months to prolong battery life, even if it has not been used.
- Clean the exterior with a soft, dry cloth. Do not use harsh chemicals or abrasives.
- Operating temperature range: -20°C to 60°C (-4°F to 140°F). Avoid storing or using outside this range.

The jump starter is designed to operate effectively in extreme temperatures, from -20°C (-4°F) to 60°C (140°F).
7. Troubleshooting
- Device will not turn on: Ensure the unit is charged. If not, connect it to a charger.
- Vehicle will not jump-start:
- Check if the jump starter has sufficient charge (at least 20%).
- Verify that the clamps are securely connected to the correct battery terminals (red to +, black to -).
- Ensure the blue plug of the intelligent clamps is fully inserted into the jump starter.
- The vehicle battery might be severely damaged or completely dead.
- The vehicle's engine might have other issues preventing it from starting.
- Clamps display an error code: Refer to the intelligent clamp's display for specific error indicators (e.g., LV for low voltage, RC for reverse charge). Consult the safety section for proper connection and usage.
- Device not charging: Ensure the charging cable and adapter are functioning correctly. Try a different cable or adapter.
8. Specifications
| Brand | AUTOWN |
| Model Number | RP-PI-04 |
| Peak Amperage | 1000 Amps |
| Output Current | 800 Amps |
| Battery Capacity | 21000mAh |
| Item Weight | 1.72 Pounds (approx. 0.78 kg) |
| Product Dimensions | 7.6 x 3.5 x 1.5 inches (approx. 19.3 x 8.9 x 3.8 cm) |
| UPC | 715802994678 |
| Date First Available | August 29, 2019 |
9. Warranty and Support
AUTOWN products are designed for reliability and performance. For warranty information, technical support, or customer service inquiries, please refer to the contact information provided with your purchase or visit the official AUTOWN website. Please retain your proof of purchase for warranty claims.
Related Documents - RP-PI-04
 |
Datavideo Product Guide 2017-2018: Professional Video Production Equipment Explore the comprehensive Datavideo Product Guide for 2017-2018, featuring a wide range of professional video switchers, cameras, recorders, streaming solutions, and studio equipment designed for broadcast and live production. |
 |
Roland DGA Product End-of-Life Policy | Official Document Official policy document from Roland DGA outlining the product end-of-life (EOL) process, including key milestones, support timelines, and product lifecycle management for Roland DG and DGSHAPE hardware. |
 |
RAVPower RP-PB048 Car Jump Starter & External Battery Pack User Manual Comprehensive user manual for the RAVPower RP-PB048 Car Jump Starter and External Battery Pack. Learn about package contents, technical specifications, charging, jump starting, mobile device charging, LED flashlight, troubleshooting, warnings, and warranty. |
 |
Klipsch Reference Premiere Series User Manual - Setup, Placement, and Connections Comprehensive user manual for Klipsch Reference Premiere Series speakers, covering setup, room placement, connection guides, Dolby Atmos integration, care, and product registration. Includes model details for RP-8060FA, RP-8000F, RP-6000F, RP-5000F, RP-4000F, RP-600M, RP-500M, RP-400M, RP-502S, RP-402S, RP-500SA, RP-504C, RP-404C, RP-600C, RP-500C, RP-400C, and RP-160M. |
 |
Klipsch Reference Premiere Speakers User Manual User manual for Klipsch Reference Premiere speakers, covering setup, placement, connection, care, and warranty information. Features detailed specifications and diagrams for various models including RP-8060FA, RP-8000F, RP-6000F, RP-5000F, RP-4000F, RP-600M, RP-500M, RP-400M, RP-502S, RP-402S, RP-500SA, RP-504C, RP-404C, RP-600C, RP-500C, and RP-400C. |
 |
Klipsch RP-8060FA EBONY Reference Premiere Series User Manual Comprehensive user manual for the Klipsch RP-8060FA EBONY floorstanding speaker, part of the Reference Premiere series. Includes setup, room placement, wiring instructions, Dolby Atmos configuration, maintenance, and product registration details. |
Ask a question about this manual
Ask about setup, troubleshooting, compatibility, parts, safety, or missing instructions. Manuals+ will review the question and use this page’s manual context to help answer it.