Product Overview
The ASRock X570 Steel Legend motherboard is designed to support AMD AM4 Socket Ryzen 2000 and 3000 Series processors. It features a Hyper M.2 socket for next-generation PCIe Gen4 x4 M.2 SSDs, complemented by a full-coverage M.2 heatsink for efficient heat dissipation. This ensures optimal performance for high-speed M.2 SSDs. The motherboard is built with a 10 Power Phase Design and supports DDR4 4666+ (OC) memory, providing a stable and high-performance foundation for your system.

Image: ASRock X570 Steel Legend Motherboard and its retail packaging.
Key Features
- Processor Support: Compatible with AMD AM4 Socket Ryzen 2000 and 3000 Series processors.
- Power Design: Features a 10 Power Phase Design for stable power delivery.
- Memory: Supports DDR4 memory up to 4666+ (OC) speeds.
- Expansion Slots: Includes 2 PCIe 4.0 x16 slots, 3 PCIe 4.0 x1 slots, and 1 M.2 (Key E) slot for Wi-Fi modules.
- Multi-GPU Support: Supports AMD Quad CrossFireX and CrossFireX technologies.
- Graphics Output: Equipped with HDMI and DisplayPort for video output.
- Audio: Features 7.1 CH HD Audio (Realtek ALC1220 Audio Codec) with Nichicon Audio Caps for high-quality sound.
- Storage: Provides 8 SATA3 ports, 1 Hyper M.2 (PCIe Gen4 x4 & SATA3) slot, and 1 Hyper M.2 (PCIe Gen4 x4) slot.
- USB Connectivity: Offers 2 USB 3.2 Gen2 ports (Rear Type A+C) and 10 USB 3.2 Gen1 ports (4 Front, 6 Rear).
- Networking: Integrated Intel Gigabit LAN for reliable network connectivity.
- RGB Lighting: Supports ASRock Polychrome SYNC for customizable RGB lighting.

Image: Detailed view of the motherboard's power delivery components, M.2 heatsink, and gold-plated contacts in critical slots.
Specifications
| Feature | Detail |
|---|---|
| Brand | ASRock |
| Model Name | X570 Steel Legend |
| CPU Socket | Socket AM4 |
| Compatible Processors | AMD Ryzen 2000 Series, AMD Ryzen 3000 Series |
| Chipset Type | AMD X570 |
| RAM Memory Technology | DDR4 |
| Memory Speed | 2400 MHz (up to 4666+ MHz OC) |
| Max RAM | 128GB (4 DIMM slots) |
| Graphics Output | HDMI, DisplayPort |
| USB 3.2 Gen2 Ports | 2 (Rear Type A+C) |
| USB 3.2 Gen1 Ports | 10 (4 Front, 6 Rear) |
| LAN | Intel Gigabit LAN |
| Audio | 7.1 CH HD Audio (Realtek ALC1220) |
| Dimensions (LxWxH) | 15.1 x 3.4 x 13.1 inches |
| Item Weight | 2.86 pounds |
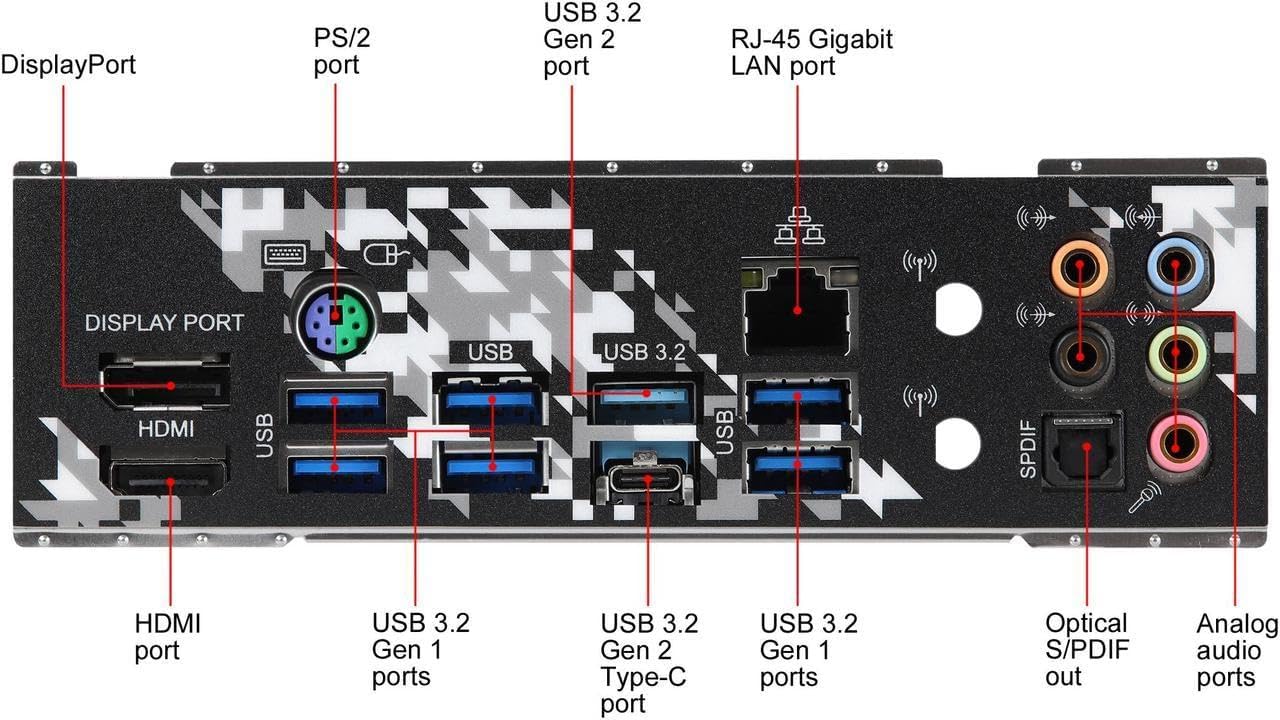
Image: Overview of the motherboard's layout with key components such as the CPU socket, RAM slots, and various expansion slots clearly marked.
Setup and Installation
Proper installation of your ASRock X570 Steel Legend motherboard is crucial for system stability and performance. Always ensure your system is powered off and unplugged before handling any components. Refer to the detailed diagrams below for component placement.
1. CPU Installation
Carefully open the CPU socket lever. Align the triangular marker on your AMD AM4 processor with the corresponding marker on the motherboard's socket. Gently place the CPU into the socket without forcing it, then close the lever to secure it.
2. Memory (RAM) Installation
Unlock the clips on the DDR4 DIMM slots. Align the notch on your RAM module with the key in the DIMM slot. Press down firmly on both ends of the RAM module until the clips snap into place. For optimal dual-channel performance, consult your motherboard manual for recommended slot configurations.
3. M.2 SSD Installation
The motherboard features Hyper M.2 slots. Remove the M.2 heatsink if present. Insert your M.2 SSD into the slot at an angle, then gently push it down and secure it with the provided screw. Reattach the M.2 heatsink for optimal thermal performance.
4. Connecting Peripherals and Power
Connect the 24-pin ATX power connector and the 8-pin CPU power connector from your power supply to the motherboard. Attach your storage devices to the SATA3 ports and connect front panel headers (USB, audio, power buttons, LEDs) according to the motherboard's pin layout.
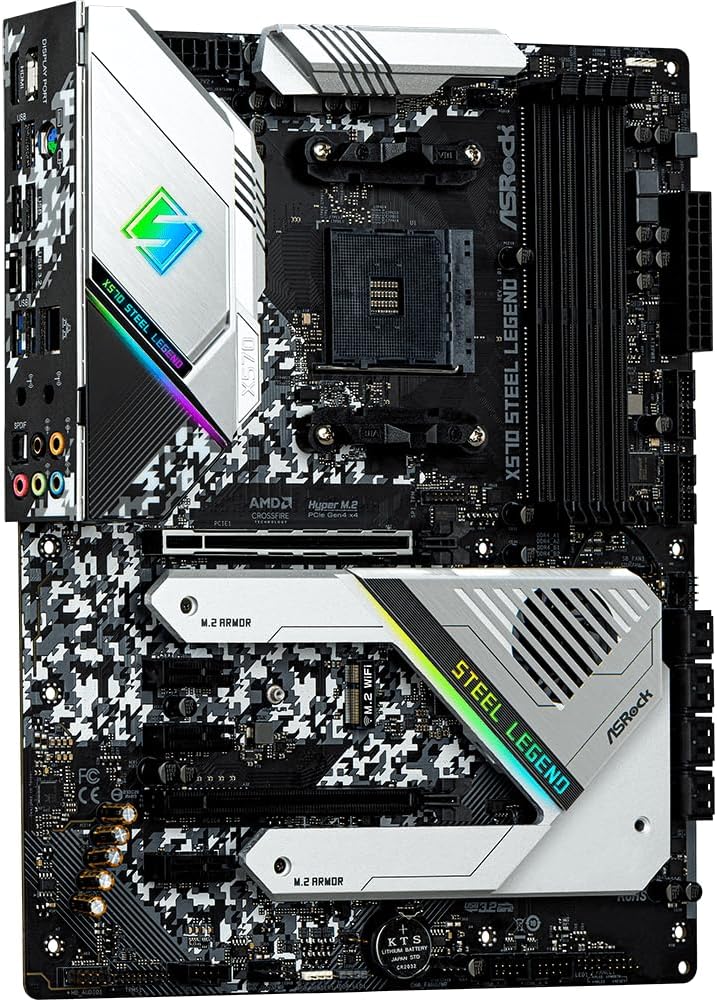
Image: The rear I/O panel, featuring HDMI, DisplayPort, USB 3.2 Gen2 Type-A and Type-C, USB 3.2 Gen1, Intel Gigabit LAN, and 7.1 channel audio jacks.
Operating Guidelines
Once all components are installed and connected, power on your system. The motherboard's UEFI BIOS provides extensive options for system configuration, including memory profiles, fan control, and boot device selection. Utilize the ASRock Polychrome SYNC software to customize the integrated RGB lighting effects.
- BIOS/UEFI Access: Press Del or F2 during system startup to enter the UEFI setup utility.
- Driver Installation: Install all necessary drivers from the ASRock support website or the included driver CD for optimal performance and functionality.
- Software Utilities: Use ASRock's utility software for system monitoring, fan tuning, and RGB lighting customization.
Maintenance
Regular maintenance helps prolong the lifespan of your motherboard and ensures consistent performance.
- Dust Removal: Periodically clean dust from the motherboard and components using compressed air. Ensure fans and heatsinks are free from obstructions.
- BIOS Updates: Check the ASRock website for the latest BIOS updates. Updating the BIOS can improve compatibility, stability, and performance. Follow the instructions carefully to avoid system damage.
- Cable Management: Ensure all cables are neatly routed and secured to promote good airflow within your PC case.
Troubleshooting
If you encounter issues with your motherboard, consider the following common troubleshooting steps:
- No Power/No Boot:
- Verify all power cables (24-pin ATX, 8-pin CPU) are securely connected.
- Check if the power supply is functioning correctly.
- Ensure the CPU, RAM, and graphics card are properly seated.
- Display Issues:
- Confirm your monitor is connected to the graphics card (if dedicated) or the motherboard's video output (if using an APU).
- Try a different video cable or monitor.
- System Instability/Crashes:
- Ensure all drivers are up-to-date.
- Test RAM modules individually or run a memory diagnostic tool.
- Monitor CPU and GPU temperatures to prevent overheating.
- Peripheral Not Detected:
- Try connecting the peripheral to a different USB port.
- Check device manager for driver issues.
For more detailed troubleshooting, refer to the official ASRock support website or contact their customer service.
Warranty and Support
ASRock provides a limited warranty for its motherboards. The specific terms and duration of the warranty may vary by region and retailer. Please retain your proof of purchase for warranty claims.
- Warranty Information: For detailed warranty terms and conditions, please visit the official ASRock website or consult your product documentation.
- Technical Support: If you require technical assistance, drivers, or BIOS updates, visit the ASRock support page at www.asrock.com/support/.


