1. Introduction
This instruction manual provides essential information for the safe and effective use of the DPTOOL Camshaft Timing Locking Tool Kit, Model HTF-1002C-F1.6. This 10-piece kit is designed to accurately lock camshafts and crankshafts in their timed positions during engine maintenance, such as timing belt service, engine rebuilds, or when variable valve timing pulleys require removal and timing.
Proper use of these tools ensures precise engine timing, which is critical for engine performance and longevity. Always follow vehicle manufacturer's service procedures in conjunction with these tools.
2. Product Overview and Kit Contents
The DPTOOL Camshaft Timing Locking Tool Kit includes 10 specialized tools crafted from high-quality steel, designed for durability and precision. Each tool serves a specific function in the engine timing process.

Image 2.1: The complete DPTOOL Camshaft Timing Locking Tool Kit stored in its protective blue case.
2.1 Kit Components
The 10-piece kit includes the following tools:
- 1 Crankshaft Pulley Alignment Tool
- 1 Camshaft Alignment Bar Tool
- 1 Camshaft Holding Bar
- 1 Camshaft Alignment Tool
- 1 Camshaft Sprocket Locking Tool (for locking camshaft sprockets during timing belt service)
- 1 Alignment Peg
- 1 Crank Locking Pin
- 1 Camshaft Timing Pin
- 1 Flywheel Timing Pin
- 1 Timing Belt Tensioner (often a small wrench or adjuster)

Image 2.2: Visual identification of each tool within the kit, with numbered labels for reference.
2.2 OEM Part Number Cross-Reference
The tools in this kit are designed to replace or correspond to the following OEM part numbers:
- 303-1097
- 303-1550
- 303-1552
- 303-376B
- 303-1059
- 303-748
- 303-735
- 303-1094
- 303-574

Image 2.3: Tools labeled with their equivalent OEM part numbers for easy cross-referencing.
3. Vehicle and Engine Compatibility
This tool kit is compatible with a wide range of Ford and Mazda engines and vehicles. It is crucial to verify your specific engine model and vehicle details before use.
3.1 Compatible Engines
- FORD 1.25, 1.4, 1.6, 1.7, 1.8, 2.0 twin cam 16V engines
- FORD 2.3L (Note: Not compatible with 2.3T engines)
- FORD 2.5L engines
- FORD 1.6 TI-VCT engines
- FORD 1.5/1.6 VVT ECOBOOST engines
- MAZDA 1.4, 1.6, 1.8, 2.0, 2.3L (Note: Not compatible with 2.3T engines)
3.2 Compatible Vehicles
- Ford: B-Max, C-Max, Escape 1.5L, Fiesta, Focus, Mondeo, S-MAX, Galaxy, Transit 2.3L, Transit 1.6L EcoBoost, Puma, Escort/Orion, Tourneo Connect, Mondeo Hybrid, Maverick
- Mazda: MPV, Tribute, Mazda 3
If you are unsure about compatibility, please consult your vehicle's service manual or contact the manufacturer with your vehicle's VIN or engine model.

Image 3.1: Overview of the wide range of engine and vehicle applications for this timing tool kit.

Image 3.2: Detailed application table for various vehicle models and their corresponding years.
4. Setup
Before beginning any work on your engine, ensure you have a safe working environment and all necessary safety equipment.
4.1 Safety Precautions
- Always wear appropriate personal protective equipment (PPE), including safety glasses and gloves.
- Ensure the vehicle is securely supported on jack stands and the parking brake is engaged.
- Disconnect the vehicle's battery to prevent accidental starting or electrical shorts.
- Allow the engine to cool completely before working on it.
- Refer to your vehicle's specific service manual for detailed safety warnings and procedures.
4.2 Engine Preparation
- Remove any engine covers, accessory belts, and components that obstruct access to the timing belt/chain, camshafts, and crankshaft.
- Clean the area around the timing components to prevent debris from entering the engine.
- Identify the timing marks on the crankshaft and camshafts as per your vehicle's service manual.
5. Operating Instructions
The following steps outline the general procedure for using the DPTOOL Camshaft Timing Locking Tool Kit. Always consult your vehicle's specific service manual for precise instructions, torque specifications, and component removal/installation sequences.
5.1 Initial Engine Positioning
- Rotate the crankshaft manually in the normal direction of rotation until the engine is at Top Dead Center (TDC) for cylinder 1, or at the specified timing position as indicated in your service manual.
- Ensure all timing marks on the crankshaft and camshafts align.
5.2 Locking the Crankshaft
- Locate the crankshaft locking point on your engine (often near the flywheel or crankshaft pulley).
- Insert the Crank Locking Pin (e.g., OEM 303-748, 303-507, 303-574, 303-735) into the designated hole to secure the crankshaft in its timed position. Ensure it is fully seated.
- For some applications, the Flywheel Timing Pin may be used to lock the flywheel.
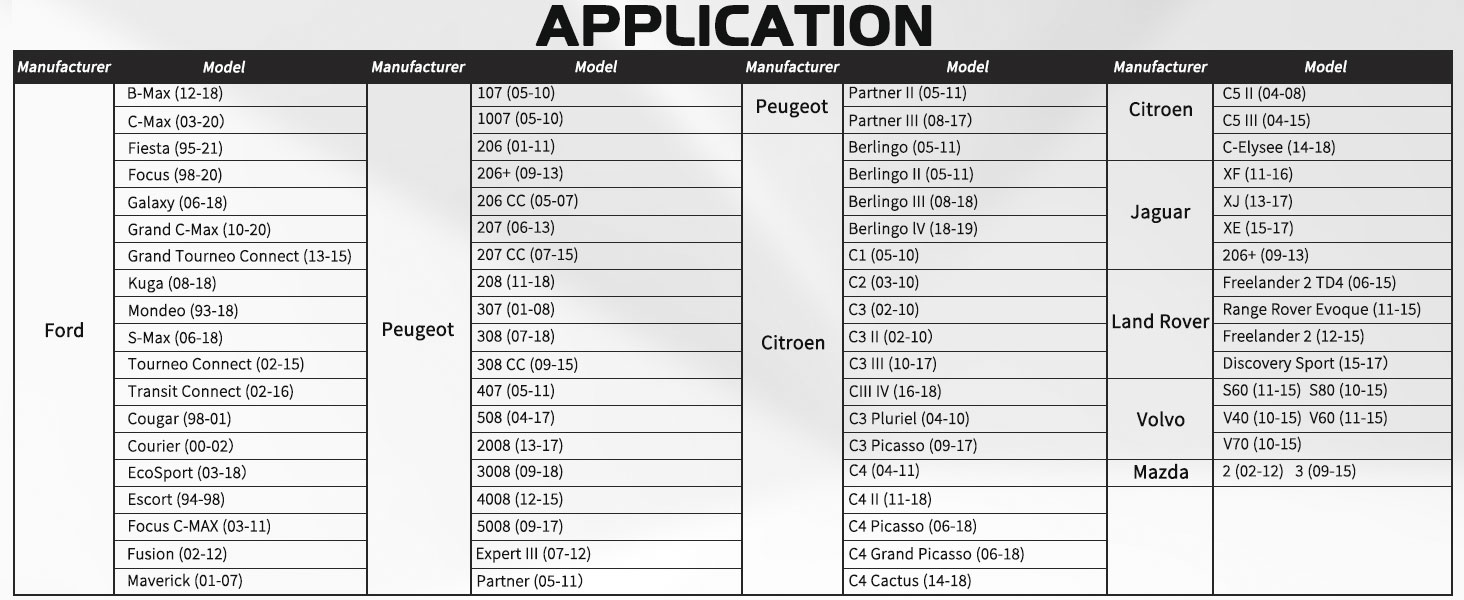
Image 5.1: Diagrams illustrating the correct placement of crankshaft timing pins (e.g., 303-507) and the flywheel timing pin (e.g., 303-1054).
5.3 Locking the Camshafts
- Once the crankshaft is locked, position the camshafts according to the service manual.
- Insert the Camshaft Alignment Bar Tool (e.g., OEM 303-1552) or Camshaft Holding Bar (e.g., OEM 303-376B) into the slots at the rear of the camshafts to hold them in their correct orientation.

Image 5.2: The camshaft setting bar (e.g., OEM 303-1552) correctly installed on the engine's camshafts to maintain timing.
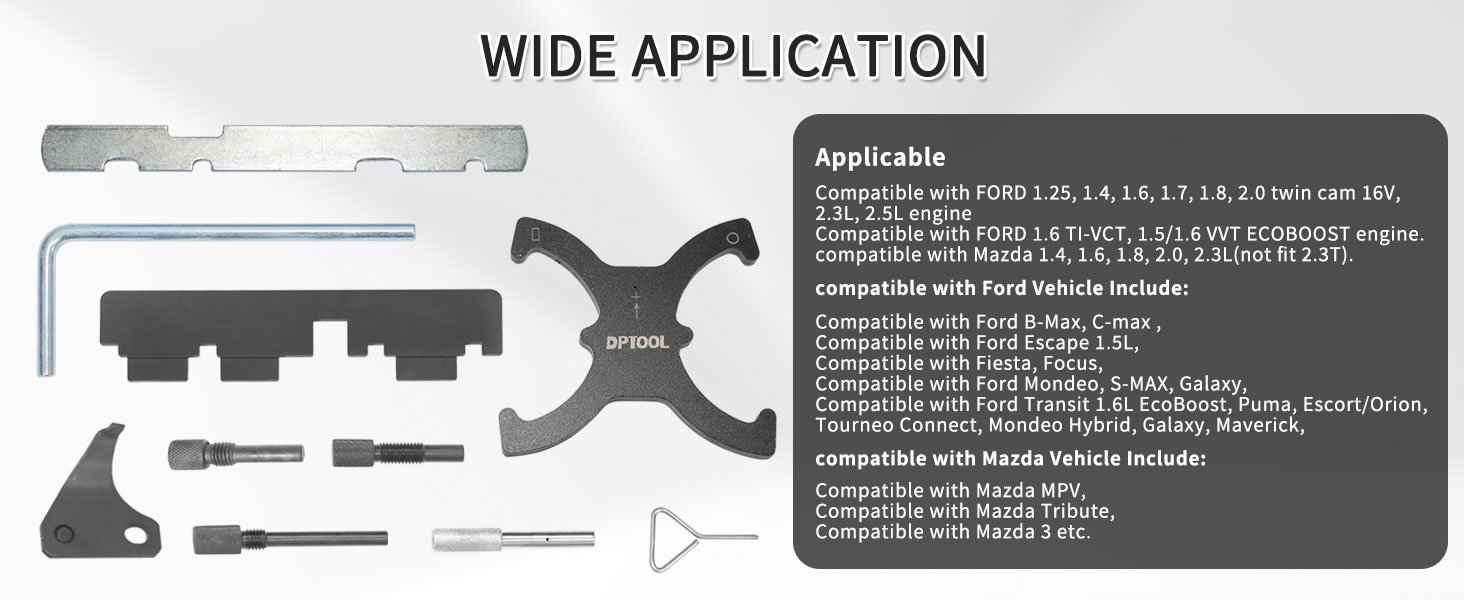
Image 5.3: Diagrams illustrating the application of camshaft locking tools, including 303-1097, 303-376B, and 303-1552.
- For engines with variable valve timing (VVT), use the Camshaft Sprocket Locking Tool (e.g., OEM 303-1097) to secure the camshaft sprockets. This tool prevents the sprockets from rotating independently of the camshafts when the timing belt is removed.

Image 5.4: The camshaft sprocket locking tool (e.g., OEM 303-1097) correctly positioned to secure the camshaft sprockets.
5.4 Timing Belt/Chain Service
- With the crankshaft and camshafts securely locked, proceed with the removal and installation of the timing belt/chain, tensioners, and any other related components as per your vehicle's service manual.
- Use the Timing Belt Tensioner tool (if applicable) to adjust the tension of the new timing belt.
5.5 Reassembly and Verification
- Once all timing components are installed and torqued to specification, remove all timing locking tools.
- Manually rotate the crankshaft two full revolutions in the normal direction of rotation.
- Re-insert the timing locking tools to verify that the timing marks still align perfectly. If they do not, repeat the timing procedure.
- Reinstall all removed engine components, covers, and reconnect the battery.
6. Maintenance
Proper maintenance of your DPTOOL kit will ensure its longevity and continued accuracy.
- Cleaning: After each use, clean all tools thoroughly to remove oil, grease, and dirt. Use a mild degreaser if necessary, and wipe dry.
- Inspection: Regularly inspect tools for any signs of wear, bending, cracks, or damage. Damaged tools should not be used as they can compromise timing accuracy or cause engine damage.
- Storage: Store the tools in their original protective case in a dry environment to prevent rust and corrosion. The case helps keep the tools organized and protected from damage.
7. Troubleshooting
If you encounter issues while using the timing tool kit, consider the following:
- Tools do not fit: Double-check that the kit is compatible with your specific engine model and year. Refer to Section 3 and your vehicle's service manual. Ensure the engine is correctly positioned at TDC or the specified timing point before attempting to insert locking tools.
- Timing marks do not align after rotation: This indicates incorrect timing. Re-evaluate your steps, ensuring all tools were correctly installed and removed at the appropriate times. Repeat the timing procedure carefully.
- Engine runs poorly after timing service: This could be due to incorrect timing, or other issues unrelated to the tools. Verify timing again. If the problem persists, consult a qualified automotive technician.
8. Specifications
| Specification | Detail |
|---|---|
| Brand | DPTOOL |
| Model Number | HTF-1002C-F1.6 |
| Item Weight | 3.34 pounds |
| Product Dimensions | 9.84 x 9.84 x 5.91 inches |
| Manufacturer | Shenzhen Dapeng Aoto Tools CO.,LTD |
| OEM Part Numbers | 303-1059; 303-748; 303-1097; 303-1550; 303-1552; 303-376B; 303-574; 303-735; 303-1094 |
9. Warranty and Support
DPTOOL provides a warranty for this product.
9.1 Warranty Information
This product comes with a 12-month warranty. If the timing tool kit exhibits any quality problems within this period, the manufacturer offers a refund or replacement. The tools are made of high-quality steel, designed for high hardness and resistance to breakage, with anti-oxidation or plated surfaces to prevent rust.
9.2 Customer Support
For any questions, concerns, or warranty claims regarding your DPTOOL Camshaft Timing Locking Tool Kit, please contact the manufacturer or your point of purchase. When contacting support, please provide your product model number (HTF-1002C-F1.6) and a detailed description of the issue.


