1. Introduction
The AIYIMA DAC-A2 is a versatile Digital-to-Analog Converter (DAC) and headphone amplifier designed to enhance your audio experience. It features multiple digital input options and provides both RCA line-out and a 3.5mm headphone output, along with adjustable bass and treble controls for personalized sound. This manual provides detailed instructions for setup, operation, and maintenance of your DAC-A2.

Figure 1: AIYIMA DAC-A2 Headphone Amplifier DAC
2. Key Features
- Integrated DAC and Headphone Amplifier: Built-in Hi-Fi headphone amplifier chip capable of driving 16ohm to 200ohm headphones.
- Advanced Chipset: Utilizes SA9023+CS8416+97220+NE5532 for optimal audio performance.
- Multiple Digital Inputs: Supports PC-USB, Optical, and Coaxial S/PDIF inputs, compatible with most home audio systems, PCs, and Macs.
- Versatile Outputs: Features RCA line-out for connecting to powered speakers or external amplifiers, and a 3.5mm headphone output.
- High-Resolution Audio: PC-USB input supports up to 24Bit/96KHz; Optical/Coaxial inputs support up to 24Bit/192kHz.
- Tone Controls: Independent bass and treble controls to customize your audio output.
- Compact and Portable: DC 5V power input allows for a portable and professional desktop audio device.

Figure 2: Internal Chipset and Features Overview
3. Package Contents
Please check the package for the following items:
- AIYIMA DAC-A2 Unit
- USB Cable (Type A to Type B)
- Optical Cable (Toslink)
- DC 5V Power Cable (USB-C for power)
- User Manual
4. Controls and Interfaces

Figure 3: Front and Rear Panel Layout
4.1 Front Panel
- Input Switch: Toggle between USB, Optical (OPT), and Coaxial (COA) inputs.
- 3.5mm Headphone Output: Connect your headphones here.
- Bass Control Knob: Adjust the low-frequency response.
- Treble Control Knob: Adjust the high-frequency response.
- Volume Control Knob: Adjust the overall output volume. This knob also acts as the power switch (push to turn on/off) and has a power indicator light.
4.2 Rear Panel
- DC 5V Power Input: Connect the provided DC 5V power cable.
- RCA Audio Output (L/R): Connect to powered speakers or an external amplifier.
- Coaxial Input (COA): Connect a coaxial digital audio source.
- Optical Input (OPT): Connect an optical digital audio source.
- PC-USB Input: Connect to your computer for USB audio.
5. Setup and Connections
Follow these steps to connect your AIYIMA DAC-A2 to your audio system:
- Power Connection: Connect the provided DC 5V power cable to the "DC 5V" input on the rear panel of the DAC-A2. Connect the other end to a suitable 5V power source (e.g., a USB wall adapter, not included). Ensure the power indicator light on the front panel illuminates when the volume knob is pressed to turn on.
- Input Source Connection: Choose one of the following input methods:
- PC-USB: Connect the provided USB cable from your computer's USB port to the "PC-USB" input on the DAC-A2.
- Optical: Connect an optical cable from your audio source (e.g., TV, game console) to the "OPTICAL" input.
- Coaxial: Connect a coaxial cable from your audio source to the "COAXIAL" input.
- Output Connection: Choose one of the following output methods:
- RCA Output: Connect RCA cables from the "AUDIO OUT" (L/R) ports on the DAC-A2 to your powered speakers or an external amplifier's input.
- 3.5mm Headphone Output: Plug your headphones into the 3.5mm jack on the front panel. Note: The headphone output takes priority. If headphones are connected, sound will be routed to them and not the RCA outputs.
- Select Input: Use the input switch on the front panel to select the desired audio source (USB, OPT, or COA).
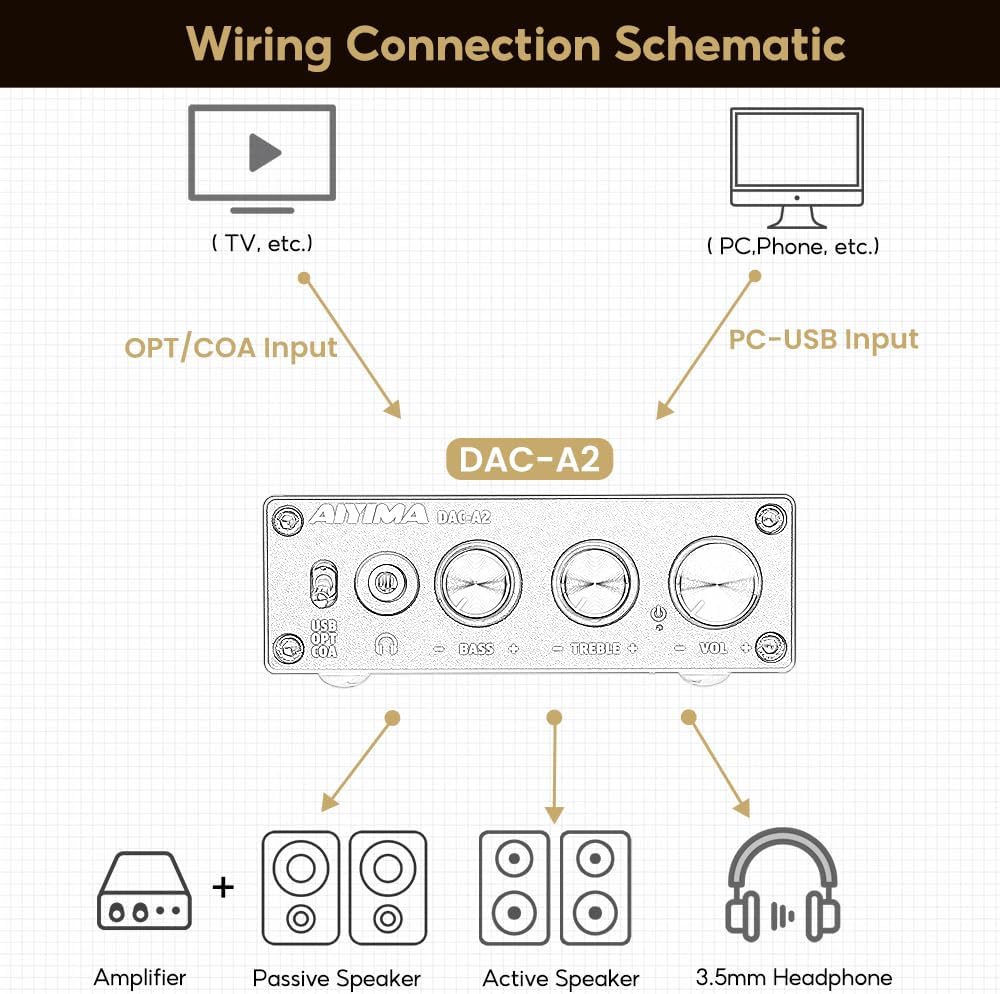
Figure 4: Connection Diagram
Video 1: Demonstrates connecting the AIYIMA DAC-A2 to a laptop and an amplifier, showing the audio output to speakers and headphones. It illustrates switching between PC-USB input and adjusting volume, bass, and treble controls.
6. Operating Instructions
- Power On/Off: Press the Volume Control Knob to turn the unit on or off. The power indicator light will illuminate when on.
- Input Selection: Use the Input Switch (USB/OPT/COA) on the front panel to select your active audio source.
- Volume Adjustment: Rotate the Volume Control Knob clockwise to increase volume and counter-clockwise to decrease it.
- Bass Adjustment: Rotate the Bass Control Knob to increase or decrease the bass frequencies according to your preference.
- Treble Adjustment: Rotate the Treble Control Knob to increase or decrease the treble frequencies according to your preference.

Figure 5: Adjustable Bass and Treble Controls
Video 2: Shows the AIYIMA DAC-A2 in a desktop setup, demonstrating the connection of headphones and the adjustment of volume, bass, and treble controls for an enhanced audio experience.
7. Specifications

Figure 6: Product Dimensions
| Feature | Specification |
|---|---|
| Brand | AIYIMA |
| Model Number | DAC-A2 |
| Chipset | SA9023+CS8416+97220+NE5532 |
| PC-USB Input Sampling Rate | 24Bit/96KHz |
| Optical/Coaxial Input Sampling Rate | 24Bit/192kHz |
| Headphone Impedance Range | 16ohm to 200ohm |
| Maximum Supply Voltage | 5 Volts |
| Minimum Supply Voltage | 5 Volts (DC) |
| Interface Type | Coaxial, USB, Optical |
| Number of Channels | 1 |
| Product Dimensions (L x W) | 3.86"L x 2.89"W (approx. 98mm x 73mm) |
| Item Weight | 14.8 ounces (approx. 420g) |
8. Troubleshooting
If you encounter issues with your DAC-A2, please refer to the following common problems and solutions:
- No Sound Output:
- Ensure the DAC-A2 is powered on and the power indicator is lit.
- Verify that the correct input source (USB, OPT, COA) is selected using the front panel switch.
- Check all cable connections (input and output) are secure.
- If using headphones, ensure they are fully plugged into the 3.5mm jack. Remember the headphone output has priority over RCA.
- Adjust the volume knob on the DAC-A2 and ensure your connected speakers/amplifier also have their volume turned up.
- For PC-USB input, check your computer's sound settings to ensure the DAC-A2 is selected as the default playback device.
- Distorted or Poor Sound Quality:
- Ensure all cables are properly connected and not damaged.
- Check the audio source for quality issues.
- Adjust the Bass and Treble controls to see if they are set to extreme levels causing distortion.
- Ensure the power supply is stable and providing sufficient 5V power. An unstable power supply can cause noise.
- Intermittent Sound:
- Check for loose cable connections.
- Ensure the power supply is consistent.
- If using PC-USB, try a different USB port on your computer or a different USB cable.
9. Maintenance
- Cleaning: Use a soft, dry cloth to clean the exterior of the unit. Do not use liquid cleaners or solvents.
- Storage: Store the unit in a cool, dry place away from direct sunlight and extreme temperatures.
- Handling: Avoid dropping or subjecting the unit to strong impacts.
- Ventilation: Ensure adequate ventilation around the unit to prevent overheating.
10. Warranty and Support
AIYIMA products are designed for reliability and performance. For warranty information, technical support, or service inquiries, please refer to the contact information provided with your purchase or visit the official AIYIMA website. Please retain your proof of purchase for warranty claims.
11. Important Safety Information
- Do not expose this unit to rain, moisture, or extreme temperatures.
- Do not open the casing. There are no user-serviceable parts inside. Refer all servicing to qualified personnel.
- Use only the specified power supply (DC 5V).
- Avoid placing the unit near heat sources or in direct sunlight.
- Keep out of reach of children.


