1. Introduction
This manual provides comprehensive instructions for the safe and proper installation and operation of your SANUS VLF728 Full Motion TV Wall Mount. Please read all instructions carefully before beginning installation. Retain this manual for future reference.
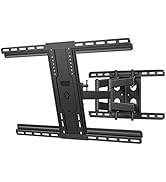
The SANUS VLF728 is designed to securely mount flat-panel televisions ranging from 42 to 90 inches and weighing up to 125 lbs (56.7 kg). Its full-motion capabilities allow for extension, swivel, and tilt adjustments, providing optimal viewing angles from various positions.
2. Important Safety Information
- Weight Capacity: Do not exceed the maximum weight capacity of 125 lbs (56.7 kg). Exceeding this limit may result in serious injury or property damage.
- TV Size: This mount is intended for use with flat-panel TVs between 42 and 90 inches.
- Wall Type: Ensure the mounting surface can safely support the combined weight of the equipment and hardware. This mount is designed for installation into wood studs or solid concrete/concrete block walls.
- Professional Installation: If you are unsure about the safe installation of this product, consult a qualified installation professional.
- Tools: Use only the tools specified in this manual.
- Assembly: Assemble the product strictly according to the instructions. Improper assembly can lead to equipment damage or serious personal injury.
- Moving Parts: Keep hands and fingers clear of moving parts during adjustment.
3. Package Contents
Verify that all components are present and undamaged. If any parts are missing or damaged, contact SANUS customer support.
- Drilling Template
- TV Hardware Bag (various screws, washers, spacers)
- Concrete and Wood Stud Installation Hardware
- TV Bracket and Extenders
- Wall Plate and Arm Assembly
- Cable Covers
- Cover Plates
This image displays the complete set of parts for the SANUS VLF728 TV wall mount, including the drilling template, various hardware bags for different wall types, the TV bracket and extenders, the main wall plate and arm assembly, and aesthetic cable and cover plates.
4. Tools Needed
The following tools are required for installation:
- Tape Measure
- Pencil
- Level
- Tape (for template)
- Screwdriver (Phillips head)
- Electric Drill
- 1/2 inch Socket Wrench
Additional Tools for Wood Stud Installation:
- Stud Finder
- Awl
- 7/32 inch Wood Drill Bit
Additional Tools for Concrete Installation:
- Hammer
- 3/8 inch Drill Bit
5. Setup and Installation
5.1. Attach Brackets to TV
- Carefully place your TV face-down on a soft, clean surface to prevent scratches.
- Align the TV brackets with the VESA mounting holes on the back of your TV.
- Secure the brackets using the appropriate screws, washers, and spacers from the TV hardware bag. Use a Phillips head screwdriver. Do not overtighten the bolts.

This image illustrates the process of securing the TV brackets to the rear of the television. Ensure proper screw length and avoid overtightening to prevent damage to the TV.
5.2. Determine Mounting Height and Location
To determine the ideal height for your TV, consider your viewing position. SANUS offers a HeightFinder tool on their website (sanus.com) to assist with this. You will need to input your TV brand, screen size, model number, and desired mounting hole pattern.
This video demonstrates how to use the SANUS HeightFinder tool on sanus.com to accurately determine the optimal TV mounting height and drill hole locations based on your specific TV model and preferences.
5.3. Prepare the Wall and Attach Wall Plate
- For Wood Stud Installation: Use a stud finder to locate the center of your wood studs. Mark the stud locations with a pencil.
- Tape the provided drilling template to the wall at your desired height, ensuring it is level using a spirit level. Mark the drill holes through the template.
- Drill pilot holes at the marked locations using the specified drill bit (7/32 inch for wood studs).
- Position the wall plate over the pilot holes. Secure it to the wall using the lag bolts and washers provided. Tighten with a 1/2 inch socket wrench.
- For Solid Concrete/Concrete Block Installation: Refer to the detailed instructions in the manual for specific drilling and anchor requirements. Use a hammer and 3/8 inch drill bit as needed.

This image illustrates the critical step of using the drilling template and a level to ensure precise placement of the wall mount. Accurate marking of drill holes is essential for a secure and level installation.

This image highlights the final step of attaching the wall plate. Proper tightening of lag bolts into the studs or anchors is crucial for the mount's stability and safety.
5.4. Attach Arm Assembly and Hang TV
- Attach the arm assembly to the wall plate. The design allows for horizontal shifting of the TV up to 16 inches to center it, even if studs are not perfectly centered. Secure the arm assembly with the included screws.
- Extend the arms fully from the wall.
- Carefully lift the TV (with attached brackets) and hang the tabs on the back of the TV brackets onto the wall plate assembly. This step typically requires two people.
- Tighten the security screws on the TV brackets to secure the TV to the mount.

This image shows the arm assembly being connected to the wall plate. The design allows for horizontal adjustment of the TV after installation, providing flexibility in placement.

This image provides a clear view of the mount's articulated arms, which allow for significant extension and movement of the television once installed.

This image demonstrates the recommended two-person lift for safely mounting the television onto the wall plate. Ensure the TV brackets are properly engaged with the wall plate before releasing the TV.
6. Operating the Mount
6.1. Extension and Swivel
The FluidMotion design allows for smooth and effortless extension and retraction of the TV from the wall, up to 28 inches. The mount also provides up to 57 degrees of swivel left or right, enabling optimal viewing from various angles in the room.
This image demonstrates the full range of motion, allowing the TV to be pulled out from the wall and angled for diverse viewing needs.

This image highlights the wide swivel capability of the mount, ensuring a great picture from almost any seat in the room.
6.2. Tilting
The mount allows for tilting the TV up to 15 degrees. This feature helps reduce glare and optimize viewing comfort. Adjust the tilt by hand, and use the knob on the TV bracket to adjust tension and secure the desired angle.

This image shows the TV tilted, a useful feature for reducing glare from windows or overhead lighting, and for optimizing viewing from lower seating positions.
6.3. Level Adjustment
If minor leveling adjustments are needed after installation, simply loosen the screws on the back of the TV bracket, adjust the TV to the desired level, and then retighten the screws.
This image shows a level being used to ensure the TV is perfectly horizontal. The mount allows for minor post-installation leveling adjustments.
7. Cable Management
The SANUS VLF728 includes built-in cable management features to keep your cords organized and out of sight. Route your cables through the arms of the mount. For a clean look, ensure the arms are fully extended when routing cables to allow for maximum movement without strain.
This image demonstrates the effective use of the mount's cable management system, keeping all wires concealed for a streamlined aesthetic.
For a completely cord-free appearance, consider SANUS in-wall power kits or paintable on-wall cable tunnels (sold separately).
8. Maintenance
- Periodically check that all screws and bolts are securely tightened.
- Clean the mount with a soft, dry cloth. Avoid abrasive cleaners or solvents.
- Ensure cables are not pinched or stressed during TV movement.
9. Troubleshooting
| Problem | Possible Cause | Solution |
|---|---|---|
| TV is not level. | Mounting screws on TV bracket are loose. | Loosen TV bracket screws, adjust level, then retighten. |
| Mount feels unstable. | Wall plate lag bolts are loose or not properly installed into studs/concrete. | Verify wall plate installation. Ensure lag bolts are fully tightened into solid structural elements. Consult a professional if unsure. |
| Difficulty moving TV (extension/swivel). | Joints may need lubrication or tension adjustment. | Refer to the full product manual for specific adjustment points. Do not force movement. |
| Cables are visible or tangled. | Improper cable routing. | Re-route cables through the integrated cable management channels, ensuring arms are fully extended during routing. |
10. Specifications
- Model Number: VLF728
- Brand: Sanus
- TV Size Compatibility: 42" to 90"
- Weight Capacity: Up to 125 lbs (56.7 kg)
- Movement Type: Articulating (Full Motion)
- Extension from Wall: Up to 28 inches
- Swivel: Up to 57 degrees left/right
- Tilt: Up to 15 degrees
- Material: Alloy Steel
- Color: Black
- Product Dimensions (Retracted): 2.15 x 33.8 x 17.68 inches (Depth x Width x Height)
- Item Weight: 38 pounds
- UPC: 793795533616
11. Warranty and Support
SANUS products are designed and engineered in the U.S. and come with a 10-year warranty, reflecting their commitment to quality and durability. For any questions, concerns, or technical assistance, please contact the SANUS customer care team.
- Customer Care: Available 7 days a week.
- Phone: 1-800-359-5520
- Website: sanus.com
The SANUS customer care team is available to provide expert assistance for any questions regarding installation, operation, or troubleshooting of your TV mount.


